Main tutorial
Lesson Overview
Warped vocal textures are one of the fastest ways to inject Ragga energy into a DnB track without cluttering the drop. In this lesson, you’ll take a short vocal phrase, warp it into a gritty rhythmic texture, then crush and layer it with a crunchy sampler chain so it sits like a percussive musical element rather than a lead vocal. The goal is not “clean vocals” — it’s to turn vocal fragments into a dirty, hooky, repeatable texture that works in jungle, rollers, darker bass, and neuro-leaning DnB.
Why this matters in DnB: vocal chops can act like a second drum layer. They create call-and-response with the snare, fill empty spaces between bass hits, and give the track identity without fighting the low-end. In Ragga Elements especially, that vocal attitude adds movement and character while keeping the arrangement club-ready.
We’ll use stock Ableton Live 12 devices and a workflow that’s fast enough for real production sessions:
- Warp a vocal in the Clip View
- Slice and resequence it with Sampler/Simpler-style logic
- Add crunchy texture with stock saturation, filtering, and transient shaping
- Control space, stereo width, and arrangement so it works inside a DnB drop
- a ragga-style chant or shout
- a chopped jungle vocal hook
- a percussive, crunchy sampler layer
- a subtle atmospheric glue element for the drop
- sit above the drums and bass, not overpower them
- repeat with enough variation to stay interesting over 8–16 bars
- use warp and sampling artifacts as part of the groove
- have a gritty midrange bite that helps it cut through a dense mix
- work as a hook in the intro, a call-and-response in the drop, or a switch-up layer before a fill
- Over-warping until the vocal sounds artificial in a bad way
- Using too much low end in the vocal chain
- Making the vocal too wet
- Choosing a sample with no transient detail
- Letting the vocal fight the snare
- Overusing distortion until the texture loses intelligibility
- Layer a tiny bit of noise under the vocal chops using Operator or a filtered Simpler noise layer to create extra edge without changing the phrase too much.
- Duplicate the vocal and pitch one layer down 3–5 semitones for a darker, weightier answer, but keep it low in the mix.
- Use Auto Pan very subtly for movement, with phase reduced or even disabled if you want a less obvious stereo wobble.
- Sidechain the vocal texture lightly to the kick or drum bus using Compressor so it dips out of the way on impact. Keep the amount subtle; you want groove, not pumping.
- If the track leans neuro or dark roller, use more bandpass filtering and shorter chops. The vocal should feel like an eerie rhythmic artifact rather than a chant.
- For a more authentic jungle feel, add a chopped reverse-tail before a new break section. That tiny backward swell can make the transition feel old-school and effective.
- Use clip gain and volume automation before heavy processing. Driving the sampler input slightly hotter often gives more satisfying crunch than just slamming the final output.
- Warp the vocal for rhythm, not realism.
- Slice it into a small set of useful chops.
- Use Sampler/Simper plus Saturator, EQ Eight, and filtering to make it crunchy and playable.
- Make the vocal interact with the break and bassline through call-and-response.
- Keep low end clean, space controlled, and movement deliberate.
- Save the chain as a reusable Rack so you can drop Ragga-style textures into future DnB sessions fast.
By the end, you’ll have a reusable technique for turning one vocal sample into a rhythmic, gritty layer that can sit over breakbeats and basslines without sounding random. 🎛️
What You Will Build
You’ll build a 1-bar to 2-bar vocal texture that behaves like a hybrid of:
Musically, the finished sound should:
Think of it as a texture that can answer the snare, punctuate the end of bass phrases, or create tension in the 2nd half of a 16-bar section. In a proper DnB arrangement, this kind of vocal layer can be the difference between “good drum programming” and “a track with personality.”
Step-by-Step Walkthrough
1. Import a strong vocal and choose a phrase with attitude
Start with a short vocal phrase that has character: a ragga shout, a spoken line, a hype ad-lib, or a chopped phrase with sharp consonants. You want something with strong transient detail and a clear vowel/consonant shape. A phrase like “selecta,” “warning,” “run it,” or any rhythmic chant works well because it already has natural percussive edges.
In Ableton Live, drag the sample into an audio track and set the clip to Warp. For this lesson, keep the phrase short — ideally under 2 seconds. If the sample is longer, trim it down to the most usable part. The best results usually come from phrases with one strong accent and one tail you can exploit.
Practical target:
- Warp mode: Complex Pro for full vocal phrases, or Beats for more rhythmic, chopped material
- Preserve: around 60–90 if using Complex Pro and the vocal sounds too smeared
- Start with the vocal hitting around the downbeat or the “and” of 4 so it can interact with the snare
Why this works in DnB: short, attitude-heavy vocal snippets slot into the fast rhythmic language of DnB better than long sung lines. The vocal becomes part of the percussion grid.
2. Warp the phrase to create rhythmic texture, not natural performance
Open the Clip View and place Warp markers strategically to exaggerate the rhythm. Don’t aim for natural timing — aim for syncopation. If the vocal has a long tail, create a few warp points so it can “stutter” or pull into the next beat.
Use these starting ideas:
- Set the phrase to loop over 1 bar or 2 bars
- Stretch one syllable slightly late to create drag against the drums
- Pull a consonant earlier to create a chopped pickup
- If using Complex Pro, try Formants between -2 and +3 to find a darker or more nasal tone
A strong jungle approach is to warp the vocal so it answers the snare on 2 and 4. For example, place a short chop just after the snare, then another response before the next kick or bass hit. That creates the “call-and-response” feel that works so well in Ragga DnB.
If the phrase gets too smooth, switch to Beats warp mode and try:
- Transients: 50–80
- Preserve: 1/16 or 1/8 depending on the source
- Envelope: 20–40 for a bit of bite
This gives a more chopped, grainy, drum-like edge.
3. Slice the warped vocal into playable chunks
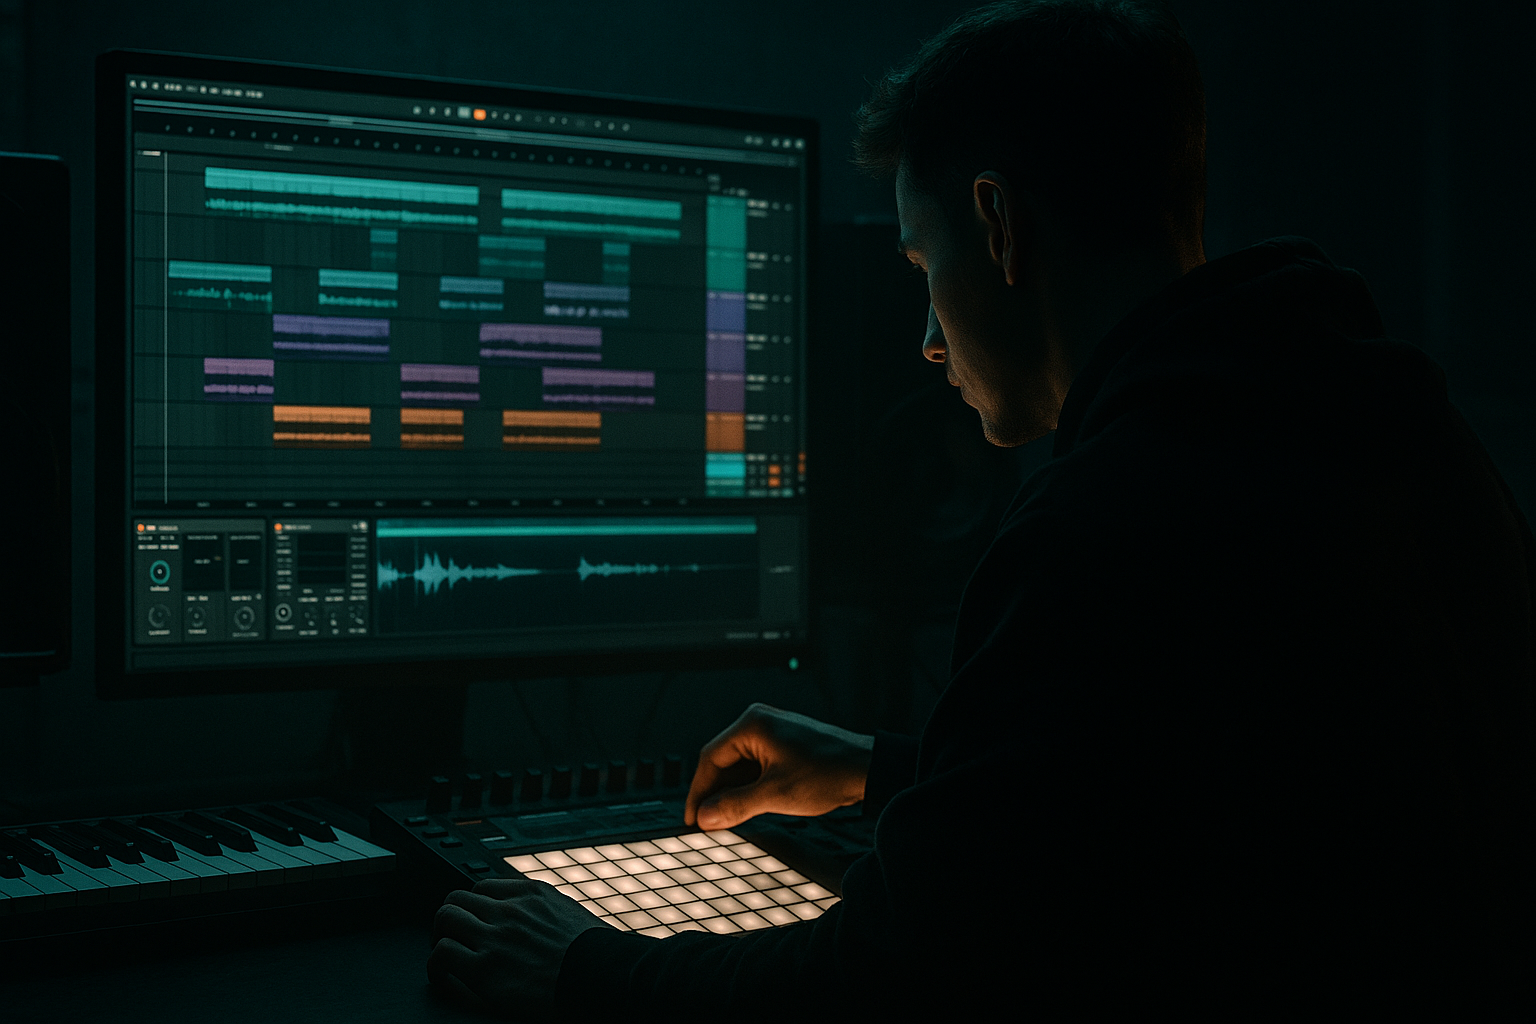
Once the phrase feels good rhythmically, right-click the clip and choose Slice to New MIDI Track. Use Transients or Warping markers as the slicing method depending on how rhythmic the source is.
In Live 12, this gives you a fast way to turn the vocal into a triggerable instrument. You can then play the slices like a drum rack performance. If you prefer more sustained shaping, use Simpler in Slice mode for each hit and keep the slices short. If you want more control over pitch, use Sampler for a more flexible mapping approach.
Suggested workflow:
- Slice to New MIDI Track
- Map to a Drum Rack if you want percussive one-shot style control
- Use Simpler in Slice mode for quick edits and straightforward playback
- Use Sampler if you want longer tails, formant-like tuning, and smoother pitch control
Keep the best 4–8 slices only. Don’t use every possible chop. The most effective DnB vocal texture is usually built from a small set of useful fragments:
- one sharp consonant hit
- one mid-length vowel
- one tail/noise burst
- one rising or descending syllable
Limiting the palette makes the rhythm more intentional.
4. Build a crunchy sampler chain for grime and attitude
Now shape the slices so they sound like a musical texture rather than a clean vocal playback. Inside Simpler or Sampler, start with a tight envelope:
- Attack: 0–5 ms
- Release: 80–180 ms for short chops, up to 300 ms for tail-based textures
- Filter cutoff: around 1.5 kHz to 6 kHz depending on brightness
- Resonance: 10–25% if you want a nasal bite
Add Ableton stock devices after the sampler:
- Saturator: Drive 2–7 dB, Soft Clip on if you want controlled grit
- Overdrive: Frequency around 700 Hz–2.5 kHz, Dry/Wet 10–35% for crunchy upper-mid bite
- Redux: downsample lightly, perhaps 2–6 bits and/or modest sample rate reduction for aliasing texture
- EQ Eight: high-pass around 120–200 Hz to keep the vocal out of sub territory
If the vocal is too clean, experiment with a parallel chain:
- Dry vocal texture chain
- Distorted duplicate chain with heavier Saturator and EQ
- Blend the distorted chain under the clean one at lower level
This is especially useful for darker DnB because it lets the vocal cut without becoming fizzy or harsh.
5. Program the rhythm to interact with the drum break
Put the vocal chops in a MIDI clip and make them respond to the drums rather than float over them. In DnB, the best vocal textures often feel “locked” to the break. Try placing hits:
- right after the snare
- in the gaps between ghost notes
- as pickups into the next bar
- on offbeats that avoid the kick/sub fundamental
A strong pattern for a 174 BPM roller might be:
- one short chop on beat 1 after the kick
- a second chop on the “and” of 2
- a response chop just after the snare on 2 or 4
- a tail or reversed vocal leading into bar 2
If you’re using a classic breakbeat, use the vocal to reinforce the groove rather than duplicate it exactly. For example, let the vocal answer the snare accents but leave space during the most active ghost-note sections. That keeps the break readable.
Add Groove if needed:
- Use a subtle MPC-style groove or extracted groove from your break
- Keep strength low, around 20–40%, so the vocal stays tight but human
This makes the vocal feel part of the drum performance instead of a pasted-on loop.
6. Shape the texture with movement and filtering
Now make it evolve. Static vocal chops can sound flat fast, especially over 8 or 16 bars. Add automation to keep tension alive:
- Automate Auto Filter cutoff from around 400 Hz up to 4–8 kHz across a build or 8-bar phrase
- Add filter resonance lightly for a telephone-like effect before a drop
- Automate Saturator Drive up 1–3 dB in the second half of a section for extra urgency
- Use Utility to automate width: keep the low-mid content mono, then widen only the higher layer if needed
If you want a darker, more industrial feel, put a second Auto Filter after distortion and automate a notch-like bandpass sweep. That can turn the vocal into a tense, unstable texture. For ragga-style energy, alternate between open and closed filter states in a call-and-response pattern with the bassline.
Arrangement idea:
- Intro: filtered vocal fragments with delay
- Build: increase chop rate and tighten the rhythm
- Drop: full crunchy texture on selected bars only
- Switch-up: strip the drums for 1 bar and let the vocal phrase lead back in
Keep movement intentional. DnB is fast enough already; the automation should create shape, not chaos.
7. Glue it into the mix with space, not wash
Vocal textures in DnB need to occupy the upper mids without masking the snare crack or bass movement. Use spatial effects carefully:
- Echo: short synced delay times like 1/16 or dotted 1/8, filtered heavily so it doesn’t cloud the drop
- Reverb: short decay, around 0.4–1.2 seconds, with high-pass filtering on the reverb return
- Send the vocal to a return track rather than inserting huge reverb directly on the channel
Keep the main vocal texture fairly dry in the drop. Put more ambience on the intro or break sections. In heavier tracks, the vocal should feel like it’s glued to the drums, not floating over them.
Mixing targets:
- High-pass the main vocal texture around 120–180 Hz
- Control harshness around 2.5–5 kHz if the sample bites too hard
- If the vocal gets smeary, reduce reverb size or shorten delay feedback
Why this works in DnB: the mix has to leave room for sub and snare impact. A vocal texture that is too wet will blur the groove and weaken the drop.
8. Make it a reusable rack for future tracks
Once the chain works, save it as an Instrument Rack or Audio Effect Rack. Create a few macro controls for fast variation:
- Macro 1: Filter cutoff
- Macro 2: Saturator drive
- Macro 3: Delay feedback
- Macro 4: Formant or pitch shift amount
- Macro 5: Dry/Wet blend for the dirty chain
- Macro 6: Width or Utility gain for performance control
This turns a one-off experiment into a repeatable Ragga Elements tool. In future tracks, you can drag in a new vocal and instantly get the same tonal world.
Practical finishing move:
- Duplicate the texture track
- Make one version more filtered and distant for intros
- Make another version more aggressive for the drop
- Mute one or the other depending on arrangement section
This gives you a simple A/B strategy that’s very useful in roller and jungle arrangements.
Common Mistakes
Fix: reduce the number of warp markers and keep one or two intentional rhythmic stretches instead of micro-editing everything.
Fix: high-pass early with EQ Eight and keep anything below 120 Hz out of the way of the sub.
Fix: use short, filtered delay and small reverb sends. In the drop, keep the vocal mostly dry.
Fix: pick a phrase with clear consonants, breaths, or shouts. Those details become your rhythm.
Fix: move chops slightly away from snare hits, or deliberately place them as responses rather than overlaps.
Fix: blend dirty and clean chains in parallel instead of destroying the source completely.
Pro Tips for Darker / Heavier DnB
Mini Practice Exercise
Spend 10–20 minutes building a two-bar Ragga vocal texture:
1. Find a vocal sample under 2 seconds with a strong rhythmic phrase.
2. Warp it in Ableton and exaggerate one or two timing points.
3. Slice it to a new MIDI track.
4. Build a 4-slice pattern that answers your snare pattern.
5. Add EQ Eight, Saturator, and one delay or reverb return.
6. Automate filter cutoff across the second bar.
7. Export a 10-second loop and listen in the context of your drums and bass.
Challenge: make one version for the intro and one for the drop. The intro version should be more spacious and filtered; the drop version should be tighter, crunchier, and more percussive.

