Main tutorial
Lesson Overview
A top loop is one of the fastest ways to give a Drum & Bass track instant identity. In jungle and oldskool DnB, the top loop is usually the high-frequency break energy: hats, shuffles, ghost hits, ride texture, little snare ghosts, and chopped break details that sit above the kick and sub. If that top layer is messy, the whole track feels blurry and late. If it’s tight, the groove locks in and the track starts moving like a proper roller 💥
In this lesson, you’ll learn how to tighten a top loop in Ableton Live 12 so it sits cleanly on top of a DnB drum pattern without losing the raw swing that gives jungle its character. This is not about making the loop sterile. It’s about shaping it so it feels punchy, controlled, and ready to drive a drop, intro, or switch-up.
This matters in DnB because the drums are doing a lot of the storytelling. In darker bass music, your top loop often creates the nervous energy while the kick and sub stay focused and powerful underneath. If the top loop drifts, flams, or has too much unwanted low-mid spill, it can fight the bassline, weaken the groove, and make the track feel amateur. Tight editing helps your drums sound intentional, which is exactly what makes oldskool jungle edits feel exciting.
---
What You Will Build
By the end, you’ll have a top loop that:
- hits tightly on the grid while still keeping a bit of break swing
- has cleaner transient impact and less muddy spill
- fits over a jungle-style kick and sub pattern without masking the low end
- feels like a usable loop for intros, build sections, and first-drop energy
- can be looped, duplicated, and arranged into a proper DnB section with variation
- a break loop with mostly hats and snare ghosts
- a top loop lifted from a jungle break
- a percussion loop with syncopation and some swing
- try Beats warp mode first
- set Preserve to a short value, around 1/16 or 1/8 for tighter transients
- use transient markers if the loop needs correction
- zoom in
- locate the first clean transient
- align it with the bar start
- listen for flamming against your kick
- shorten the clip start/end to cut dead space
- if there’s a messy tail, tighten the end so it loops cleanly
- if the loop contains low thumps, don’t worry yet — we’ll remove them in the next step
- duplicate the loop to fill 2 or 4 bars
- make one copy slightly different by trimming the end of a hit or removing a ghost note
- alternate the two versions every 2 bars
- high-pass filter around 120–200 Hz
- if the loop is very thin already, you may only need 80–120 Hz
- use a gentle slope if the loop needs more natural body, steeper if it’s messy
- low-mid boxiness around 200–500 Hz
- harshness around 3–6 kHz if the loop is brittle
- high-pass at 150 Hz as a starting point
- small cut of 2–4 dB around 300 Hz if it sounds cloudy
- narrow cut only if one resonance jumps out
- Ratio: 2:1 or 4:1
- Attack: 10–30 ms
- Release: Auto or around 0.1–0.3 s
- Aim for 1–3 dB of gain reduction
- Drive: low to moderate, around 5–15%
- Boom: usually off for a top loop
- Damp: adjust to keep the hats from getting too sharp
- Transients: small positive adjustment if you want more snap
- reduce the gain of overly loud ghost hits
- cut out one or two cluttered hits that land before the snare
- shorten the front edge of a noisy hit if it masks the groove
- if a hat lands too early or late, slice the clip and nudge just that piece
- if your main drum pattern has a strong snare on 2 and 4, make sure the top loop’s busy hits do not crowd the snare space
- if a ghost hit lands right before the snare and makes it feel late, lower it or remove it
- this creates a stronger “snap” into the snare, which is classic jungle energy
- Saturator
- Drum Buss
- Overdrive, very lightly
- Saturator: Soft Clip on, Drive 1–4 dB
- Drum Buss: Drive low, and use the transient section gently
- Overdrive: keep Dry/Wet low, around 5–15%
- try a light groove amount, around 10–30%
- don’t push the timing so much that the loop fights the snare
- test the groove while the kick and bass are playing together
- does the loop lock into the kick?
- does it leave enough air for the snare?
- does it feel urgent, or does it drag?
- Bars 1–4: full top loop
- Bars 5–6: remove one busy hit every bar
- Bars 7–8: add a filter automation or a reversed hit into the transition
- start slightly closed, around 8–10 kHz if you want tension
- open it up into the drop or next phrase
- use a modest resonance if you want a more oldskool edge, but keep it subtle
- solo is useful, but full-mix context is the truth
- if the top loop makes the snare feel smaller, cut more low-mid or reduce density
- if it disappears, add a touch more saturation or raise the loop slightly
- if the groove feels too busy, remove one or two hits instead of lowering the volume
- Over-warping the loop
- Leaving too much low-end in the loop
- Compressing too hard
- Making every hit too loud
- Trying to “fix” timing with effects only
- Ignoring the snare space
- Forgetting arrangement
- Duplicate the loop and make one version slightly darker with Auto Filter, then automate between them for tension and release.
- Try parallel saturation by sending the loop to a return track with Saturator or Drum Buss, then blend it lightly back in for extra bite.
- Use Utility to keep the loop mono-compatible if it has wide stereo noise. Narrowing the width a little can make the center feel stronger.
- If the loop feels too clean for jungle, resample it to audio after your edits, then chop the rendered version for a grittier result.
- For neuro-influenced tension, automate subtle filter movement or very small volume dips before fills, so the loop feels like it’s breathing with the bass.
- If your bassline is very heavy, keep the top loop brighter and tighter rather than louder. Clarity beats volume in dark DnB.
- Use a short reverse hit or tiny cymbal swell at the end of every 8 bars to signal the next phrase without overdoing the transition.
- Tightening a top loop in Ableton Live is about cleaning timing, controlling transients, and protecting space for the kick, snare, and sub.
- Use Warp carefully, then trim and edit the clip before relying on effects.
- EQ Eight, Glue Compressor, Drum Buss, Saturator, and Auto Filter are enough to get a strong jungle/oldskool DnB result.
- Keep the loop energetic, but leave room for the backbeat and bassline.
- Small arrangement changes every 4 or 8 bars keep the loop exciting and DJ-friendly.
- In DnB, a tight top loop makes the whole track feel faster, heavier, and more professional 🎛️
Musically, think of this as a high-end break layer that could sit over a classic Amen-style drum bed, a rolling 170 BPM beat, or a darker half-time bass section. It should feel like a loop that can carry momentum through 8 or 16 bars without sounding repetitive or smeared.
---
Step-by-Step Walkthrough
1. Choose the right top loop source
Start with a break or top-loop sample that already has rhythmic character. In Ableton Live’s Browser, look for break-style loops, hat loops, shuffled percussion, or chopped break tops. For beginner editing, choose something with clear transients and not too much low-end rumble.
Good candidates:
Drag it onto an audio track and set the project tempo around your target DnB tempo, usually 170–174 BPM for classic jungle and rollers.
Why this works in DnB: DnB lives on movement. A top loop with natural syncopation gives you that feeling instantly, but the groove only works if the loop is cut to the track properly.
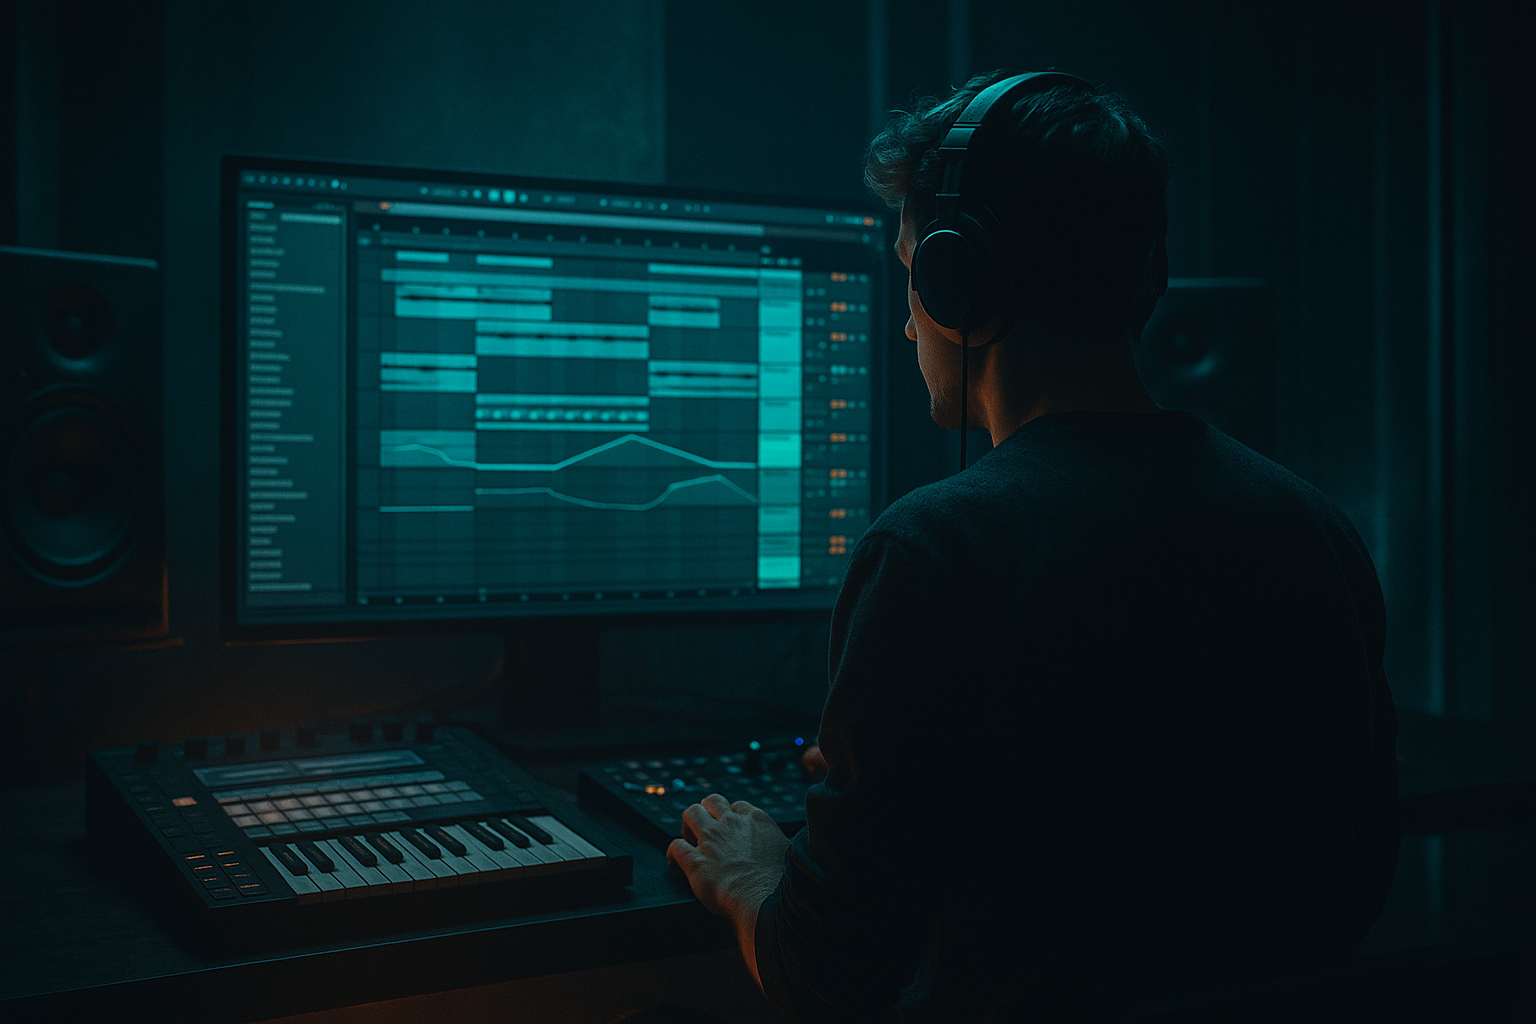
2. Warp the loop correctly in Ableton Live 12
Double-click the clip so you can see Clip View. Turn Warp on if it isn’t already.
For a drum loop like this:
If the loop is already close to tempo, keep the warp movement minimal. You want it locked, not over-stretched. If the loop has a lot of shuffle, avoid overly aggressive quantizing at this stage.
A useful beginner habit:
If the loop feels smeared or “underwater,” the warp is probably too loose or the clip start is slightly off.
3. Clean the loop with basic clip edits
Now trim the clip so only the useful top-end material plays. In oldskool DnB, this often means stripping away unwanted noise and leaving just the energetic top movement.
Do this:
Use the clip’s gain if needed, but keep the overall level conservative. Leave headroom for drums and bass.
A very practical edit move:
This gives the top loop movement without needing extra samples.
4. Remove low-end and control mud with EQ Eight
Add EQ Eight to the top loop. This is one of the most important steps because a “top loop” should support the groove, not compete with the kick and sub.
Start with these moves:
Then listen for:
Useful beginner settings:
Why this works in DnB: the kick and sub need a clear lane. Jungle loops often contain extra low-end from the original break, and removing that lets the bassline hit harder while keeping the drum top crisp.
5. Tighten the transients with Glue Compressor or Drum Buss
Now give the loop a controlled, punchy envelope. You want the top to feel more “together” without flattening the break too much.
Option A: Glue Compressor
This keeps the top loop stable and slightly glued.
Option B: Drum Buss
For beginner workflow, start with Glue Compressor. It’s easier to hear and harder to overdo.
Why this works in DnB: a top loop often has lots of tiny hits. Light compression helps those hits feel like one coherent rhythm rather than a bunch of separate spikes fighting the beat.
6. Use transient shaping through clip gain and micro-edits
If the loop still feels loose, use basic editing before reaching for more processing. In Ableton Live, the simplest tightening tool is often just your ears and your mouse.
Try these moves:
For oldskool jungle vibes, don’t make every hit perfectly rigid. Leave some of the original swing. The goal is to tighten the loop’s timing relationship to the kick and snare, not erase its personality.
A good musical context example:
7. Add light saturation for edge and density
A top loop in DnB often benefits from a bit of harmonic grit. This helps it cut through bass-heavy mixes without making it louder.
Try Ableton stock devices:
Good starting points:
Be careful: too much saturation can make hats harsh and brittle. The goal is density, not fuzz.
If your loop is very thin, saturation can help it read on smaller speakers. If it already sounds bright and sharp, use a tiny amount only.
8. Groove it like a DnB editor, not a pop loop
Now check the loop’s feel against the track. In Ableton, use the Groove Pool if you want to add or borrow swing from a break-style groove template, but keep it subtle.
Beginner-friendly approach:
You can also manually shift the entire clip a few milliseconds if the loop feels early or late. This is an edit decision, not a mix one. In DnB, tiny timing changes matter a lot because the tempo is fast and the pocket is narrow.
Ask yourself:
If it drags, move it slightly earlier. If it feels rushed, move it slightly later.
9. Create a simple 8-bar arrangement with variation
A tight loop is useful, but a track section needs movement. Build a small arrangement idea with the loop as the top layer.
Example arrangement:
Use Auto Filter for a simple automation pass:
This is classic DnB phrasing: repetition first, then a small change every 4 or 8 bars so the DJ-friendly flow stays strong while the track keeps evolving.
10. Check the loop in the full drum and bass context
Now listen with the kick, snare, sub, and bassline together. This is the real test.
Do these checks:
A top loop is successful when you can feel it more than hear it individually. In jungle and darker DnB, the best top loops often just lock the whole record in place and make the drop feel more alive.
---
Common Mistakes
Fix: use the minimum warp movement needed. If the groove gets robotic, back off and keep some natural swing.
Fix: high-pass more aggressively with EQ Eight. A top loop should not compete with the kick or sub.
Fix: reduce gain reduction and slow the attack a bit. Too much compression kills the break’s bite.
Fix: lower ghost notes and keep accents clear. Jungle groove depends on contrast.
Fix: use actual clip edits and nudges first. Effects should refine the loop, not rescue a bad edit.
Fix: if the top loop is cluttering the backbeat, cut or move the busiest hits around the snare.
Fix: even a great loop gets stale if it repeats unchanged. Add simple 4- or 8-bar variations.
---
Pro Tips for Darker / Heavier DnB
---
Mini Practice Exercise
Spend 10–20 minutes on this:
1. Find one break or top loop sample in Ableton Live.
2. Warp it to 174 BPM and align it cleanly to the bar.
3. High-pass it with EQ Eight at around 150 Hz.
4. Add Glue Compressor and aim for 1–3 dB of gain reduction.
5. Add a touch of Saturator, keeping the Drive subtle.
6. Duplicate the loop across 8 bars.
7. Remove one busy hit in bars 5–6 and add a simple filter automation in bars 7–8.
8. Listen with a kick and sub playing underneath and adjust the loop until the snare space feels clean.
Bonus challenge: make one version for a cleaner roller vibe and one version for a rougher jungle vibe, using only Ableton stock devices and clip edits.
---

