Main tutorial
Lesson Overview
This lesson is about turning a Soul Pride-style jungle swing into a finished DnB arrangement inside Ableton Live 12 by resampling the core groove, reshaping it into variations, and placing it like a pro in a proper track structure. The focus is not just on making the break feel good in isolation, but on making it arrangeable, repeatable, and mix-ready for a full roller, jungle hybrid, or darker dancefloor tune.
In advanced Drum & Bass production, this matters because the best swing often lives in a very specific moment: a break loop, a ghost-note pocket, a snare push, a slightly late hat, or a chopped re-hit. If you keep that groove trapped in a single 2-bar loop, the track can feel static. If you resample it intelligently, you can build drop energy, call-and-response phrasing, breakdown contrast, and DJ-friendly sections without losing the original human feel.
You’ll work like a real studio producer: build a tight break groove, bounce it to audio, cut it into usable phrases, process the resamples, and arrange the material into a complete DnB structure. We’ll also keep an ear on the mastering side of the workflow: headroom, mono compatibility, low-end separation, and making sure the groove survives loud playback 🎚️
What You Will Build
By the end of this lesson, you’ll have a Soul Pride-inspired jungle swing section that turns into:
- a 2-bar break loop with authentic shuffle and ghost-note motion
- a resampled drum phrase that can be chopped into fills and drop variations
- a sub/bass call-and-response arrangement that sits cleanly under the break
- a DJ-friendly intro, main drop, and switch-up that feels like a real DnB record
- a master-bus-safe premix with controlled low end, managed peaks, and enough headroom for final mastering
- Over-quantizing the break
- Resampling too early without committing to a phrase
- Letting the sub and kick hit full strength at the same time every bar
- Putting stereo wideners on the low end
- Over-processing the drum resample
- Ignoring arrangement contrast
- Mixing too hot before mastering
- Use parallel saturation on the drum bus instead of crushing the main drum resample. A lightly distorted parallel layer can add menace without flattening transients.
- For a darker roller feel, keep the bass notes shorter than you think and let the drum swing carry the rhythm. Long bass notes can blur the jungle pocket.
- Use frequency-separated automation: open the bass filter while slightly narrowing drum ambience, or vice versa, to create motion without adding elements.
- Resample the bass after processing if you want a more “finished” character. A second-generation resample often feels more authoritative in neuro-influenced or darker rollers.
- Use very short reverb throws on snare ghosts or fill hits. A tiny room can make the groove feel bigger without washing the break.
- If the drum resample feels too polite, add a touch of Redux or Erosion on a duplicate lane and blend quietly. Texture at low level reads as weight.
- Keep the low end honest with mono checks frequently. Dark DnB gets huge from control, not just aggression.
- Try arranging one drop with more break density and another with more bass density. Contrast is part of the heaviness.
- Build the groove first, but think in arrangement phrases, not just loops.
- Resample the jungle swing so you can chop, automate, and arrange it like a core musical asset.
- Keep the sub mono, clean, and separated from the kick.
- Use Ableton stock devices to shape punch, grit, and control: EQ Eight, Drum Buss, Saturator, Glue Compressor, Utility, Auto Filter.
- Make the track feel like DnB by using space, call-and-response, fills, and tension/release.
- Mix for mastering from the start: headroom, mono checks, and low-end discipline are non-negotiable.
Musically, think of a section where the drums lead the identity, the bass answers in short phrases, and the arrangement breathes like a classic jungle-to-rollers hybrid: raw break energy, modern low-end control, and purposeful tension/release.
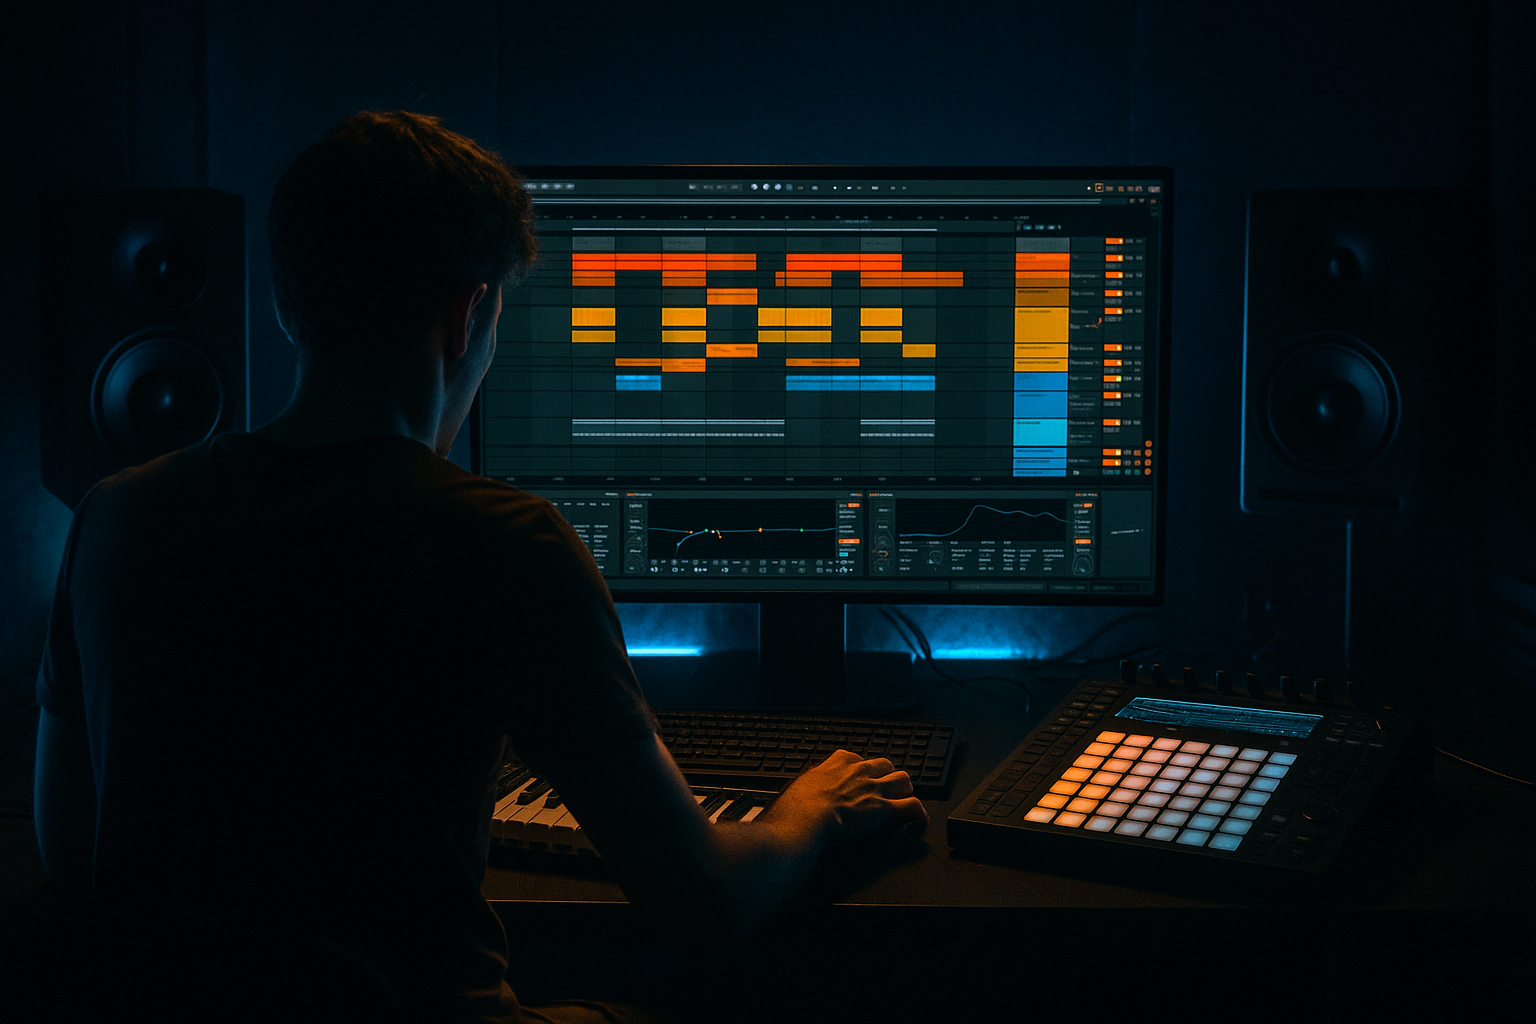
Step-by-Step Walkthrough
1. Set up the project around arrangement, not loop-first habit
Start in Ableton Live 12 with a blank project and set the tempo between 170 and 174 BPM. For a Soul Pride-style swing, 172 BPM is a strong starting point because it keeps the break moving without smearing the groove.
Create these tracks:
- Drum Break
- Drum Resample
- Kick Layer
- Snare Layer
- Sub
- Reese / Mid Bass
- Atmos / FX
- Return A: Short Room
- Return B: Dub Delay
Put a reference track on a muted audio lane if you have one. Use it to compare snare placement, break density, and bass spacing. For mastering awareness, leave your master peaking around -6 dBFS to -8 dBFS while building. That headroom is crucial later.
In Ableton, set the Session View clip launch quantization to 1 Bar while sketching, then switch to Arrangement View once the groove is working. Advanced workflow tip: make your structure early. Don’t wait until the loop is “perfect” before thinking in 16- and 32-bar phrases.
2. Build the core jungle swing with break editing and groove control
Drop a classic break or break-style slice set into the Drum Break track. If you’re using a clean one-bar break, start by slicing it to a Drum Rack or using Simpler in Slice mode. For advanced control, use Simpler in Classic mode on individual slices after chopping the source, so you can fine-tune transients and tail length.
Focus on the swing identity:
- Let the main snare land with authority around beats 2 and 4
- Keep ghost notes low in velocity, usually around 20–55
- Push or pull selected hats slightly off-grid for human movement
- Use Groove Pool with a light MPC-style swing or extracted groove from the break itself
Suggested settings:
- Groove Amount: 20–45%
- Velocity variation: subtle, not random
- Clip Transpose: if needed, keep break pitch neutral or slightly down for darker weight
Why this works in DnB: jungle swing lives in the relationship between micro-timing and transient hierarchy. The groove feels alive because the break is not perfectly quantized, but the snare still hits with enough certainty to anchor the bar. That tension is exactly what makes rollers and jungle hybrids move.
3. Resample the groove to create a playable phrase
This is the core of the lesson. Create a new audio track called Drum Resample and set its input to Resampling or route the Drum Break group to it. Arm the track and record 4 to 8 bars of the groove while you play small variations: muting a hat, swapping a snare ghost, opening the break for a fill, or letting a crash tail ring out.
Once recorded, consolidate the best take and start editing it like a new instrument:
- Split at phrase boundaries
- Keep one version for the main loop
- Make a second version with a fill or turnaround
- Make a third version with a more stripped-down bar for arrangement breathing space
Add Warp only if necessary. If the swing is already strong, keep warp edits minimal. If timing is drifting, use Complex Pro cautiously on the full resample, but avoid over-warping transient-heavy drums because it can soften the snap.
Concrete move: create an 8-bar resample and use Consolidate on the final selected region. Then duplicate it and make one copy with Reverse, one copy with a tiny Fade Out, and one with a single-bar gap for a DJ-style drop reset.
4. Shape the resampled drums with stock Ableton devices
Put these devices on the Drum Resample track in this general order:
- EQ Eight
- Drum Buss
- Saturator
- Compressor or Glue Compressor
- optional Redux for controlled grit
A solid starting chain:
- EQ Eight: high-pass very gently around 25–35 Hz if the resample contains unnecessary sub rumble; cut muddy buildup around 180–300 Hz if the break feels boxy
- Drum Buss: Drive 5–20%, Crunch low to moderate, Boom very subtle or off if the kick/sub relationship is already strong
- Saturator: Drive 1–4 dB, Soft Clip on, keep it for density rather than obvious distortion
- Glue Compressor: Ratio 2:1, Attack 10 ms, Release Auto or 0.3 s, aiming for 1–2 dB of gain reduction
- Redux: only if you want grime; use tiny amounts, like a mild bit-depth reduction, not destroyed artifacts
The goal is to make the resample feel like a single musical object, not a random chopped loop. You want cohesion, punch, and enough tonal weight to survive arrangement changes.
5. Design the bass answer: sub discipline first, then reese movement
Add a dedicated Sub track with a simple sine or triangle-based source from Operator. Keep it mono and clean. In the low end, DnB mastering lives or dies here.
Suggested starting points:
- Operator: sine oscillator, no unneeded modulation
- Low-pass or keep harmonics minimal
- Saturator: very light drive, maybe 1–2 dB to make the sub audible on smaller systems
- Utility: Width at 0% for strict mono
Then create a Reese / Mid Bass track using Operator, Wavetable, or a resampled source. For a darker roller character, use detune and motion without stepping on the sub:
- Filter cutoff around 150–600 Hz depending on density
- Mild LFO movement on filter or wavetable position
- Keep stereo width mostly above the low mids, not in the sub
Use call-and-response phrasing: let the bass answer the drum resample every 2 bars, or leave the first bar sparse and fill the second bar with a longer note or slide. Advanced DnB arrangement often works because the drums tell the story first, while bass punctuation gives the section weight and momentum.
6. Arrange the drop in 8- and 16-bar logic
Now move from loop to record-shaped thinking. In Arrangement View, build a structure like this:
- Intro: 16 bars
- Build / tease: 8 bars
- Drop A: 16 bars
- Switch-up: 8 bars
- Drop B: 16 bars
- Outro: 16 bars
For a Soul Pride-style jungle swing, the first drop should not be overstuffed. Let the break establish identity, then introduce the bass after 4 or 8 bars. A good progression might be:
- Bars 1–4: drums only, with a filtered texture
- Bars 5–8: sub enters on sparse hits
- Bars 9–16: full bass response and extra drum resamples
- Bars 17–24: strip some elements for contrast, then return with a fill
Use clip automation and track automation for:
- filter cutoff sweeps on the bass
- Send A/B throws to reverb/delay for transition moments
- Drum Buss Drive automation on the drop return
- Utility gain dips for breakdowns and pre-drop tension
Musical context example: in a 172 BPM roller, you might run an 8-bar intro with filtered break ambience, then slam into a 16-bar drop where the drum resample carries the groove while the sub only answers on bar endings. That creates space and makes the second half of the drop feel heavier when the bass fully arrives.
7. Create fills, turnarounds, and switch-ups from the resample itself
Don’t write all your transitions from scratch. Use the resampled drum audio as your fill source. This is where advanced arrangement feels polished.
Try this:
- Duplicate the main resample onto a new lane
- Slice a 1-bar turnaround
- Reverse one snare tail or hat hit
- Add a tiny fade-in on the first transient of the next section
- Use Beat Repeat very lightly on a send or duplicate for a short stutter effect
Keep fills short and intentional. In DnB, too many fills kill momentum. Better to have a single strong turnaround every 8 or 16 bars than to clutter every bar with edits.
Good fill tools in Ableton:
- Beat Repeat for controlled stutter
- Erosion or Redux for edge on transition snippets
- Auto Filter automation for tension
- Reverb with a short decay on throws only
Parameter idea: for transition FX, use Auto Filter resonance around 0.4–0.7 and automate cutoff from roughly 200 Hz to 6–8 kHz over 1–2 bars.
8. Prepare the premix for mastering discipline
Treat the arrangement like a mastering pre-check even before final export. The point is not to master the song inside the mix, but to make sure the mix can be mastered properly.
Check:
- Master peaks below about -6 dBFS
- Sub and kick do not compete at the same time
- Mono compatibility of the low end
- Harshness around 2.5–5 kHz
- Too much stereo spread below 120 Hz
Use Utility on the Sub track to keep it mono. On the master or groups, use Spectrum and your ears to identify if the break resample is filling too much low-mid space. If it is, carve subtly with EQ Eight, usually small moves like:
- -2 to -4 dB around 220–350 Hz on the drum bus if necessary
- gentle high shelf reduction if cymbals get brittle
- narrow notch only if a nasty ring dominates the break
Keep the drum bus and bass bus separate as long as possible. That separation makes balancing easier and helps the master feel louder later without over-compression.
9. Finalize the energy curve with automation and contrast
The final arrangement should feel like it breathes. Use automation to create energy shifts without constantly adding new parts.
Key moves:
- automate bass filter opening across 8 bars
- mute or thin the break for one bar before a drop
- bring in a filtered atmospheric tail before switch-ups
- automate send levels to dub delay only on the last hit of a phrase
- automate a very slight gain lift into the second drop, then pull it back to protect headroom
Advanced tip: sometimes the best move is subtraction. Removing the sub for 1 beat before a drop hit can make the return feel much larger than adding another riser.
Common Mistakes
- Fix: use subtle groove settings and preserve the original swing pocket.
- Fix: record 4–8 bars first, then edit into usable sections.
- Fix: offset their roles. Let one lead while the other supports, especially in dense drop sections.
- Fix: keep sub mono with Utility and keep stereo motion in mids and highs only.
- Fix: if Drum Buss, Saturator, and Glue all sound “cool” but the groove loses snap, back off. Punch beats novelty.
- Fix: build clear 8- and 16-bar phrases with space, fills, and switch-ups.
- Fix: keep headroom. If the master bus is clipping early, every later decision becomes harder.
Pro Tips for Darker / Heavier DnB
Mini Practice Exercise
Spend 10–20 minutes making a two-drop mini arrangement:
1. Load a jungle break and create a 2-bar swing loop.
2. Resample 4 bars of your best loop into audio.
3. Chop the resample into:
- one main phrase
- one fill phrase
- one stripped phrase
4. Add a simple Operator sub and a Reese / mid bass.
5. Arrange:
- 4 bars intro
- 8 bars drop A
- 4 bars switch-up
- 8 bars drop B
6. Use only:
- EQ Eight
- Drum Buss
- Saturator
- Utility
- Auto Filter
- Glue Compressor
7. Finish by checking:
- mono low end
- headroom under -6 dBFS
- whether the groove still feels strong when the bass drops out for one bar
Goal: make the resampled drums feel like a performable instrument, not just a loop.

