Main tutorial
Sequence Jungle Kick Weight Using Macro Controls (Ableton Live 12) 🥁⚙️
Skill level: Intermediate
Category: Atmospheres (with groove/weight control that impacts the whole vibe)
---
1) Lesson overview
In jungle / rolling DnB, the kick isn’t just “a kick”—it’s weight, momentum, and space management. The trick is making the kick feel heavy where it needs to be, but lighter and faster where the groove needs air for the Amen, bass, and atmos.
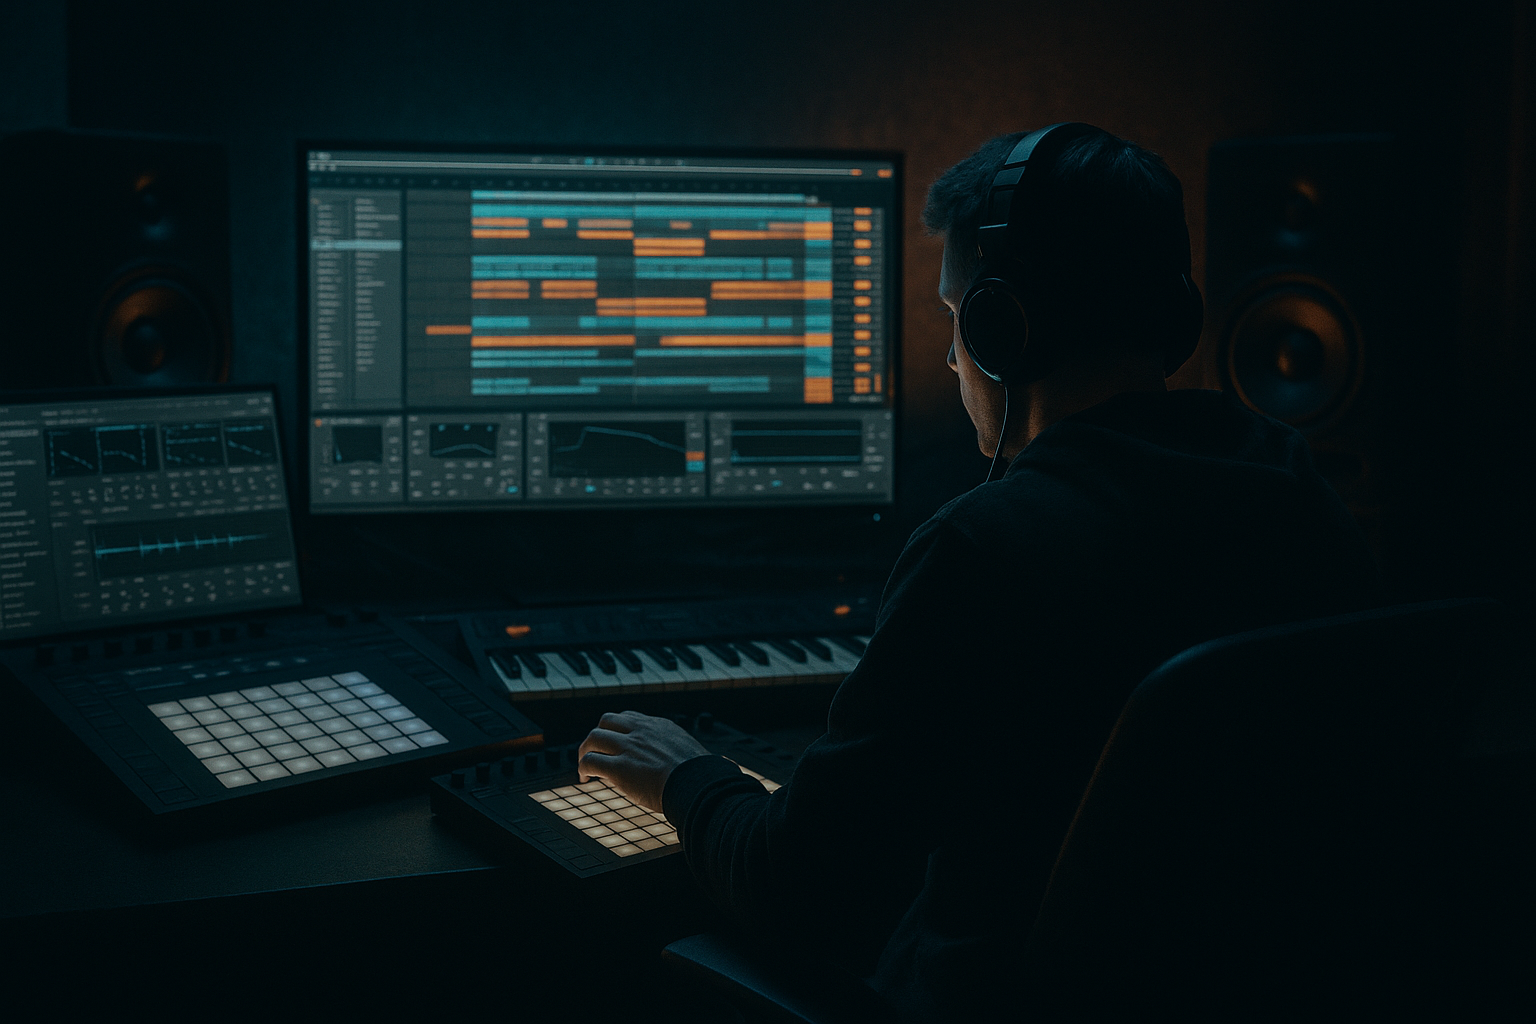
In this lesson you’ll build an Ableton Live 12 rack where Macro controls sequence kick “weight” over time—not by changing the MIDI notes, but by morphing the sound (sub, punch, transient, saturation, and room) in a controlled, musical way. You’ll then automate macros to create phrase-based weight changes typical of jungle (e.g., heavier on the 1, lighter on ghost kicks, heavier again at the end of 8/16-bar phrases).
---
2) What you will build
A Kick Weight Rack (Audio Effect Rack) that gives you performance-style control over:
- Sub weight (low shelf / low band dynamics)
- Punch (mid transient emphasis)
- Transient length (tight vs boomy)
- Drive (saturation that reads loud on small speakers)
- Room/air (tiny ambience for vibe without washing out breaks)
- Optional: Stereo/mono discipline for club translation
- Macro automation for 8/16-bar phrasing
- Or MIDI-triggered macro changes (via clip automation / dummy clips) for more “sequenced” movement.
- Drop the kick into a Simpler (One-Shot mode).
- Turn Warp OFF for one-shots.
- In Simpler, set Voices: 1 (prevents overlaps).
- Adjust Start slightly if needed to tighten the transient.
- Enable a low shelf on Band 1.
- Freq: 55–70 Hz (start 60 Hz)
- Q: 0.70
- Gain range: map Macro from -2 dB → +4 dB
- Freq: 120–200 Hz (try 150 Hz)
- Q: 1.2
- Gain map: 0 dB → +3.5 dB
- Freq: 2.5–4.5 kHz (try 3.2 kHz)
- Q: 1.5
- Gain map: -2 dB → +3 dB
- Gate Threshold map: -30 dB → -12 dB
- Return: 150 ms
- Hold: 5–15 ms
- Drum Buss → Transients map: -10 → +15
- Type: Analog Clip (or Soft Sine for smoother)
- Drive map: 0 dB → +7 dB
- Turn Soft Clip ON
- Attack: 10 ms
- Release: Auto (or 0.1–0.3s)
- Ratio: 4:1
- Map Threshold: adjust for 0–4 dB GR across range
- Make-up: set by ear
- Boom: 20–35% (map 0 → 35%)
- Boom Freq: 45–60 Hz (set around your kick root; don’t map unless you need)
- Damp: 20–40%
- Algorithm: Room or Ambience
- Decay: 0.25–0.6s
- Pre-delay: 0–10 ms
- Low Cut: 200–400 Hz
- Dry/Wet map: 0% → 10%
- Put a Meter (or watch track meter) after the rack.
- Aim for peaks around -6 to -3 dBFS on the kick track before the drum bus.
- When Macro 5 (Drive) goes up, ensure output doesn’t jump wildly—adjust Saturator Output or Glue Make-up.
- Bars 1–8 (intro roll): Weight around 20–40%, Punch moderate.
- Bars 9–16 (main): Weight 60–80% on downbeats, slightly lower between.
- Bar 16 last 2 beats: ramp Drive and Punch up for tension.
- Bar 17 (drop/return): snap Weight back to 80–90% for impact.
- Macro 4 (Tightness): tighter during dense break fills; looser in sparse moments.
- Macro 8 (Air): bring in during atmospheric breakdowns, pull out during full drop.
- Downbeat kick: Weight 80%, Drive 40%, Tightness medium
- Ghost kick: Weight 35%, Drive 10%, Tightness tight
- End-of-phrase kick: Weight 90%, Punch 70%, Air 0% (keep it solid)
- If your break is busy, reduce Macro 3 (Click) slightly and use Macro 2 (Punch) instead.
- If your sub bass is long, keep Macro 7 (Boom) low and use Macro 5 (Drive) for presence.
- Consider sidechain: put Compressor on the bass, sidechained from the kick.
- Over-boosting sub (Macro 1 + Macro 7 together): You’ll get a loud, undefined low end that collapses on a limiter. Pick one as the “main weight” tool.
- Too much transient shaping: If Macro 4 makes the kick clicky and thin, you’ll lose the jungle stomp.
- Ignoring context: A kick that feels huge solo can be wrong with Amen + bass. Always tweak with the full drum+bass playing.
- No gain staging: Saturation and Glue threshold automation can cause level jumps that feel like “weight changes” but are actually just volume spikes.
- Too much reverb on the kick: Even 10% can be too much if you don’t low-cut the verb.
- Mono discipline: Add Utility at the end of the rack and keep Bass Mono ON (or Width 0% under ~120 Hz using EQ/Multiband approach).
- Multiband weight control (advanced): Replace Glue with Multiband Dynamics and map:
- Saturator tone shaping: In Saturator, enable Color and gently tilt:
- “End-of-8” aggression: Automate Macro 5 (Drive) up only on the last bar of an 8-bar phrase—classic tension trick without changing drums.
- Atmosphere synergy: In breakdowns, increase Macro 8 (Air) and slightly decrease Macro 3 (Click) so the kick sits behind pads/FX instead of poking out.
- You built a Kick Weight Rack using stock Ableton devices (EQ Eight, Drum Buss, Saturator, Glue, Gate, Hybrid Reverb).
- You mapped musical weight controls (sub tilt, punch, click, tail, drive, glue, boom, air).
- You sequenced jungle kick weight with automation to create phrase movement and tension/release—hugely important in rolling DnB.
- You kept it mix-safe with gain staging and context checks against breaks + bass.
Then you’ll use:
---
3) Step-by-step walkthrough
Step 0 — Session setup (DnB context)
1. Set tempo: 170–176 BPM (try 174 BPM).
2. Create a basic drum skeleton:
- Kick on 1 and some syncopated hits (classic jungle patterns vary—don’t overkick).
- A break (Amen/chopped loop) on another track for context.
- A simple sub bass (sine/triangle) so you can hear how kick weight interacts with bass.
> You’ll get best results when you build the rack while the bass + break are playing.
---
Step 1 — Choose / prep a kick that works for jungle
Option A (fast): Use a clean one-shot (tight transient, controlled tail).
Option B (more jungle): Layer a clicky/punchy kick with a subby thump.
Recommended: Start with a single kick sample that’s already decent and do weight-morphing via rack macros.
Quick prep:
---
Step 2 — Build the “Kick Weight Rack” (Audio Effect Rack)
On your kick track, add (in this order):
1. EQ Eight
2. Drum Buss
3. Saturator
4. Glue Compressor
5. Gate (optional but useful for tail control)
6. Hybrid Reverb (very small, optional “air”)
Select them → Cmd/Ctrl+G to group into an Audio Effect Rack.
Now map key parameters to 8 Macros.
---
Step 3 — Macro mappings (practical settings + why)
#### Macro 1 — Weight (Sub Tilt) 🧱
Device: EQ Eight
Why: This is your “more/less low-end mass” without touching sample choice.
---
#### Macro 2 — Punch (Low-Mid Knock) 👊
Device: EQ Eight (Band 3 bell)
Why: Jungle kicks often read “bigger” from 130–180 Hz, especially under breaks.
---
#### Macro 3 — Click / Beater ✨
Device: EQ Eight (Band 6 bell)
Why: Helps the kick cut through dense break edits without just turning it up.
---
#### Macro 4 — Tightness (Tail Control) ✂️
Choose one of these approaches:
Approach A (clean): Gate
Approach B (musical): Drum Buss Transients
Why: Tight kicks for rolling sections; longer tails for halftime drops or sparse intros.
---
#### Macro 5 — Drive (Harmonics) 🔥
Device: Saturator
Optional: Output trim mapped inversely (manual is fine if you gain-stage properly).
Why: Perceived loudness and “grit” without losing the transient.
---
#### Macro 6 — Glue (Density / Control) 🧲
Device: Glue Compressor
Why: Keeps heavy macro moments from spiking and makes the kick feel “finished.”
---
#### Macro 7 — Boom vs Thump (Drum Buss Boom) 🌊
Device: Drum Buss
Why: This is your controlled “club bloom.” Use sparingly; it can fight the sub bass.
---
#### Macro 8 — Air (Micro Room) 🌫️
Device: Hybrid Reverb
Why: Gives a subtle atmospheric halo that can make minimal jungle sections feel alive without washing.
---
Step 4 — Gain staging checkpoint (don’t skip)
Before sequencing weight, make sure the rack behaves:
---
Step 5 — “Sequencing” the kick weight with Macro automation (the core move) 🎛️🧠
#### A) Arrangement automation (best for phrasing)
1. Go to Arrangement View.
2. Hit A to show automation lanes.
3. Choose your kick track → Rack → Macro 1 (Weight).
Try this classic jungle phrasing:
Then add smaller moves:
#### B) Clip automation “dummy clip” sequencing (more performance-style)
If you want the macro to “step” in a repeatable loop:
1. Create a new MIDI track called `KICK MACRO CTRL`.
2. Create a MIDI clip the length of your drum loop (e.g., 2 bars).
3. In the clip, open Envelopes → choose MIDI Ctrl (or device parameter if you route via a control device).
- In Live, direct control of another track’s macro via MIDI CC isn’t native without extra routing—so the simplest reliable method is:
- Duplicate the kick clip and use clip automation on the kick track itself (recommended).
4. On the kick track’s MIDI clip, open Envelopes → select the Rack Macro parameter and draw “step” shapes:
- Heavier on beats 1 and 3 (or just 1), lighter on syncopations.
A super usable 2-bar pattern idea:
This gives the illusion of layered kicks without needing extra samples.
---
Step 6 — Make it jungle: tie kick weight to breaks + bass
Now make the rack serve the mix:
- Ratio 4:1, Attack 5–15 ms, Release 60–120 ms, aim 2–5 dB GR.
---
4) Common mistakes
---
5) Pro tips for darker/heavier DnB 🖤
- Low band threshold for controlled sub swell,
- Mid band for punch containment.
- Slightly darker for deep rollers (less 3–6k),
- Brighter for techy jungle (more 3k click).
---
6) Mini practice exercise (15 minutes) ⏱️
1. Make a 16-bar loop at 174 BPM: kick + Amen loop + sub bass note.
2. Build the rack and map the 8 macros above.
3. Draw automation:
- Bars 1–8: Weight 30–50%, Air 5–8%, Tightness tight
- Bars 9–12: Weight 60–75%, Air 0–3%
- Bars 13–16: add a ramp on Drive (Macro 5) and Punch (Macro 2), then snap back at bar 17 (even if you don’t have bar 17, practice the “snap”).
4. Export a quick bounce and listen on:
- headphones,
- phone speaker (Drive/Punch will matter),
- and if possible a sub-capable system (Weight/Boom discipline will matter).
Goal: It should feel like the kick is being “performed”, not just repeated.
---
7) Recap ✅
If you want, tell me what style you’re aiming for (94 jungle, modern deep roller, jump-up, techstep) and what kick type you’re using, and I’ll suggest a tailored macro mapping range + a 2-bar kick pattern that fits it.

