Show spoken script
Saving break racks using Arrangement View, beginner Ableton Live lesson. Drum and bass workflow.
Alright, let’s build something you can reuse forever: a break rack that loads fast, sounds like DnB, and already behaves like a real track in Arrangement View, not just a four-bar loop.
The big idea is simple. In drum and bass and jungle, you don’t want to reinvent your break setup every session. You want a repeatable system: slice a break, process it, arrange variations over 8 to 16 bars, then save it properly so next time you’re writing instantly.
Before we touch anything, here’s what we’re making.
A Drum Rack built from a sliced break, a solid DnB processing chain on the rack, a little arrangement structure with a main loop, a variation, and at least one fill, and then we’ll save it at the right “level of done” so it recalls exactly how you want.
Step one: prep the project for DnB speed.
Set your tempo somewhere around 172 to 176 BPM. I’ll pick 174. Turn on the metronome. If you like recording, set a one or two bar count-in.
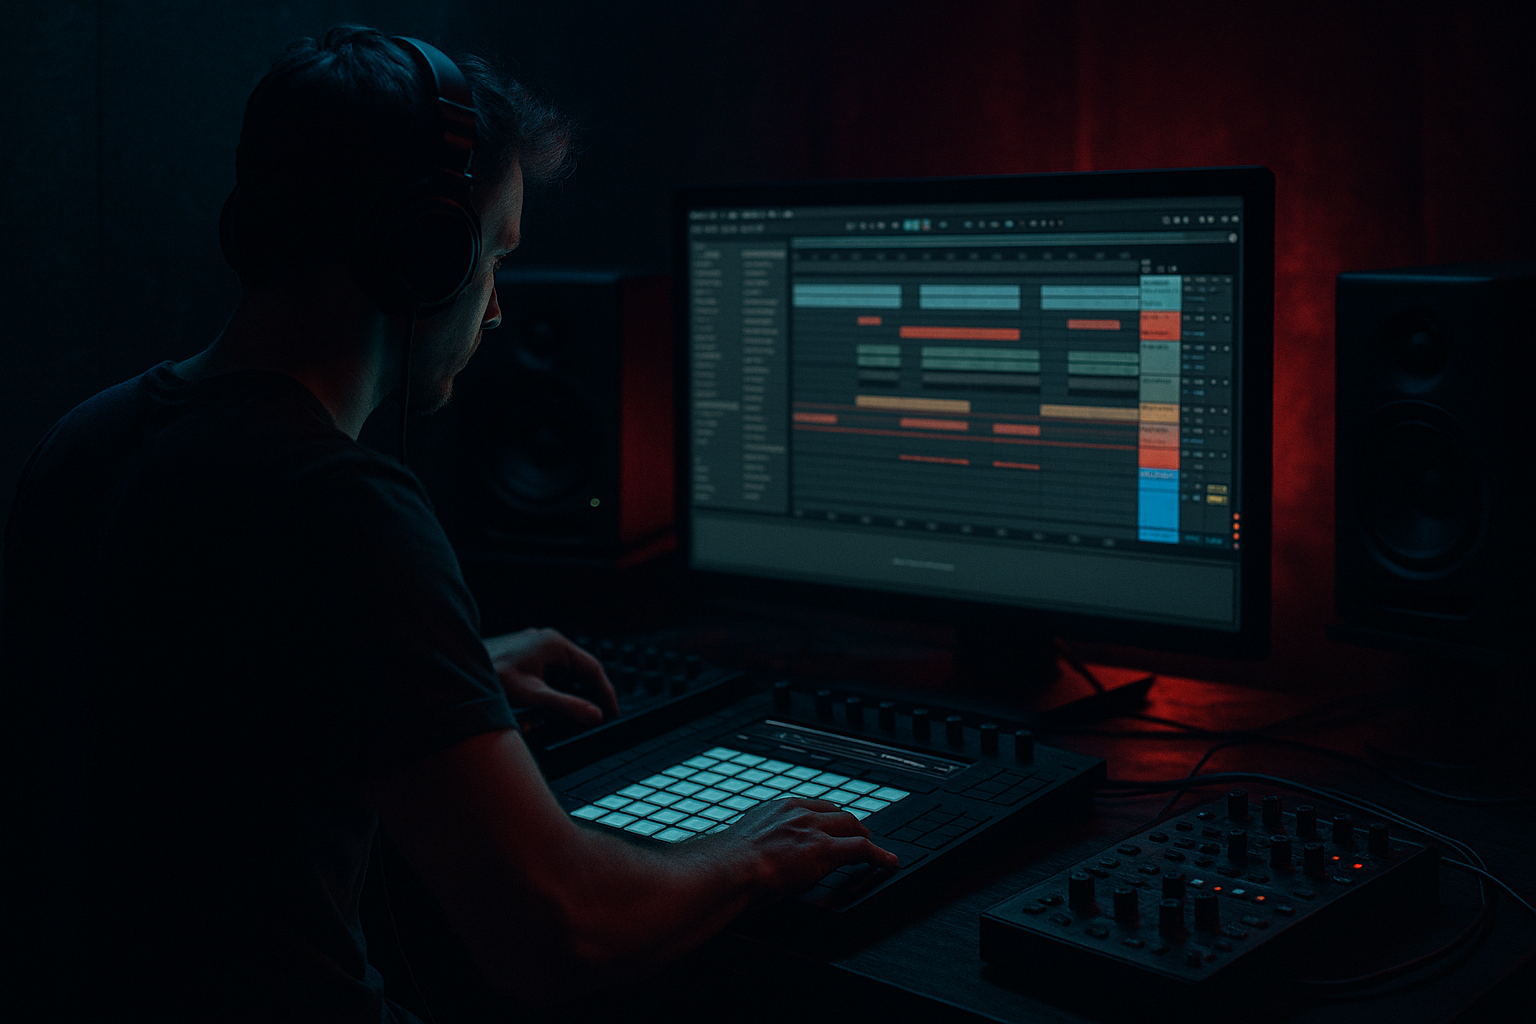
Now switch your brain into Arrangement View mode. This matters because DnB is about phrasing: 8-bar questions and answers, 16-bar momentum, fills into drops. Session View is great for jamming, but Arrangement View is where a loop becomes a tune.
Create a new MIDI track and name it something obvious and reusable, like “BREAK RACK – AMEN STYLE” or “BREAK RACK – THINK.” Naming now saves you later.
Step two: grab a break and slice it to Drum Rack.
Drag your breakbeat audio file into an audio track. Amen, Think, Hot Pants, whatever you’ve got.
Now warp it. Turn Warp on. Make sure the clip actually locks to your grid at your project tempo. If it sounds kind of flammed, messy, or like the hits are smearing against the metronome, don’t ignore it. Fix the warp now, because slicing a poorly warped break just bakes in chaos.
For breaks, start with Warp Mode set to Beats. Preserve Transients. And set Transient Loop Mode to Forward. That usually keeps the bite of the hits.
Once it’s tight, right-click the audio clip and choose “Slice to New MIDI Track.”
For slicing settings, choose Slice By Transients, one slice per transient, and choose the slicing preset that slices to Drum Rack. Ableton will generate a new MIDI track with a Drum Rack where each slice is mapped across pads starting at C1.
Rename that new track with something you’ll actually recognize later. A good starter name could be “BreakRack_Amen_174_Punchy.”
Quick teacher note: this is where a lot of beginners stop and just start clicking notes. But the magic is making this rack behave consistently and saving it in a way that future you can actually find.
Step three: clean up the slices so it plays like a pro rack.
Open the Drum Rack.
First, gain staging. Play a basic pattern or just trigger some hits. Aim for the rack output peaking around minus 10 to minus 6 dB. In DnB, you need headroom because the sub is going to be huge. If you build your drums already smashing the meter, the mix will fight you all day.
Next, choke groups, optional but really useful. If you have hat or ride-like slices that overlap in a weird way, put them in the same choke group so one cuts the other off, like a real closed hat behavior. The goal is to avoid that unrealistic wash where everything rings over itself.
Then check Simpler playback behavior. For classic break slicing, One-Shot mode is usually what you want, because each slice acts like a drum hit.
And tighten tails. If some slices have long ringing endings, shorten the decay, or trim the end point slightly. Breaks can get messy fast, and the cleaner your tails, the easier it is to compress without turning the whole thing into a constant hiss.
Step four: build the DnB processing chain on the rack track.
Important: put these devices on the Drum Rack track itself, not on each pad. We want a consistent “break bus” sound that glues everything together.
Start with EQ Eight.
Add a high-pass filter, 24 dB per octave, somewhere around 25 to 35 Hz to clear sub rumble. If it’s boxy, do a small cut around 200 to 350 Hz, maybe 2 to 4 dB. And if you need a bit of snap, a gentle lift around 3 to 6 kHz can help. Keep it subtle. We’re shaping, not destroying.
Next, Glue Compressor.
Set attack to 3 milliseconds, release to Auto, ratio 4 to 1. Lower the threshold until you see around 1 to 3 dB of gain reduction on the peaks. Then enable Soft Clip. That soft clip is a massive workflow trick for DnB because it controls those spiky transients without you having to slam a limiter.
Next, Saturator.
Use Analog Clip mode. Drive maybe 2 to 6 dB. And then level match your output. Don’t let it get louder and fool you into thinking it sounds better. A good habit is to toggle the device on and off and make sure the perceived loudness stays close.
Then Drum Buss.
Drive somewhere around 5 to 15 percent, Crunch optional, Boom with care. Breaks can get tubby fast. The big one here is Transients. Try plus 5 up to plus 20 depending on the break. This is where you can make the break feel like it’s snapping through the mix.
Optional movement: Auto Filter.
Put a low-pass 12 dB filter and use a very subtle LFO amount, like 5 to 10 percent, with a slow-ish rate like 1/8 or 1/4. This can give your break a tiny sense of evolution over 8 to 16 bars without you doing anything complicated.
Goal check: we want tight, punchy, controlled. Not smashed flat. If you feel like the break got smaller, you probably overcompressed or over-saturated.
Step five: make it musical in Arrangement View.
Now we’re going to actually write this like a DnB track.
In Arrangement View on your break rack MIDI track, create a MIDI clip that’s 8 bars long. Double-click in the lane to create it, then set the loop length to 8 bars.
Program a basic foundation.
Put the main snare on beats 2 and 4. That’s the anchor. Then put a kick on 1, and add another kick before or after the snare depending on the vibe. Then sprinkle ghost notes using other slices from the break. Those tiny in-between hits are what make it roll.
A simple rolling feel starting point is to keep snare on 2 and 4, then add little ghost hits in-between. Don’t stress about exact grid positions at first. Use your ear. The point is: main hits are clear, ghosts are quieter and add motion.
Now duplicate that clip out to 16 bars.
Bars 1 to 8 is your main groove. Bars 9 to 16 is a variation. And here’s the beginner-friendly rule: change just one or two things. Swap a kick slice, add one extra ghost note, or push a hat moment. Small changes read as big energy changes in DnB because the listener is locked into the pattern.
Add a fill at the end of bar 16. One bar. Classic move is a rapid snare slice run or an “Amen turnaround” kind of feel. But the real secret weapon is velocity. DnB breaks live on velocity. Main hits might be around 80 to 115. Ghosts might be as low as 10 to 45. That difference is what gives the groove menace without turning into random machine gun.
Two extra arrangement tricks you can use immediately.
First, call and response phrasing. Make bar 1 stable, bar 2 answers with a tiny twist. Then loop that two-bar phrase across 16 bars. It instantly feels like it’s talking instead of looping.
Second, micro-timing push and pull. Nudge ghost snares a few milliseconds late for swagger, and hats a tiny bit early for drive. Keep it subtle. If you can clearly hear it as a flam, you went too far.
Step six: decide what you’re actually saving.
There are basically three levels.
Level one is sound only. That’s Drum Rack plus your processing chain. Fastest drop-in.
Level two is sound plus controls. That’s the same rack but with macros mapped to the knobs you always touch. This is the best long-term move.
Level three is sound plus song behavior. That’s a whole template: locators, automation lanes, section structure, everything ready.
We’re going to do at least level one, and I’ll strongly recommend level two because it saves you time every single session.
Before saving, do a quick translation check.
Listen quiet. Do the kick and snare still read?
Listen loud. Are the highs painful?
Hit mono. Does it collapse or does it still punch?
Do this check now, then save. Not the other way around.
Now let’s macro-map quickly, beginner style.
Create six macros and name them:
Tone, Snap, Dirt, Glue, Air, and TopsBlend if you set up a parallel tops chain later.
Map Tone to an EQ tilt or filter cutoff.
Map Snap to Drum Buss Transients.
Map Dirt to Saturator Drive.
Map Glue to Glue Compressor threshold or makeup.
Map Air to a high shelf on EQ Eight.
Map Tighten, if you want, could be a gate threshold or a decay control, but keep it simple if you’re new.
Macro map first, then save. That’s the workflow win.
Now saving options.
Option A, drop-in ready chain.
You can drag the Drum Rack device, or the entire device chain, into your User Library so you can load it in any project. Name it clearly with a tag system that you can search later.
Here’s a naming format that actually works:
BRK, then break name, then BPM range, then vibe, then a note like NoBoom or Boomy, then version.
For example: “BRK_Amen_170-176_Tight_NoBoom_v3.”
That way, when you’re five projects deep, you can type BRK and instantly see your whole break toolkit.
Option B, save just the Drum Rack.
Click the Drum Rack title bar so it’s selected, then hit the little save disk icon on the device. Save it into User Library under Presets, Instruments, Drum Rack. This is the most common approach.
Option C, save a template.
If you want your arrangement blocks, automation, and locators to always be there, go to File and choose Save Live Set as Template. Name it something like “DnB_BreakRack_Arrangement_Template_174.”
This is killer if you write a lot, because every new tune starts with momentum.
Two crucial beginner mistakes to avoid before we wrap.
One, saving without the samples. If you move computers or send projects around, you can lose the break audio. Use Collect All and Save from the File menu when you need portability.
Two, no headroom. Don’t mix your break at minus 1 dB. Leave space for bass and mastering.
Quick practice assignment you can do in 15 to 20 minutes.
Slice one break to Drum Rack.
Build your chain: EQ Eight, Glue, Saturator, Drum Buss.
In Arrangement View, write 8 bars main, duplicate to 16, add a one-bar fill at bar 16.
Then save the rack preset with a searchable name, and save the Live Set as “BreakRack_Practice_174.”
Bonus: save an A and B version.
A is clean punch. B is dirtier and more hyped, but output level matched so it only feels more intense because of tone, not because it’s louder.
Recap.
You sliced a break into a Drum Rack, cleaned it up so it behaves, processed it with a DnB-ready chain, arranged it over real phrases with variation and fills in Arrangement View, and saved it so you can reuse it in seconds.
If you tell me what break you’re using and whether you’re aiming for rollers, jump-up, jungle, or halftime, I can suggest a tailored macro set and a 16-bar blueprint that matches that substyle.