Main tutorial
Ruffneck: Bass Wobble Distort in Session View to Arrangement View in Ableton Live 12
1. Lesson overview
In this lesson, you’ll build a dirty, moving bass wobble for jungle / oldskool DnB and learn how to turn a simple Session View loop into a proper Arrangement View performance in Ableton Live 12.
The goal is not just “make bass loud.” The goal is to create a riff-driven, ragga-friendly, rude bassline that evolves over time with distortion, filter movement, and automation. That’s a classic ruffneck DnB vibe: raw, energetic, and a little nasty 😈
You’ll learn how to:
- Create a bass sound with movement
- Add distortion and filtering without destroying the low end
- Use Session View clips to experiment quickly
- Record your clip performance into Arrangement View
- Shape the bass so it works with breakbeats and jungle drums
- A 16-bar bass loop in Session View
- A bass sound made from:
- A simple wobble rhythm that fits oldskool DnB
- A recorded Arrangement View performance with automation
- A bass that leaves space for:
- Oscillator 1: Sine or Saw
- Oscillator 2: Off or very low level
- Filter: Low-pass
- Voices: 1
- Glide/Portamento: Slightly on if you want sliding notes
- Osc 1: Sine
- Filter type: LP24
- Cutoff: around 150–300 Hz to start
- Resonance: 10–20%
- Drive: small amount if available
- Osc 1: Saw
- Lower the filter cutoff
- Add distortion later
- solid sub
- midrange movement
- not too much stereo width
- F
- G
- Ab
- Bb
- C
- Long note on beat 1
- Short note before beat 2
- Stab on the “and” of 2
- Another hit near beat 4
- Use short notes for groove
- Leave space for the snare
- Don’t overcrowd the bar
- Keep the low notes simple and repeatable
- Start with cutoff low
- Rise halfway through the bar
- Drop again at the end
- Add Auto Filter
- Add LFO (Max for Live device if available)
- Map it to cutoff
- 1/2 note
- 1/4 note
- 1/8 note
- Drive: +3 to +8 dB
- Soft Clip: On
- Output: lower it if needed to avoid clipping
- Drive: 10–25%
- Crunch: small amount
- Boom: careful — use sparingly
- Transients: adjust lightly
- Damp: tweak if needed
- Saturator adds controlled harmonics
- Drum Buss adds attitude and thickness
- The filter keeps motion
- The sub stays anchored underneath
- Width: 0% to 60%
- For sub-heavy bass, keep the lowest end very mono
- Use Bass Mono if needed
- Sub = mono
- Top/mid bass = can be slightly wider if needed
- testing loop variations
- changing bass patterns quickly
- recording live automation
- building arrangement ideas without feeling stuck
- Scene 1: low cutoff, cleaner
- Scene 2: cutoff opens, more wobble
- Scene 3: Saturator drive up, more aggressive
- Scene 4: short fill, filtered down for a breakdown
- Clip changes
- Filter sweeps
- Distortion changes
- Mutes and drops
- Bass fills before snare drops
- Intro: filtered bass tease
- Drop 1: main bass riff
- Variation: more distortion or new note pattern
- Breakdown: reduced bass, filtered and tense
- Drop 2: heavier version with extra movement
- Outro: strip back to sub or filtered loop
- Remove the bass for 1 bar before the drop
- Automate filter closing on the last 2 beats
- Add a bass fill before the snare roll
- Introduce a more distorted version after 16 bars
- Kick and snare break should leave room for bass notes
- Avoid bass hits directly on every kick if it muddies the groove
- Let the snare punch through
- shorten bass note lengths
- reduce low-mid resonance
- high-pass the distortion layer slightly
- sidechain lightly if needed
- Use Operator or a sine wave
- Keep it clean
- Mono
- Minimal effects
- Use Wavetable
- Add distortion, filter, wobble
- This layer creates the character
- filter cutoff
- wavetable position
- drive amount
- low drive
- multiband or parallel-style processing if you want controlled aggression
- use it on a duplicate mid-bass track if the main bass gets too messy
- increase Saturator Drive on the last 2 beats before the drop
- pull it back for the next phrase
- use dramatic contrast
- 1-bar bass phrase
- 1-bar answer phrase
- small fills every 4 or 8 bars
- EQ Eight
- Utility
- reduced drive
- shorter MIDI notes
- Sine or saw
- LP24 filter
- medium cutoff
- light drive
- Auto Filter
- Saturator
- Utility
- Clip A: cleaner, lower cutoff
- Clip B: more open, more drive
- open the filter before the drop
- close it during the breakdown
- Does the bass leave space?
- Does the distortion add character?
- Does the arrangement feel like a phrase, not a loop?
- How to build a ruffneck DnB bass wobble
- How to use Session View for fast bass experimentation
- How to add controlled distortion with Ableton stock devices
- How to keep the bass mono, tight, and club-ready
- How to record your Session View performance into Arrangement View
- How to shape the bass so it works with jungle drums and oldskool DnB energy 🎛️🥁
- Sub stays solid
- Midrange gets nasty
- Filter gives motion
- Arrangement gives life
This is beginner-friendly, but the result can sound seriously authentic if you follow the steps carefully.
---
2. What you will build
By the end, you’ll have:
- Wavetable or Operator
- Auto Filter
- Saturator
- Drum Buss or Roar for grit
- Optional Utility for mono control
- breakbeats
- snare on 2 and 4
- sub impact
Think: deep sub foundation + ragged midrange movement + distortion that sounds intentional.
---
3. Step-by-step walkthrough
Step 1: Set up your project for DnB
1. Open Ableton Live 12.
2. Set the tempo to 160–174 BPM.
- For oldskool jungle vibes, try 166 BPM.
- For heavier modern DnB, try 172 BPM.
3. Create a new MIDI Track for the bass.
4. Load a synth:
- Wavetable if you want easy movement
- Operator if you want a cleaner sub-heavy bass
- Analog if you want simple classic tone
For this lesson, I recommend Wavetable because it’s beginner-friendly and great for wobble motion.
---
Step 2: Create the bass sound
Load Wavetable and start with a simple foundation.
#### Wavetable starting point
#### Suggested settings
If you want more attitude, use:
For a jungle-style bass, the sound should have:
Keep it mostly mono.
---
Step 3: Write a simple bass pattern
Now make a basic MIDI clip.
#### Pattern idea
Use a 1- or 2-bar loop at first.
Try notes around:
These work well for dark DnB in keys like F minor or G minor.
#### Example rhythm
Try a pattern like:
This creates a rolling, syncopated vibe instead of a flat sustained bass.
#### MIDI tips
A lot of classic jungle bass is about rhythm and tone, not complicated note writing.
---
Step 4: Add wobble movement with automation
Now we make the bass “wobble.”
There are a few ways to do this in Ableton. For beginners, the easiest is filter automation.
#### Option A: Automate the filter cutoff in the clip
1. Open the MIDI clip.
2. Use the Envelopes tab.
3. Choose Auto Filter > Frequency if Auto Filter is on the track.
4. Draw movement over the clip.
A simple wobble pattern can look like:
This gives the bass a talking, breathing motion.
#### Option B: Use an LFO device
If you have Auto Filter and want more control, you can:
If you don’t want extra devices, manual automation is totally fine.
#### Good wobble rate ideas
For oldskool jungle, a wobble that is too fast can feel modern or dubstep-like. Start with 1/2 or 1/4 notes for a more classic feel.
---
Step 5: Add distortion the right way
This is the key part: distort the bass without killing the sub.
A good chain order is:
1. Wavetable
2. Auto Filter
3. Saturator
4. Drum Buss
5. Utility
#### Saturator settings
Add Saturator after the filter.
Suggested starting values:
Saturator adds harmonic grit and helps the bass cut through breakbeats.
#### Drum Buss settings
Add Drum Buss next for extra weight and crunch.
Try:
Be careful with Boom on bass synths. It can make the low end too fluffy. Use it lightly or not at all.
#### Why this works
That’s the “ruffneck” edge.
---
Step 6: Keep the bass mono and tight
In DnB, low frequencies should usually stay centered.
Add Utility at the end of the chain.
#### Utility settings
If your bass gets too wide, it can weaken the kick and breakbeat impact.
A good rule:
If you use an effect like Chorus or Phaser, apply it very lightly or only to a copied mid layer.
---
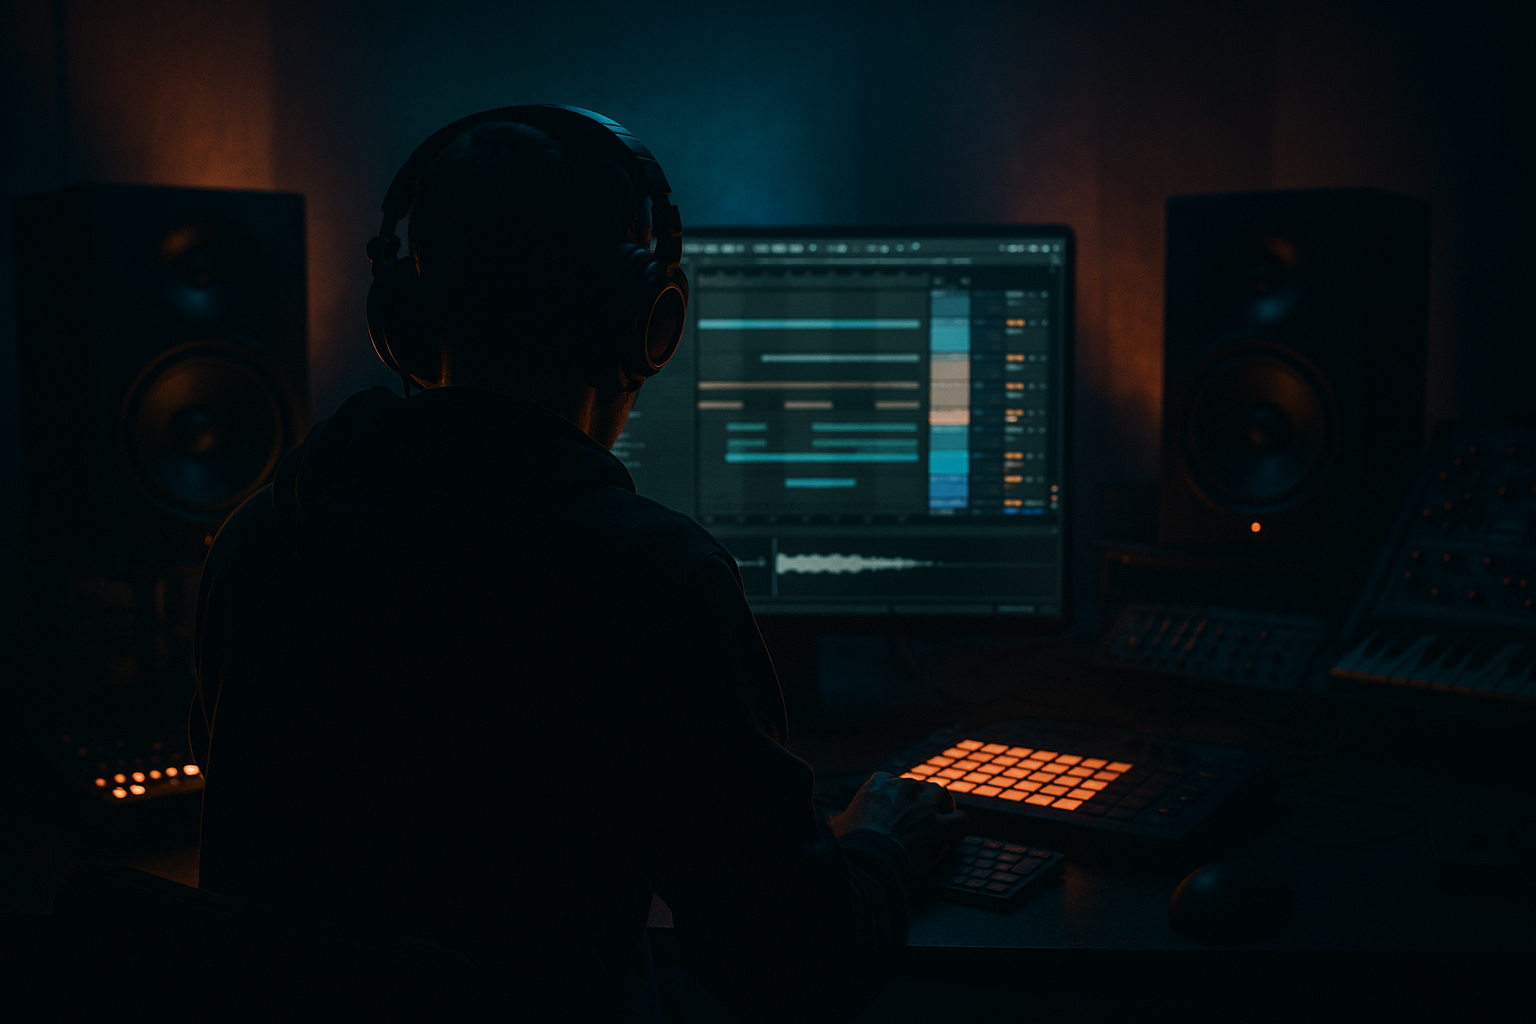
Step 7: Turn the Session View loop into a performance
Now we move into Session View workflow.
#### Why Session View first?
Session View is great for:
#### Do this:
1. Create a bass clip in Session View.
2. Duplicate it into a few scenes:
- Scene 1: dry bass
- Scene 2: more filter open
- Scene 3: heavier distortion
- Scene 4: high-passed or stripped-back variation
Now you can trigger different bass energies like a live set.
---
Step 8: Automate scene changes and effect changes
Use clip variations to make the bass feel alive.
#### Example scene ideas
This is a classic DnB technique: arrangement by energy contrast.
---
Step 9: Record from Session View into Arrangement View
Now the fun bit: capture your performance.
#### Steps
1. In the top transport, enable Arrangement Record.
2. Start launching your bass clips in Session View.
3. Play through your section as if you were performing it.
4. Stop recording.
5. Switch to Arrangement View and inspect the recorded automation and clip changes.
This gives you a real musical arrangement instead of a static loop.
#### What to record
This method makes your track feel human and energetic.
---
Step 10: Shape the arrangement for jungle / oldskool DnB
A bassline in DnB often works best in phrases, not endless repetition.
#### Simple arrangement structure
#### Arrangement ideas
For jungle, tension and release are everything.
---
Step 11: Add drums around the bass
Even though this is a bass FX lesson, the drum context matters.
Classic jungle / DnB drum placement:
If your bass and drums are clashing:
---
Step 12: Optional layered bass approach
If you want a more professional result, split the bass into two layers:
#### Layer 1: Sub
#### Layer 2: Mid bass
This is a very reliable DnB technique because it keeps the low end solid while letting the midrange sound aggressive.
---
4. Common mistakes
1. Distorting the sub too much
If you push distortion hard on the whole bass, the low end can get messy fast.
Fix: keep the sub clean and distort the midrange more.
---
2. Too much wobble movement
If the wobble is constantly changing, it can sound chaotic instead of musical.
Fix: use simple, repeatable motion. Let the groove breathe.
---
3. Bass notes too long
Long notes can clash with breakbeats and make the groove feel heavy in the wrong way.
Fix: shorten note lengths and leave gaps.
---
4. Forgetting mono compatibility
Wide bass sounds cool solo but can disappear or smear in a club system.
Fix: use Utility and keep the low end centered.
---
5. No arrangement variation
A loop is not a track. If the bass never changes, the drop loses impact.
Fix: build scenes and automation differences in Session View, then record them into Arrangement View.
---
6. Filter automation too extreme
If the filter opens too much, the bass may become harsh and lose body.
Fix: automate within a controlled range. Small changes often sound bigger in context.
---
5. Pro tips for darker/heavier DnB
Use resonance carefully
A little resonance gives the bass personality, but too much can make it whistle or thin out the low end.
Add subtle movement with an LFO
If you have a Max for Live LFO, try mapping it to:
Keep depth low for musical movement.
Use Roar for modern grit
In Live 12, Roar can be a killer choice for more advanced distortion textures.
Try:
Automate the distortion, not just the filter
For heavier drops:
Use a call-and-response bass rhythm
Oldskool jungle often feels like a conversation between drums and bass.
Try:
Embrace grit, but control it
A ruffneck bass should sound raw, but not accidental.
If the sound is too wild, tame it with:
---
6. Mini practice exercise
Try this 15-minute exercise:
Exercise goal
Create a 4-bar jungle bass loop with two energy levels.
#### Step 1
Make a bass patch in Wavetable:
#### Step 2
Write a 2-bar MIDI phrase using 3–5 notes.
#### Step 3
Add:
#### Step 4
Create two Session View clips:
#### Step 5
Perform between the clips and record into Arrangement View.
#### Step 6
Add one automation move:
#### Step 7
Play the loop with a breakbeat and ask:
If yes, you’re on the right track.
---
7. Recap
Here’s what you learned:
Core device chain
A strong starting chain is:
Wavetable → Auto Filter → Saturator → Drum Buss → Utility
Core idea
If you want, I can also make you a follow-up tutorial with exact Ableton rack macros for this same bass sound, including a 16-step MIDI pattern and automation map.

