Main tutorial
Lesson Overview
A classic air horn hit is one of those sounds that can instantly pull a DnB track into oldskool territory, but in a sunrise set context it needs more than nostalgia. The goal here is to resample an oldskool DnB air horn hit in Ableton Live 12 and turn it into an emotional, controlled, mix-ready element that feels ravey, uplifting, and a little battered around the edges.
This sits really well in:
- 16-bar breakdowns before a drop
- mid-track switch-ups where you want to reset the energy
- DJ-friendly outro hooks that keep the floor engaged
- sunrise moments where the track shifts from pressure into release ☀️
- a one-shot horn hit with grit, thickness, and controlled brightness
- a short tonal tail that can be automated into a sunrise-style phrase
- a layered impact version for drop starts or rewind-style emphasis
- a processed audio clip you can slice, reverse, pitch, and space out across an 8- or 16-bar section
- a version that works in rollers, jungle-influenced sections, and darker bass music, not just happy rave moments
- a call-and-response cue against drums and bass
- a “hands up” emotional marker before the groove returns
- an oldskool reference with modern mix discipline
- Making the horn too loud
- Leaving too much low-mid buildup
- Over-widening the main transient
- Too much reverb in the drop
- Not checking against the bassline
- Using the same horn every 2 bars
- Transpose the resample down slightly to make the horn feel more ominous. Even -2 or -3 semitones can turn a “rave cheer” into a warning signal.
- Add a parallel dirt layer with Saturator or Redux, but keep it quiet. This gives the horn a gritty edge without destroying clarity.
- Put an Auto Pan on the reverb return only, with slow phase and low amount, for subtle movement in a halftime or atmospheric section.
- Use frequency slotting with your reese: if the bass lives around 120–400 Hz, keep the horn’s body lean and let its presence come from the upper mids.
- For darker sets, filter the horn so it lands more like a haunted memory than a festival scream. A low-pass opening into the hit can be very effective.
- Use a reverse reverb pre-hit on a separate track to create tension before the horn lands. This works brilliantly before a switch-up or a DJ-friendly drop.
- In neuro or heavy rollers, keep the horn extremely brief and make it more of a texture accent than a melody. That way it adds character without stealing focus from the drums and bass.
- one before a drop
- one in a breakdown
- one as a call-and-response with a breakbeat fill
- Which version still hits hardest?
- Which one feels most emotional?
- Which one would actually work in a real DnB arrangement?
- Resample the horn so you can shape it like a real DnB hook, not just a raw sample.
- Keep the transient centered, the tail controlled, and the low-mid cleaned up.
- Use EQ Eight, Saturator, Drum Buss, Echo, Reverb, Auto Filter, and Utility as your core Ableton tools.
- Place the horn with intention: breakdown lift, switch-up cue, or DJ-friendly transition.
- Think like a mastering engineer early: headroom, mono compatibility, and frequency space matter.
- For sunrise emotion, let the horn bloom; for darker rollers, let it menace.
Why this matters in DnB: a raw horn sample is often too sharp, too dry, or too “sample-pack obvious” on its own. In drum & bass, the impact comes from how you place it in the arrangement, how you carve its midrange, and how you automate tension around it. Resampling lets you turn a simple hit into a musical texture: part hook, part atmosphere, part emotional signal.
This is also a mastering-minded workflow. Even though you’re designing the sound inside the arrangement, you’re thinking like a finisher: headroom, mono compatibility, transient control, and how the horn sits against a sub-heavy mix. If the horn dominates the wrong frequency range, it’ll flatten your drop. If it’s shaped well, it becomes a signature moment that translates on club systems and headphones alike.
What You Will Build
By the end, you’ll have a resampled air horn hit chain that sounds like a convincing oldskool rave reference, but with a cleaner modern DnB arrangement around it.
Specifically, you’ll build:
Musically, the result should feel like:
Step-by-Step Walkthrough
1. Find or create the source horn and place it in a clean context
Start with a simple horn source. In Ableton, this can be:
- a sampled air horn hit
- a short synth brass stab made with Wavetable or Operator
- a ripped oldskool-style one-shot from your own library
Put the sound on an audio track and loop a section where the horn lands on its own, without bass competing underneath. If you’re working from a rough project, solo the horn and a basic drum loop so you can judge its tone.
Important DnB context: don’t resample the horn while the whole mix is smashing unless you want that exact dirty print. For a sunrise set emotion, you want a horn that has weight but still breathes.
Practical starting points:
- trim the clip so the horn starts exactly on the transient
- leave about 100–250 ms of tail if the source has character
- set clip gain so the peak is not clipping before processing
If you’re using a synth source, try:
- Wavetable with a saw-based patch and a narrow pitch envelope
- short decay, moderate sustain, and a fast attack for a punchy brass-like stab
- then bounce it to audio so you can resample it like a real oldskool hit
2. Shape the horn tone before the resample
Before printing audio, put a processing chain on the horn track using stock Ableton devices. A strong starting chain is:
- EQ Eight
- Saturator
- Drum Buss
- Utility
Suggested settings:
- EQ Eight: high-pass around 120–180 Hz to remove useless low rumble
- small dip around 300–500 Hz if it feels boxy
- gentle boost around 2–4 kHz if the horn needs bite
- Saturator: Drive around 2–6 dB, Soft Clip on
- Drum Buss: Drive around 5–15%, Crunch low to moderate
- Utility: reduce gain if the chain gets too hot, and keep bass mono if needed
Why this works in DnB: horns compete with snare crack, reese harmonics, and atmospheric mids. If you let the horn hold too much muddy low-mid, it will fight the break and blur the groove. DnB production needs clear midrange hierarchy.
At this stage, ask: do I want the horn to feel:
- bright and celebratory
- dark and warning-like
- distant and hazy
- close and aggressive
That decision will guide your resample.
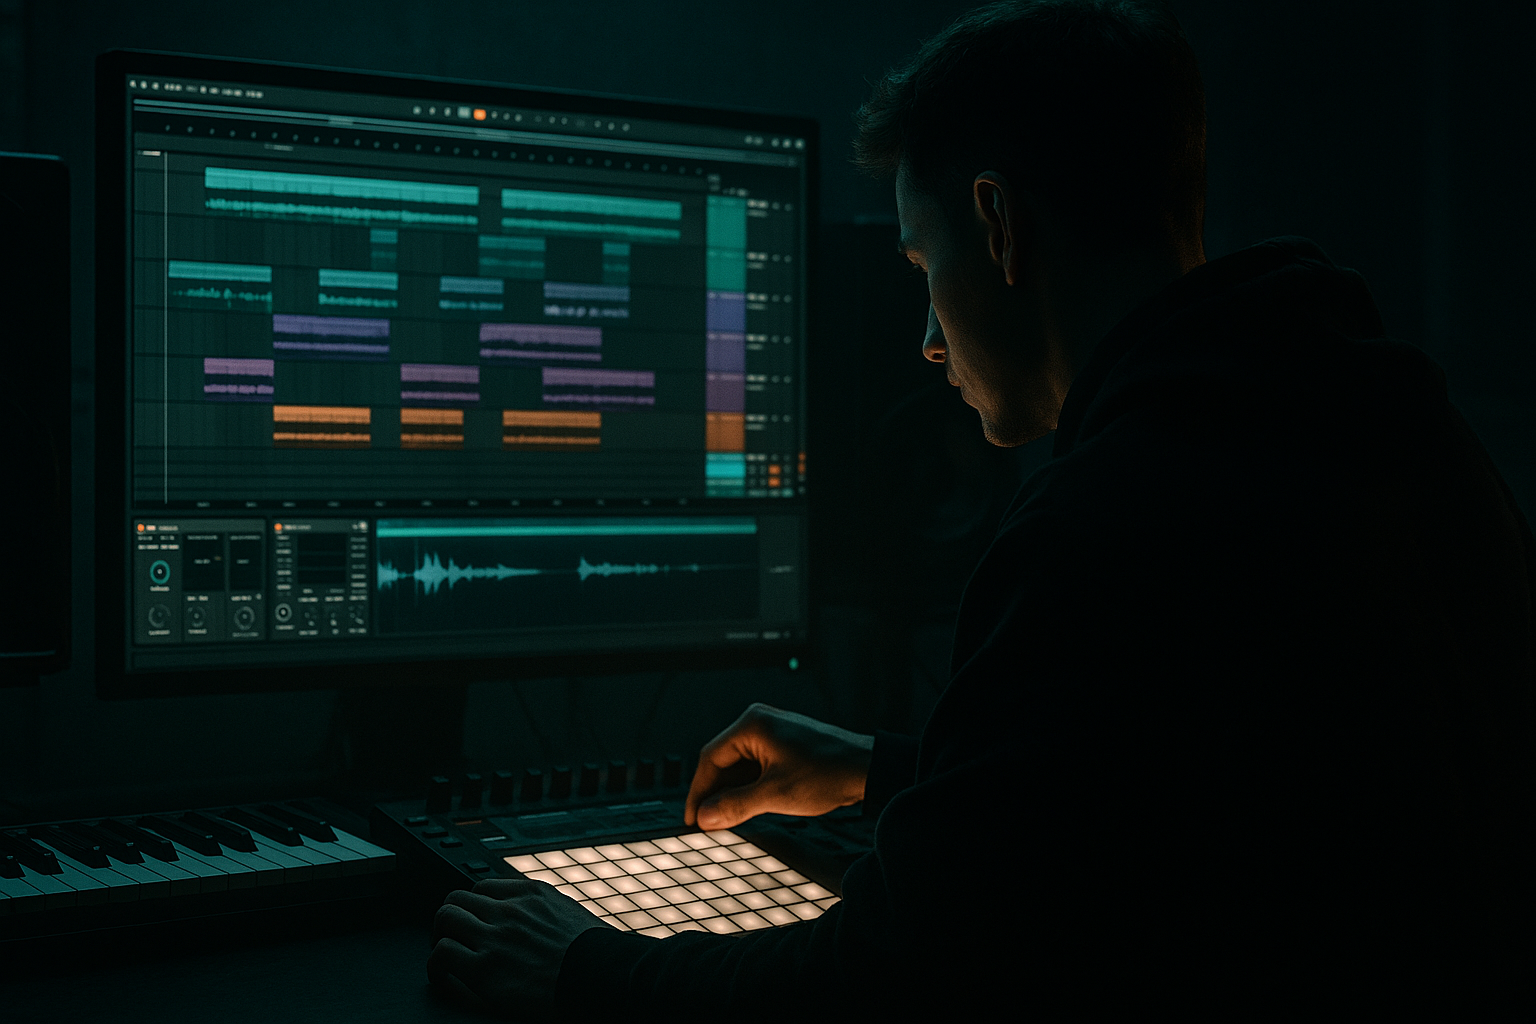
3. Resample the horn into a new audio track
Create a new audio track and set its input to Resampling. Arm the track and play the horn through your processing chain. Record a few hits:
- one dry-ish pass
- one with extra saturation
- one with any automation moves you plan to use
Record at least 4–8 hits so you can choose the best print later. You want variation because the best DnB hooks often come from slightly different resampled versions, not just one static sample.
After recording:
- consolidate the best hit with Cmd/Ctrl + J
- rename it clearly, such as `Horn_Resample_01`, `Horn_Grit_02`, `Horn_SunriseTail`
- color-code it for quick navigation
Intermediate workflow tip: keep the resample track in the project even after printing. That way, you can always revisit the chain if the mix direction changes later.
4. Build a more emotional tail using audio processing and automation
Now you’ll turn the horn from a simple hit into a musical event. On the resampled audio clip, add:
- Reverb
- Echo
- Auto Filter
- optionally Hybrid Reverb if you want a smoother spacious tail
Suggested parameters:
- Reverb: Decay 1.2–2.8 s, Dry/Wet 8–20%
- Echo: Delay Time around 1/8D or 1/4, Feedback 15–35%
- Auto Filter: automate a low-pass opening from roughly 500 Hz to 8–12 kHz
- set the filter envelope subtly if the horn needs more movement
For sunrise emotion, automate the tail so it blooms into the next phrase:
- start slightly filtered and narrow
- open it over 1 or 2 bars
- send it into a wide reverb as the drums thin out
If you want more control, use Return tracks for reverb and echo. That keeps the dry horn punch intact while letting the spacious tail live separately.
Arrangement idea: place the horn at the end of an 8-bar breakdown, then let the echo/reverb return fill the gap right before the drop or the next drum variation. This creates a DJ-readable cue and a real emotional lift.
5. Make it fit the track with resampling layers
One horn hit is useful, but a layered resample is where it starts sounding like a record. Duplicate the audio clip and make three versions:
- Version A: Dry punch
- little or no reverb
- keep the transient sharp
- place this on the main downbeat for emphasis
- Version B: Wide tail
- add more echo/reverb
- automate a longer fade
- use it before a breakdown or switch
- Version C: Character layer
- transpose down -3 to -7 semitones for weight
- or transpose up +3 to +5 semitones for urgency
- warp carefully if needed, but keep the transient clean
You can also create a layer by bouncing the horn through Redux very lightly:
- Downsample subtly for texture
- Mix it low, around 5–15%
- Use it as grit, not as the main tone
In a DnB arrangement, this layered approach helps the horn survive different sections:
- in the drop, it should be a short accent
- in the breakdown, it can be wider and more emotional
- in the intro/outro, it can be filtered and DJ-friendly
6. Place the horn rhythmically with drums and bass
The horn should talk to the groove, not sit randomly on top of it. Put it into a context with:
- a breakbeat loop
- a sub or reese bass
- a simple atmospheric pad or noise layer
Try these placement ideas:
- horn on the last beat of bar 8 before a section change
- horn on beat 1 with a snare pickup before it
- horn in a call-and-response with a snare fill or tom pattern
- horn answer after a bass phrase ends
For rollers and jungle-influenced energy, use the horn sparingly and let the drums keep moving. For darker bass music, place the horn against a more restrained arrangement so it becomes a warning flare rather than a party chant.
If the horn clashes with the snare or reese, make room:
- use EQ Eight to carve a small notch where the horn and snare fight
- automate the bass out for a moment
- mute or thin the hats around the horn hit if the midrange is crowded
This is a mastering-minded move because your arrangement is already doing some of the balancing work before the mixdown stage.
7. Control stereo width and mono compatibility
Oldskool horns can sound huge when wide, but DnB master chains punish messy stereo. Use Utility and EQ Eight to control this carefully.
Suggested workflow:
- keep the main horn transient mostly centered
- widen only the tail or echo return
- use Utility Width around 80–120% on the wide layer, not the main hit
- check the horn in mono to make sure it still reads
If the stereo tail feels unstable, try:
- high-passing the side content with EQ Eight on the return
- reducing reverb low end
- shortening delay feedback
Why this matters in DnB: a horn that sounds massive in stereo but collapses in mono will disappear on club systems or create phase weirdness with the snare and bass. A good sunrise horn feels wide, but the core impact is solid in the center.
8. Final polish for mastering awareness
Even though this is a sound-design lesson, think like a mastering engineer in the arrangement stage.
Check:
- does the horn peak too hot against the snare?
- is there too much 2–5 kHz harshness?
- is the reverb tail swallowing the kick/sub?
- does the horn trigger too often and become fatiguing?
Use these stock devices if needed:
- Compressor or Glue Compressor for gentle control on the horn bus
- EQ Eight to tame harshness around 3–6 kHz
- Limiter only for emergency peak control, not as a creative crutch
Good practical target:
- leave enough headroom so your master bus isn’t reacting to every horn hit
- if the horn needs to feel louder, often the fix is less low-mid and more contrast, not more gain
At this stage, bounce the final horn group if it’s working well. Having a committed audio version helps you finish the track faster and prevents endless tweaking.
Common Mistakes
- Fix: turn it down and make the arrangement thinner around it. In DnB, contrast sells the hit better than raw volume.
- Fix: use EQ Eight to cut mud around 250–600 Hz. This is where horns can make the mix cloudy fast.
- Fix: keep the attack centered and widen only the tail or return effects.
- Fix: keep the dry horn punch short in the drop and save bigger space for breakdowns and transitions.
- Fix: mute the bass for the horn moment, then bring it back and see if the hook still reads. If not, simplify the tail or shorten the note.
- Fix: vary placement, filter state, and tail length so it feels intentional, not looped.
Pro Tips for Darker / Heavier DnB
Mini Practice Exercise
Spend 10–20 minutes making three horn versions from one source sample in Ableton Live:
1. Make a dry punch version with EQ and light saturation.
2. Make a wide sunrise version with delay, reverb, and filtered automation.
3. Make a dark tension version pitched down with grit and a shorter tail.
Then place each one in a different 8-bar context:
Finally, do a mono check and ask:
Keep the best one, delete the weak one, and commit the sound to audio.

