Main tutorial
Lesson Overview
This lesson is about building a ragga cut rebuild for oldskool rave pressure in Ableton Live 12, using resampling as the main engine. In Drum & Bass, this kind of workflow is gold when you want that chopped, vocal-led energy that sits somewhere between jungle, roller attitude, and rave stabs — but still feels modern and heavy.
A ragga cut rebuild is not just “throw a vocal over drums.” It’s the process of taking a vocal phrase, slicing it into playable parts, re-phrasing it like an instrument, then resampling the result into new textures you can arrange into a full DnB drop. That matters because DnB thrives on movement, call-and-response, contrast, and momentum. A vocal cut can act like the hook, the percussion, the transition tool, and the atmosphere all at once.
This technique fits especially well in:
- Intro sections to establish identity before the drop
- First-drop hooks where you want oldskool rave energy without overcrowding the mix
- Switch-ups after 16 or 32 bars to reset attention
- Breakdowns / second drops where you can flip the vocal into darker, more degraded forms
- a tight vocal chop hook
- a resampled call-and-response layer
- a lo-fi rave texture pass with grit and stereo movement
- a version that sits over:
- a short drop-ready arrangement with tension/release and a DJ-friendly intro/outro
- chopped ragga phrases on top of breakbeats
- short vocal hits answering the snare or bass stabs
- a gritty resampled layer that can be automated into fills and transitions
- enough structure to drop into a 174 BPM DnB track without sounding crowded
- short, punchy phrases
- strong “t”, “k”, “p”, “d”, “r” sounds
- a human swing that can lock to drums
- enough character to survive heavy processing
- Complex Pro for full phrases with tone
- Beats for choppier material
- Texture if you want a more smeared, grainy edge
- Warp markers should tighten phrase timing, but don’t over-grid it immediately
- If the vocal is loose, align the first strong transient to the bar
- Trim silence tightly so the clip starts cleanly
- Transient if the vocal has obvious words and attacks
- 1/8 or 1/16 if you want more controlled rhythmic chopping
- Rename pads by syllable or phrase if needed
- Group pads that belong to a call-and-response idea
- Use MIDI notes to trigger fragments like:
- leave space on beat 2 and 4 for the drums to breathe
- use offbeat vocal hits to answer the hi-hats
- place longer words at the end of bar 2 or bar 4 as a hook payoff
- EQ Eight: high-pass around 120–180 Hz to keep the low end clean
- Saturator: Drive around 2–6 dB, with Soft Clip on if needed
- Drum Buss: Drive around 5–20%, Boom low or off if the vocal gets muddy
- Auto Filter: for movement and transition sweeps
- Utility: reduce width or force mono if the chop needs to stay focused
- Rate: 1/2 or 1 bar
- Amount: 10–25%
- Phase: 0° if you want more rhythmic movement than stereo swirl
- time: 1/8 or 1/8 dotted
- feedback: 10–25%
- filter the repeats so they don’t clutter the lead phrase
- move the Auto Filter cutoff between roughly 200 Hz and 6 kHz
- increase Saturator drive during phrase peaks
- mute and unmute certain slices to create gaps
- automate Dry/Wet on Echo if you want dubby tails on transitions
- consolidate the best bars
- cut out weak sections
- warp again if needed
- use fades to remove clicks at chop boundaries
- the main hook
- a higher, thinner response layer
- a degraded fill layer
- a transition/impact layer
- use Transient slicing for editable chunks
- then place the strongest hits on the grid
- bar 1 = vocal call
- bar 2 = answer or repeat
- last half-bar = fill or echo tail
- phrase hit
- phrase hit again an octave up or with more filtering
- a tail chopped into a one-shot
- a reverse or pre-hit leading into the snare
- Frequency: around 200–500 Hz range emphasis by taste
- Spray: low to moderate
- Dry/Wet: 5–15%
- drum break or layered break
- sub
- midbass / reese
- vocal hook
- stabs or FX accents
- if a chop lands right on the snare, either commit to it as a unison hit or move it slightly earlier/later
- use ghost notes in the break to answer the vocal rhythm
- let the vocal occupy spaces the kick and snare don’t fully dominate
- use Utility on bass if needed to mono the low end
- keep the sub clean below about 100–120 Hz
- if you have a reese, carve a small pocket around 1–3 kHz in the vocal if the vocal is too forward
- intro: ragga phrase + filtered break
- drop 1: sub hits on the downbeat, vocal cut answers every 2 bars
- bar 9: switch-up with half-time vocal stabs
- bar 17: fuller call-and-response with more bass movement
- Bars 1–8: intro groove, filtered vocal fragments, drum tease
- Bars 9–16: first drop statement, vocal hook in full
- Bars 17–24: variation with gap, fill, or bass switch
- Bars 25–32: denser version or call-and-response climax
- automate Auto Filter opening across 8 bars
- add reverb sends only on the end of phrases
- use Reverse or Consolidate + reverse for pre-drop tension
- place a fill in the last half-bar before section changes
- EQ Eight: remove low rumble, cut harshness if needed
- Compressor: gentle glue, around 2–4 dB gain reduction
- Utility: use width control if the layer feels too wide
- Saturator or Roar if you want controlled grit and harmonic density
- reduce 3–6 kHz slightly
- tame resonances with narrow EQ cuts
- shorten reverbs
- keep delays filtered
- layer a second resample with more distortion
- add a very short room reverb
- automate filter movement so the phrase breathes
- Resample through grit in layers: do one clean pass, one saturated pass, one crushed pass. Blend them instead of over-processing a single take.
- Use call-and-response with bass: let the vocal hit on one bar, then answer with a reese movement or sub drop on the next.
- Clip envelopes matter: tiny fades at the start/end of slices stop clicks and make the chop feel tighter.
- Use Echo as a rhythmic shadow: filtered repeats around 1/8 can create space without washing out the front of the mix.
- Make the vocal “duck” into the drums: a small amount of compression or volume automation can let the snare stay dominant.
- Flip brightness between sections: brighter cut in the intro, darker and band-limited in the drop for contrast.
- Print a degraded version for switch-ups: resample with more distortion, lower sample feel, or stronger filtering for the second drop.
- Keep the sub unwavering: the ragga cut can go wild up top, but the sub should stay simple and locked to the groove.
- Use Drum Rack returns for performance: if you trigger vocal slices live, you can record spontaneous phrasing and then resample the best take.
- Automate the hook’s bandpass: a bandpass-like feel using Auto Filter can make the vocal sound more “ravey” and oldskool when moving from intro to drop.
- Slice a strong ragga vocal into playable chunks in Ableton Live 12.
- Build a rhythm first, then resample it to commit the energy and grit.
- Rebuild the resampled audio into a hook, response layer, and fill layer.
- Keep the vocal locked around the drums and out of the sub range.
- Use stock Ableton devices like EQ Eight, Saturator, Drum Buss, Auto Filter, Echo, Utility, and Compressor to shape attitude and clarity.
- In DnB, this works because call-and-response, repetition, and tight rhythmic phrasing create instant pressure and movement.
Why it matters in DnB: the genre often needs a fast-arriving payoff. A ragga cut rebuild gives you a way to create immediate personality with very little source material. One short vocal can become a full rhythmic and tonal system, and resampling lets you turn performance ideas into committed audio that you can warp, chop, and process with purpose.
---
What You Will Build
You’ll build a ragga-style chopped vocal system that works like a DnB instrument:
- sub-heavy roller bass
- break-edited drums
- oldskool stab accents
By the end, you should have a loop that feels like:
---
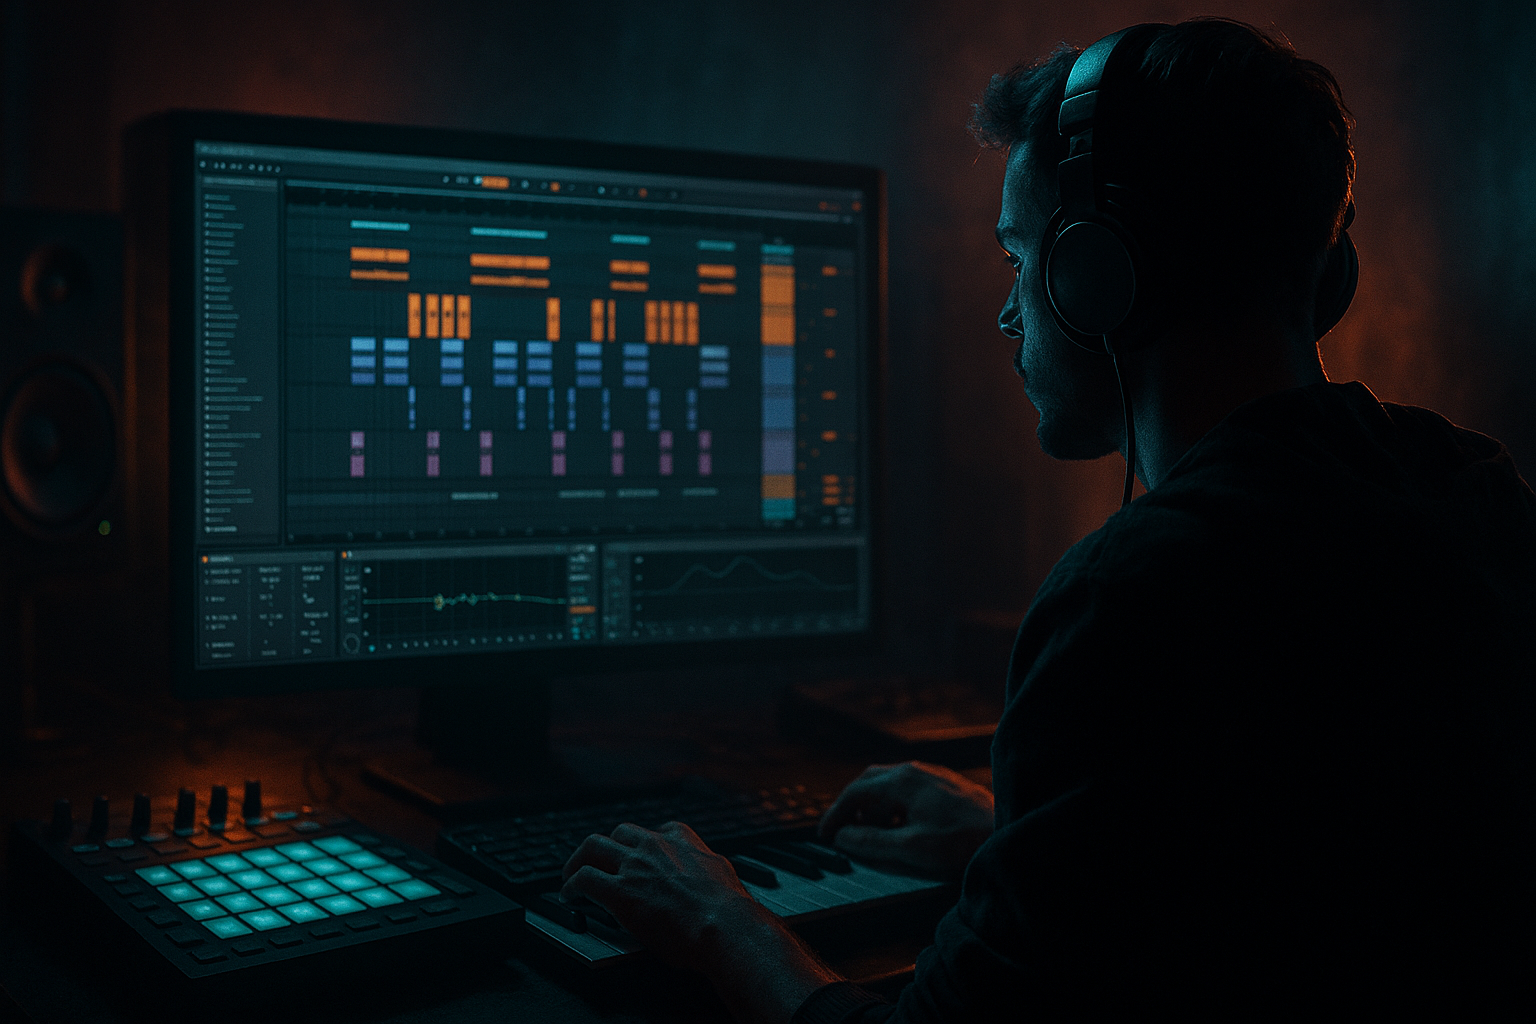
Step-by-Step Walkthrough
1) Pick the right vocal source and prep it for slicing
Start with a vocal that has clear consonants, short phrases, and attitude. Ragga cuts work best when the source already has rhythm in it: shouts, phrases, calls, crowd-style words, or sung snippets with strong syllables.
Good source traits for DnB:
Drag the audio into an Ableton audio track and set the project around 174 BPM if you’re building standard modern DnB. Warp the vocal and choose a mode based on the source:
Practical settings:
For this workflow, keep a duplicate of the raw vocal in an “Originals” track. You’ll thank yourself later when you need to resample a different pass.
2) Slice the vocal into a playable instrument
Right-click the vocal clip and choose Slice to New MIDI Track. For ragga cuts, a useful slicing method is:
Ableton will create a Drum Rack with slices mapped to pads. This is ideal because you can now program the vocal like a drum break.
Suggested workflow:
- short pickup
- main phrase
- alternate tail
- breath or shout
- repeat hit
Now program a 1-bar loop that feels like a drum pattern. Think in terms of conversation with the snare:
Why this works in DnB: the genre already relies on rapid rhythmic detail. When vocal slices become percussive, they naturally interlock with breakbeats and bass syncopation without needing big harmonic movement.
3) Shape the sliced chops with stock devices before resampling
Before you print anything, process the Drum Rack return or the sliced track so the vocal has a clear identity.
A strong stock chain:
Use EQ Eight to cut boxy low mids around 250–500 Hz if the vocal clouds the snare or break. If there’s harshness, a narrow dip around 2.5–5 kHz can make the chop sit better.
Add Auto Pan for movement, but keep it subtle:
For oldskool rave pressure, you can also add a very light Echo:
The goal here is not final polish. The goal is to make the chop feel exciting enough to resample.
4) Resample the processed chops into a new audio lane
Create a new audio track and set its input to Resampling. Arm it and record a few passes of your sliced vocal pattern while you tweak device parameters in real time.
This is the core move.
Do at least two passes:
1. A cleaner pass with minimal movement
2. A more aggressive pass with filter sweeps, saturation changes, and clip starts varied
While recording, perform small changes:
After recording, you now have audio that’s been “performed” into shape. This makes the phrase feel more like a finished hook and less like a preset slice sequence.
Then go into the resampled clip and tighten it:
This is where the sound starts becoming custom. Resampling also commits the grime, which is useful in DnB because the edge often disappears when you keep everything live and overly editable.
5) Rebuild the resampled audio into a hook and fills
Now take the resampled audio and treat it like a new source. This is where the “rebuild” happens.
Duplicate the audio track and create separate lanes for:
You can do this by slicing the resampled clip again:
Create a 2-bar phrase where:
For a ragga-oldskool feel, use short repeats like:
If the vocal hook needs more edge, use Grain Delay very subtly on a duplicate:
This can add a dusty rave smear without turning it into chaos.
Keep the original hook simple. The “rebuild” layer is what makes it feel like a full production rather than a loop.
6) Lock the vocal against the drums and bass
Now build the DnB foundation underneath the vocal rebuild.
Use a classic structure:
For drums, keep the vocal from fighting the snare:
For bass, make sure the vocal doesn’t mask the important midrange:
A good musical context example:
That arrangement keeps the vocal from overstaying its welcome while still giving it “headline” status.
7) Create a heavy, DJ-friendly arrangement from the loop
Turn the loop into a proper DnB section with clear tension and release.
A practical 32-bar idea:
Use arrangement tools:
For oldskool rave pressure, don’t overcomplicate the drop. The vocal should function like a chant or command. The energy comes from repetition, spacing, and contrast, not from constant variation.
8) Polish the resampled layers and keep the mix clean
Now refine the audio so it sits with the rest of the track.
On the vocal bus:
If the resampled layer feels too edgy:
If it feels too flat:
Do regular mono checks on the vocal bus and bass bus. In DnB, stereo excitement is useful, but the important rhythmic anchor should still survive mono playback.
---
Common Mistakes
1. Over-slicing the vocal until it loses identity
Fix: keep one or two phrases recognizable. Ragga cuts need a human signature.
2. Letting the vocal fight the snare and bass
Fix: carve space with EQ Eight and arrange the chops around the drum accents.
3. Resampling too early before the idea works
Fix: establish a strong slice pattern first, then print it.
4. Too much reverb on the main hook
Fix: keep the lead vocal short and dry-ish; use tails only on transitions.
5. Ignoring low-mid buildup
Fix: cut mud around 250–500 Hz on the vocal bus if the mix gets cloudy.
6. Making everything wide
Fix: keep the hook focused, and let width live in selective FX layers.
7. Not giving the vocal a role in the arrangement
Fix: decide if it’s the main hook, a response layer, or a transition tool. Don’t make it all three at full intensity all the time.
---
Pro Tips for Darker / Heavier DnB
---
Mini Practice Exercise
Spend 15 minutes building a ragga cut rebuild from scratch:
1. Find one short vocal phrase or shout.
2. Slice it to a Drum Rack using Transient or 1/16.
3. Program a 2-bar rhythm with at least 5 different slices.
4. Add EQ Eight, Saturator, and Auto Filter to the slice chain.
5. Resample one full pass while automating filter cutoff and saturation drive.
6. Chop the resampled audio into 3 reusable pieces:
- main hook
- response hit
- fill/transition tail
7. Place the hook over a simple 174 BPM drum loop and a sub note pattern.
8. Check mono and reduce anything that blurs the kick/snare or sub.
Goal: by the end, you should have one loop that feels like a real DnB drop element, not just a vocal sample.
---

