Main tutorial
1. Lesson Overview
Goal: Learn how to take a pre-recorded “Kanine rain ambience,” tighten it up, and arrange it inside Ableton Live 12 so it supports a late-night drum & bass roller with weight and clarity. You’ll import and warp the sample, remove competing low-end, tighten its dynamics and timing so it sits under drums and bass, add controlled space using returns, and arrange the ambience so it pushes the track without washing out the low frequencies.
This lesson stays focused on "Kanine rain ambience: tighten and arrange in Ableton Live 12 for late-night roller weight" and uses only Ableton stock devices and simple sampling workflows suitable for a beginner.
2. What You Will Build
A small working arrangement (8–32 bars) where a Kanine rain ambience sample:
- is tempo-synced and optionally sliced for rhythmic interplay,
- is EQ’d and tightened with compression/sidechain so it doesn’t clash with kick/sub,
- is given controlled spatial depth via return channels (short plate-style reverb + subtle delay),
- is automated for energy across intro → roller loop,
- and sits as a supportive texture beneath a simple DnB drum/bass pattern to create late-night weight.
- Ambience (audio track with Simpler/Sampler or warped clip)
- Ambience Send(s) (Hybrid Reverb & Echo return channels)
- Drums (placeholder for sidechain source)
- Bass (reference for EQ decisions)
- Ambience Group (optional for parallel processing)
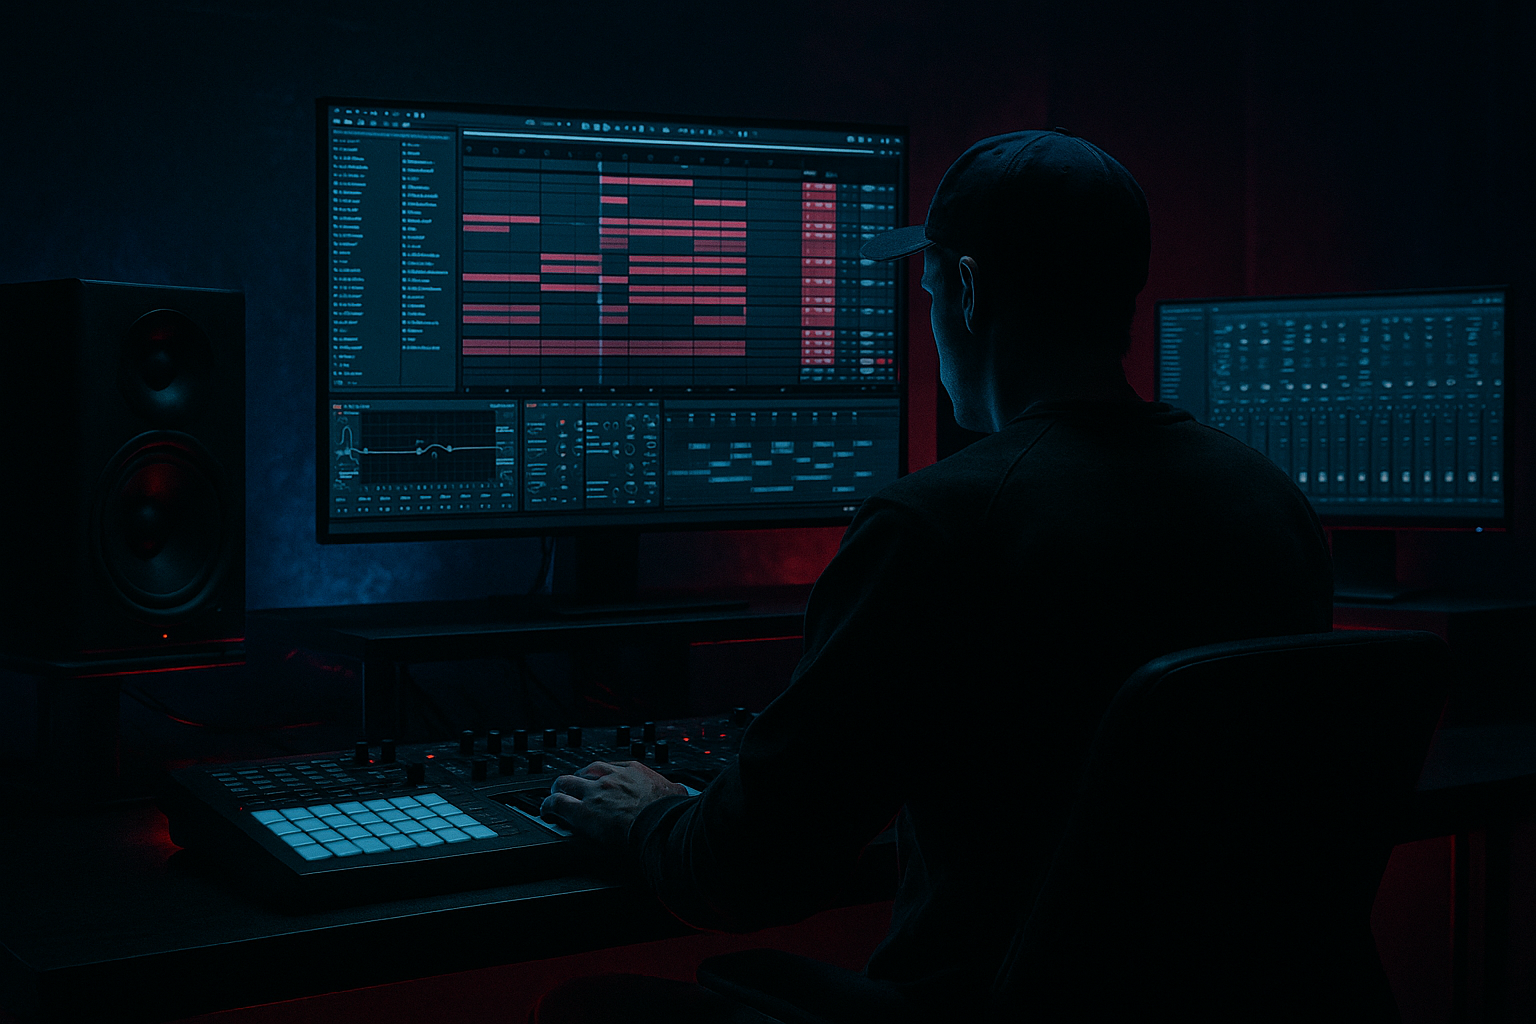
- Drag the Kanine rain ambience WAV into an empty audio track.
- Double-click clip and enable Warp. Set the clip’s tempo to your project tempo (e.g., 174–176 BPM for rollers).
- Choose Warp mode: start with Complex Pro for long sustained ambience to preserve character. If you want rhythmic chopped textures later, you can switch to Beats or load into Simpler Slice mode.
- If the sample has a long intro tail, zoom and set a sensible Loop brace or trim the clip start so it begins where useful.
- Insert EQ Eight after the clip. Use a high-pass filter and sweep from 30 Hz up to around 100–160 Hz to remove rumble that competes with sub-bass.
- Insert Utility after EQ for mono low-end: set Width to 100% for the whole track but automate or set a Low/High split using a grouped duplicate (see Step 7). For beginners: keep the whole ambience but later add a duplicate for mid/side if needed.
- Place Compressor (stock) after Utility. Use sidechain later; for now, set a gentle ratio (2:1), attack 10 ms, release 200 ms, threshold so gain reduction reads 1–3 dB to slightly glue the tail.
- For a more “tight” feel, follow with Glue Compressor: medium attack (10–20 ms), fast release (0.1–0.5 s), 2–4 dB gain reduction—this helps the ambience sit more consistently under dynamic drums.
- Add Saturator after Compressors. Use Soft Sine or Analog Clip, drive lightly (+2–4 dB) and bring Output down if it clips. This helps the ambience cut through without adding overt loudness.
- Optionally add Redux lightly for subtle lo-fi texture if you want night-time grit.
- Create two Return tracks: A = Hybrid Reverb (short plate-ish settings), B = Echo (subtle slap/tempo delay).
- Send the Ambience track to these returns at low levels (5–20% wet). Short, dark reverb keeps things tight and late-night instead of washed out.
- Add another Compressor on the Ambience track (or use one instance for the main sidechain slot). Enable Sidechain, choose the Kick drum track as input (or a copy of Kick).
- Settings: ratio 3:1–4:1, attack 5–10 ms, release 120–220 ms. Threshold to taste until the ambience ducks clearly on kicks but recovers quickly. This creates rhythmic breathing with the drums—essential for roller weight without masking the low-end.
- If you have a snare/backbeat that should also duck ambience, route a summed drum group to the sidechain input.
- Option A — Simpler (Slice mode): Drag the audio to a MIDI track’s Simpler and choose Slice. Simpler will slice transients. Program a simple MIDI pattern to trigger short slices locked to the groove (helps create rhythmic texture).
- Option B — Sampler/Clip automation: Use Clip Envelopes (Sample Start) to shift starting point rapidly for choppy rhythms. Use short fades to avoid clicks.
- When using slices, use a short low-pass filter and envelope (in Simpler): decay 300–600 ms for pads or longer for sustained atmosphere.
- Duplicate your Ambience track and name one “Ambience_Lows_Mono” and the other “Ambience_Highs_Stereo”.
- On the Lows_Mono track: place EQ Eight and lowpass at ~400–800 Hz, then Utility to set Width = 0% (mono). This captures body but doesn’t smear stereo low-end.
- On the Highs_Stereo track: highpass at ~400 Hz, keep stereo width wide, add slight chorus or small movement using Auto Filter LFO or small modulation to keep interest.
- This split ensures late-night weight (mono lows) without losing atmospheric stereo highs.
- Intro (0–8 bars): bring ambience in full-bodied, more reverb send, slightly brighter (raise send automations). This sets mood.
- Lead-in / build (bars 8–24): reduce reverb sends, increase sidechain amount or automate HPF to thin the ambience so drums/bass breathe.
- Roller loop / drop (bars 24+): keep ambience lower in level, mono low portion active, stereo highs audible but filtered. Automate the Highs_Stereo track to reduce during dense bass hits and open during breakdowns.
- Use clip automation (Volume/Filter cutoff/Send levels) to make the ambience move across sections—subtle is key for late-night weight.
- Group ambience tracks into a single group. Add Glue Compressor on the group with mild settings (2–3 dB gain reduction) to glue the two-band split back into a cohesive sound.
- Use Utility in the group to set final gain and width; consider -1 to -2 dB gain trim so it sits behind drums/bass.
- EQ Eight HPF on main ambience: 120 Hz, 12 dB/oct.
- Saturator: Drive +2–4 dB, Soft Sine.
- Compressor (sidechain): Ratio 3:1, Attack 8 ms, Release 150 ms, Threshold to 2–6 dB ducking on kicks.
- Hybrid Reverb: Decay 1.0 s, Pre-delay 25 ms, High Cut ~3 kHz, Low Cut ~400 Hz.
- Echo send: 1/8 sync, Feedback 20%, Filter low-pass ~1 kHz.
- Glue Compressor on group: Attack 10 ms, Release 0.3 s, 2–3 dB gain reduction.
- Not high-passing the ambience: This leaves mud in the sub region and competes with bass.
- Over-reverbing: long bright reverb kills clarity in rollers; use dark, short reverbs for tightness.
- Too much sidechain release: a very long release makes ambience pump unnaturally; keep it short enough to recover between kicks.
- Using Complex Pro when you actually need rhythm: Complex Pro preserves texture but won’t let you slice easily—switch to Simpler/Slice for rhythmic chopping.
- Making the ambience too loud in the mix: ambience is supportive—if you can’t hear drums/bass clearly, reduce ambience level or narrow its low-end.
- Forgetting stereo low-frequency control: wide sub/low frequencies cause phase problems and ruin weight.
- Resample a processed version: once you like the processed ambience, resample (Record the track taped to a new audio track) to consolidate processing and allow creative further edits.
- Automate filter and sends for movement: slowly sweep a lowpass on the highs stereo track to create late-night motion without increasing clutter.
- Use small pre-delay on reverb to preserve transient clarity: pre-delay ~20–40 ms helps reverb sit behind the transient energy.
- For extra weight, gently saturate the mono low track and apply Multiband Dynamics (stock) to glue low-mid content to the bass.
- Use clip fades (0.5–5 ms) when chopping to avoid clicks when making short slices.
- Keep an ear on the bass region in mono to check phase and ensure the ambience’s low portion doesn’t disturb the sub.
- Step A: Import the sample and set Warp mode to Complex Pro. Trim and HPF at 120 Hz.
- Step B: Add Compressor with sidechain to an 808-style kick (or a simple kick clip). Set ratio 3:1, attack 8 ms, release 150 ms so the ambience ducks on each kick.
- Step C: Send the track to Hybrid Reverb (short decay) and Echo (short tempo delay). Keep sends low.
- Step D: Duplicate track; lowpass one at 600 Hz and mono it; highpass the other at 600 Hz and widen. Group them.
- Step E: Create a 2-bar MIDI slice in Simpler to trigger a rhythmic texture overlay, then duplicate to form 8 bars.
- This lesson covered "Kanine rain ambience: tighten and arrange in Ableton Live 12 for late-night roller weight."
- Key steps: import & warp sample → HPF to remove rumble → compress & saturate lightly → use short/dark returns → sidechain to kick for rhythmic breathing → split lows (mono) and highs (stereo) → arrange with subtle automation.
- Keep processing subtle. The aim is supportive weight and clarity—tightening the ambience so it enhances the roller groove rather than masking drums or bass.
Tracks you’ll create (minimum):
3. Step-by-Step Walkthrough
Important: keep the Kanine file handy (wav). These steps are practical and use Ableton Live 12 stock devices.
Step 1 — Import + initial warp
Step 2 — Clean low end (HPF) and stereo control
- Beginner starting point: HP @ 120 Hz, 12 dB/oct. Adjust by soloing the ambience + bass to hear interaction.
Step 3 — Tighten dynamics with gentle compression + transient control
Step 4 — Add harmonic weight and presence
Step 5 — Create controlled space using returns (short + filtered)
- Return A (Hybrid Reverb): choose a short decay (0.8–1.5 s), Pre-Delay 20–40 ms, high-frequency damping to keep the reverb dark. Lowpass the reverb tail inside the device or add EQ after the return to remove lows (<500–700 Hz).
- Return B (Echo): set Sync style, 1/8 or 1/4 dotted, Feedback low (15–25%), filter low and high on the echo to keep it dark and not compete with bass.
Step 6 — Sidechain to the kick for roller groove
Step 7 — Optional: Slice or Simpler mapping for rhythmic tightness
Step 8 — Stereo shaping & low-mid separation
Step 9 — Arrangement: when to add / remove ambience for impact
Step 10 — Final glue & sizing
Concrete starter settings summary (beginner-friendly):
4. Common Mistakes
5. Pro Tips
6. Mini Practice Exercise
Task: Create an 8-bar roller loop (174 BPM) using the Kanine rain ambience sample.
Goal: The final loop should have audible ambience texture that breathes with the kick, remains low-end-clean, and feels appropriate for a late-night roller.
7. Recap
Now try the Mini Practice Exercise and experiment with the sidechain release and HPF cutoff until the ambience feels like it’s sitting behind the drums while still giving the track that late-night, heavy roller vibe.

