Main tutorial
Lesson Overview
A deep jungle breakbeat lives or dies by feel. In Drum & Bass, especially jungle, rollers, and darker atmospheric styles, a perfectly quantized loop can sound stiff and plastic fast. The goal of this lesson is to turn a clean break into something that feels performed: a little late here, a little pushed there, with ghost notes, micro-gaps, and groove that breathes.
In Ableton Live 12, you do this by combining timing edits, Groove Pool swing, small velocity changes, and smart layering. The result is not just “messy drums” — it’s controlled movement that sits in the pocket with your bassline and atmosphere. This matters because in DnB the drums often carry the entire identity of the track. If the break feels alive, the tune feels alive.
We’ll keep this beginner-friendly and practical, using only Ableton stock tools. You’ll build a humanized break that works in a deep jungle context: dark, rainy, tense, and danceable 🥁
What You Will Build
By the end of this lesson, you’ll have a 1–2 bar breakbeat loop that sounds less like a loop and more like a drummer playing a haunted jungle session.
Specifically, you’ll create:
- A classic chopped break with natural timing variation
- Ghost notes that add motion without clutter
- Small velocity differences to make hits feel less repeated
- Drum bus processing that glues the break while keeping transients sharp
- A version that works under a sub-heavy bassline and atmospheric pads
- A loop you can drop into a DnB intro, build, or first drop
- clear kick and snare hits
- audible ghost notes or ghost hats
- some room noise or grit
- not too much low-end rumble
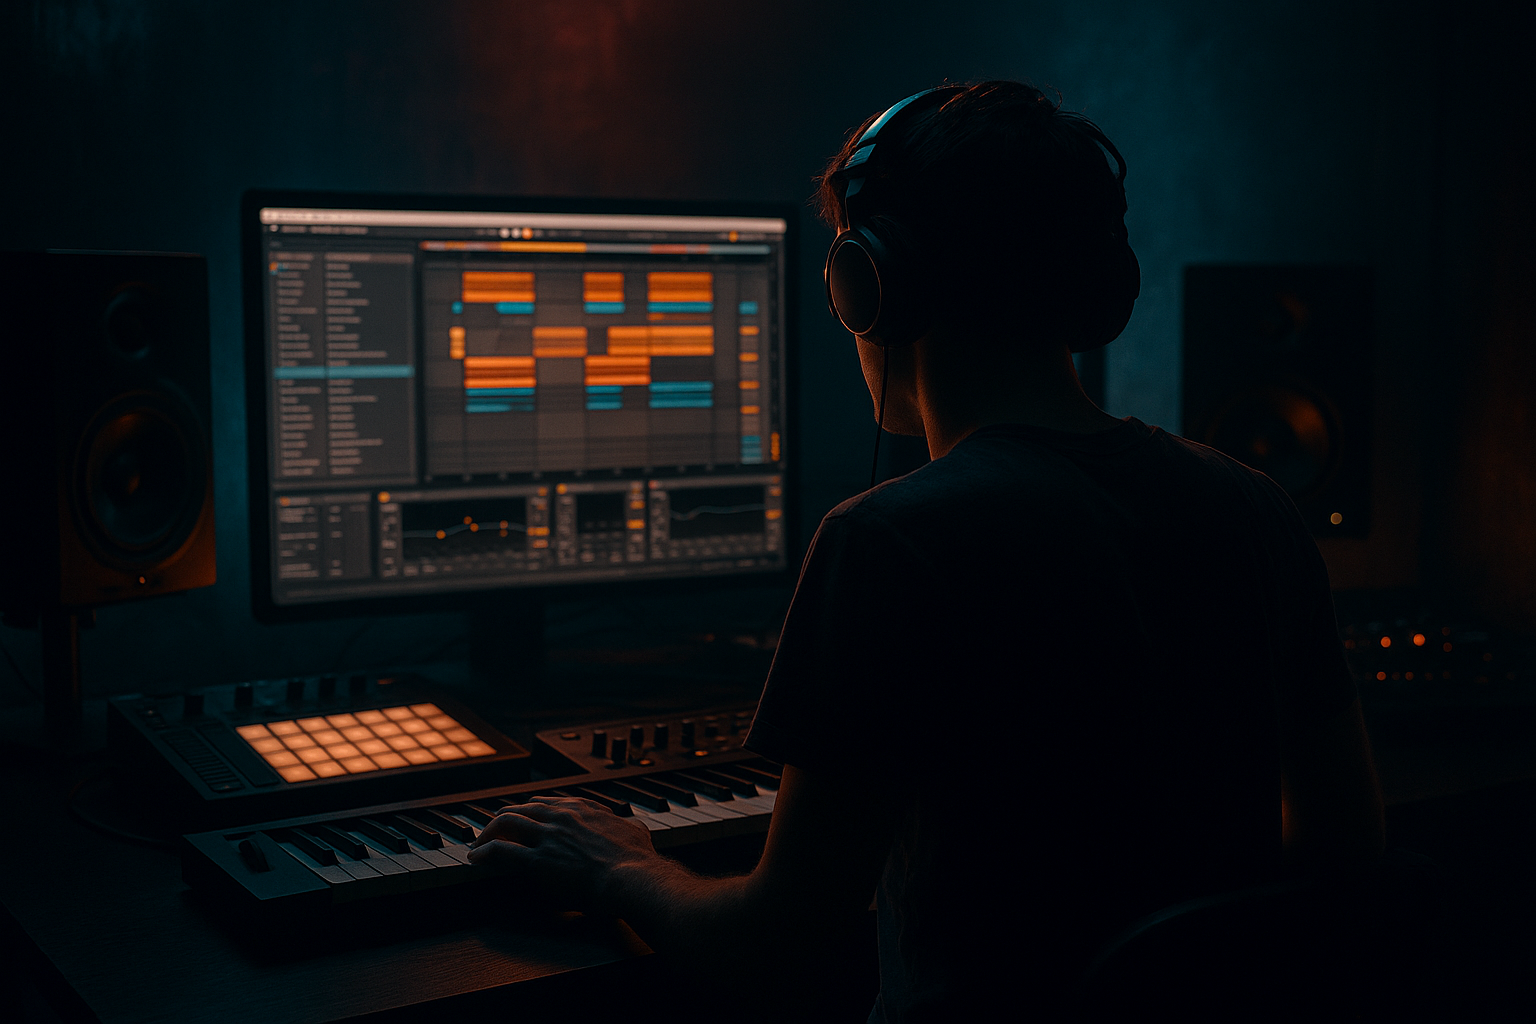
- Drag the break onto an Audio Track
- Double-click the clip to open Clip View
- Turn on Warp if needed, but keep it simple for now
- Set the clip to loop over 1 or 2 bars
- Right-click the audio clip and choose Slice to New MIDI Track
- Or manually split the clip at key transients using Cmd/Ctrl + E
- Slice by transients or 1/16 notes if the break is fairly consistent
- Keep kick, snare, and key ghost hits on separate pads if possible
- Rename important pads like Kick, Snare, Ghost, Hat if you want to stay organized
- Keep the main kick and snare hits locked close to the original break
- Add a few ghost hits around the snare
- Leave some 16th-note gaps for breathing room
- Use fewer hits than you think you need
- Move some ghost notes slightly late by 5–15 ms
- Push an occasional hat or pickup slightly early by 2–8 ms
- Avoid moving every note — just a few key ones
- Keep the main snare fairly solid so the loop still hits hard
- Zoom in so you can place notes precisely
- Use the arrow keys for small shifts if that feels easier
- Don’t quantize everything back to perfect grid after you’ve moved it
- Select your ghost notes and lower their velocity
- Make alternate hats and percs slightly different in strength
- Keep the main snare strong, but don’t max everything out
- Ghost notes: velocity around 25–55
- Hats and light percussion: 45–85
- Main snare: 95–120
- Main kick: 90–115
- MPC-style swing
- a loose 16th-note groove from one of your own clips
- a subtle groove with 54–58% timing feel
- Drag one groove into the Groove Pool
- Apply it lightly to your break clip
- Start with Amount around 20–40%
- Keep Random low or off at first
- Timing Amount: 20–35% for subtle swing
- Velocity Amount: 10–25% if you want more dynamic variation
- Random: 0–10% only, unless the loop feels too robotic
- High-pass gently around 25–35 Hz to remove useless sub rumble
- If the break is boxy, dip 200–400 Hz slightly
- If the snare is sharp in a bad way, tame 3–6 kHz a little
- Drive: 5–15% for weight
- Transients: +5 to +20 for more snap
- Boom: use carefully, often very low or off for jungle breaks under sub bass
- Soft Clip on
- Drive around 1–4 dB for grit
- Keep output level matched
- Use Width only if the break needs more stereo feel
- Keep low-end mono or near-mono if the break contains any bassy room noise
- A closed hat loop from another break
- A shaker texture
- A filtered vinyl noise layer
- A very short room-tambourine hit
- Volume low enough that you miss it when muted, but don’t immediately notice it when unmuted
- High-pass the layer so it doesn’t cloud the low mids
- Pan lightly if needed
- Put the layer on a separate track
- Use EQ Eight to high-pass around 200–500 Hz depending on the sound
- Use Auto Filter if you want the texture to open slowly through the intro or build
- In the intro, low-pass the break and slowly open it over 8 or 16 bars
- Automate Drum Buss Drive up slightly in the build
- Mute the ghost layer for the first 8 bars, then bring it in for the drop
- Cut the break down to kick-and-snare only for tension before the drop
- Add a short fill every 4 or 8 bars
- Auto Filter
- EQ Eight
- Drum Buss
- Reverb for short atmosphere tails
- Echo for a quick transition throw on the snare or ghost hit
- Solo the drums with the bassline
- Check whether the kick and snare still cut through
- Make sure ghost notes aren’t masking the bass movement
- Use Utility to mono-check the low end if needed
- Keep the break’s low end controlled with EQ Eight
- If the bass is dense, reduce low-mid clutter in the break around 150–350 Hz
- If the snare disappears, don’t just turn it up — try reducing competing bass harmonics
- Over-quantizing after humanizing
- Moving too many notes
- Using too much swing
- Making every hit the same velocity
- Heavy processing before timing is right
- Letting the break fight the sub
- Adding layers that are too loud
- Use slightly late ghost notes to create menace
- Resample your break once it feels right
- Push Drum Buss carefully for underground weight
- Use short reverb throws, not constant wash
- Keep stereo wider in the highs, tighter in the lows
- Create call-and-response between drums and bass
- Automate filter movement for tension
- slice the break so you can edit it
- move a few hits by tiny amounts
- vary velocity so repeats don’t sound fake
- use Groove Pool lightly for swing
- shape the break with stock devices like EQ Eight, Drum Buss, Saturator, and Utility
- keep the drums working with the sub and bassline
- automate movement so the arrangement evolves
Musically, this is the kind of break you’d hear in a deep jungle tune where the intro starts sparse with rain, atmosphere, and filtered drums, then opens into a rolling drop with sub pressure and a smoky break that stays moving without dominating the mix.
Step-by-Step Walkthrough
1. Pick a break that already has character
Start with a break that has strong transient detail and a bit of natural room tone. In Ableton, import a classic break sample into an Audio Track, or use any clean jungle-style break you already have.
Good choices are breaks with:
If your break is too clean, it can still work — but you’ll need to add more humanization yourself. If it’s too messy, it may fight the bassline later.
Action in Ableton:
Beginner tip: if the break is already in time, don’t over-edit the warp markers. For this lesson, feel matters more than perfect surgery.
2. Slice the break into playable hits
Now split the break into pieces so you can move individual hits around. This is where the human feel starts.
Two easy Ableton ways:
For beginners, Slicing to New MIDI Track is usually the fastest because it gives you a Drum Rack with individual pads for each hit.
Do this:
Why this works in DnB:
Breakbeats in jungle are usually not just looped — they’re re-edited. Slicing gives you control over the rhythm so you can shape swing, push and pull the groove, and leave space for the bassline.
3. Rebuild the main pattern with tiny timing variations
Open the MIDI clip that plays your sliced break and rebuild the pattern in a simple 2-bar loop. Don’t try to make it fancy yet. First, get the core hits in place.
A good beginner jungle starting point:
Now humanize it manually:
In Ableton’s MIDI editor:
A useful rule: the main snare should feel confident, while the surrounding percussion should feel human.
4. Add velocity variation for realism
This is one of the easiest ways to make a break feel alive. Repeated hits at identical velocity sound mechanical fast, especially in a loop.
In the MIDI editor:
Concrete starting ranges:
If your break starts sounding flat, look at velocity before reaching for more effects.
Why this works in DnB:
DnB often uses repeated 1–2 bar structures, so tiny velocity changes stop the loop from feeling like a copied file. That small variation creates motion without messing up the dancefloor energy.
5. Use Groove Pool for swing, not chaos
Now we add groove. This is where the break gets that rolling, slightly off-grid jungle feel.
Open Ableton’s Groove Pool and try a stock groove such as:
For beginners:
If the groove is too strong, the break can lose its punch. In deep jungle, the best groove often feels barely noticeable when soloed but instantly musical in context.
Try these settings:
The aim is not to make the break sloppy. It’s to make it feel like a human drummer leaning into the beat.
6. Shape the break with stock Ableton devices
Now that the timing feels good, control the tone so the loop sits in a dark DnB mix.
Place these on the break’s track or Drum Rack chain:
EQ Eight
Drum Buss
Saturator
Utility
Beginner approach:
Use one device at a time and listen to what it changes. You’re not trying to “fix” the break with processing. You’re shaping it so the humanized rhythm translates in the mix.
7. Layer a tight top loop or ghost texture
If the break feels good but still needs extra motion, layer a very quiet top loop or noise layer.
Options:
Keep the layer subtle:
Ableton workflow:
This is especially useful in jungle atmospheres. A light top layer can make the whole drum loop feel deeper and more continuous without making the main break busier.
8. Automate movement for the arrangement
Humanized breaks become powerful when they evolve across the arrangement. In a DnB intro or drop, the listener should feel the drums waking up, not just repeating.
Easy arrangement ideas:
Stock devices for automation:
Musical context example:
Start with rain, a filtered break, and distant atmosphere in the intro. At bar 17, let the full humanized break come in under the bassline. At bar 25, remove the top layer for two bars so the next return feels bigger. That contrast is what makes a DnB arrangement feel intentional.
9. Check the break against sub and bass
A humanized break only works if it leaves room for the bass. In DnB, the sub is usually non-negotiable.
Do this:
Useful beginner habits:
Why this works in DnB:
The groove must survive the bassline. A break that sounds amazing alone but steals the sub’s space will fail in the mix. Humanization should improve the pocket, not fill every gap.
Common Mistakes
Fix: Make your timing changes after you’ve chosen the groove. Don’t snap everything back to the grid.
Fix: Humanize only a few key ghost notes, hats, or pickup hits. The main snare should stay grounded.
Fix: Start with subtle Groove Pool amounts. Too much swing can make the loop feel lazy or broken.
Fix: Vary ghost notes and hats more than kicks and snares.
Fix: Get the feel first, then add Drum Buss, Saturator, and EQ.
Fix: Clean up the low end with EQ Eight and keep the bassline in its own space.
Fix: If you clearly hear the layer as a separate part, it’s probably too high in the mix.
Pro Tips for Darker / Heavier DnB
A few late snare ghost hits can make the break feel heavier and more ominous without slowing the track down.
Record the processed break to audio, then chop it again. This is a classic jungle workflow and gives you a more committed, gritty result.
A small amount of Drive plus Transients can make the break hit harder without killing the natural shape.
A tiny Reverb on selected hits can add depth, but too much will blur the groove. Think atmosphere, not room-filling blur.
The break can feel spacious on hats and texture while staying solid and focused in the core punch.
Let the break leave small pockets where the bass answers. This is huge in rollers and darker halftime-influenced DnB too.
Slowly closing an Auto Filter in the intro or breakdown makes the eventual open-drop feel more dramatic.
Mini Practice Exercise
Set aside 10–20 minutes and do this:
1. Import one 1–2 bar breakbeat into Ableton Live.
2. Slice it to a Drum Rack or chop it manually.
3. Rebuild the loop with just the main kick, snare, and 3–6 ghost hits.
4. Move 2–3 ghost notes slightly late and 1–2 hat hits slightly early.
5. Set velocities so ghost notes sit in the 25–55 range and main hits stay strong.
6. Apply a subtle groove from Groove Pool with Amount around 25–35%.
7. Add EQ Eight and Drum Buss to shape the sound.
8. Loop it with a bass drone or simple sub note and listen for clashes.
9. Make one automation move: filter opening, Drum Buss Drive increase, or a short fill.
10. Bounce a rough 8-bar loop and listen again outside the session.
Goal: make the break feel less robotic and more like it belongs in a deep jungle intro or drop.
Recap
Humanizing a breakbeat in Ableton Live 12 is about controlled imperfection. The big wins are:
If the break feels alive, dark, and locked with the bass, you’re in the zone. That’s the jungle magic 🖤

