Show spoken script
Title: Folder hygiene for samples: for smoky late-night moods (Beginner)
Alright, let’s set you up with sample folder hygiene that actually supports writing smoky late-night drum and bass in Ableton, instead of killing your momentum.
This is beginner-friendly, but I’m going to treat it like a real studio habit. Because honestly, the difference between finishing tracks and endlessly “looking for the right snare” is usually workflow, not talent.
The goal today is simple: one master sample location, a clean DnB-first folder structure, a super practical keep-maybe-trash curation loop, and a small Ableton “digging” template so you can audition sounds fast, in context, and in the right mood.
Before we touch folders, quick mindset check. Smoky late-night DnB lives in tight drum choices, darker textures, and consistent tone. That means you’re not trying to collect infinite options. You’re trying to build a small, reliable palette that gets you to an 8-bar loop fast.
Step one: pick one Master Samples location. Do this first, seriously.
Choose one folder on a fast drive, ideally an SSD. On Mac, something like Music slash Samples_MASTER. On Windows, maybe D colon slash Samples_MASTER.
Here’s the rule: stop splitting your library across Downloads, Desktop, random external drives, and a bunch of project folders. One hub prevents missing files later, prevents duplicates multiplying, and makes Ableton browsing predictable. Predictable equals fast. Fast equals more music.
Cool. Step two: build a DnB-first folder structure inside Samples_MASTER.
At the top level, you want an INBOX for new stuff, then clear categories: drums, bass, atmos and texture, FX, MIDI, reference loops, and an archive.
Your drums folder is the big one. Inside drums, separate one-shots like kicks, snares, hats, and percussion from break material. Breaks behave differently. They need warp settings. They need transient handling. They’re groove sources. One-shots are building blocks. Keep them apart so your brain doesn’t have to do extra work.
For kicks, you might have punchy, subby, and dirty. For snares, maybe rolling tight, jungle crack, and rim or clap layers. Hats can be closed short, open shuffly, plus rides. Perc can include shakers, toms, and foley hits. Breaks can be classic, rechopped, and top loops.
Then bass: subs, reeses, wobble or growl, bass one-shots.
Then atmos and texture: pads, drones, vinyl noise, room tone, field recordings. For smoky vibes, that atmos folder is basically your secret weapon. A two-step drum pattern is one thing. A two-step drum pattern sitting inside a coherent “room” is the mood.
Then FX: impacts, risers, downlifters, sweeps, and yes, sirens and airhorns if you must. No judgment. Mild judgment.
Then MIDI and reference loops, and finally an archive for old stuff you don’t want cluttering the main view.
Now, step three: add mood tags, but don’t overcomplicate.
The mistake beginners make is turning organization into a hobby. You don’t need 30 micro-genres. You need broad mood buckets that help you choose quickly.
So add one extra layer only where it matters: drums and atmos.
For example, inside your rolling tight snare folder, you might have Dark and Bright. Inside drones, you might have Smoky and Industrial. Inside vinyl noise, Soft and Aggressive.
Broad moods. Fewer clicks. Less thinking.
Step four: naming convention that you can actually search in Ableton.
When you rename samples, don’t try to rename everything you own. Only rename keepers. The stuff you want to use again. Your naming should help you search by type and vibe.
A simple pattern is: Type, Tone, key info, source or tempo.
So you might end up with names like: SNARE_Rolling_Tight_Dark_180bpm. Or HAT_Closed_Shuffly_Dry. Or BREAK_Amen_Dark_Chopped_170. Or DRONE_Smoky_Room_C. Or FX_Riser_Noise_Long_8bar.
In DnB, tempo matters, especially for loops, tops, and breaks. So adding 170, 174, 180 when relevant is a huge win.
Quick coaching note here: if you can’t tell the key quickly on a texture, don’t force it. Atonal is fine. But for clearly tonal drones, adding something like Fm or C# can save you later.
Step five: set up Ableton Places so everything is one click away.
Open Live’s browser. Find your Samples_MASTER folder. Add it to Places. Then also add the key folders directly to Places: your DnB drums, your atmos and texture, your FX, and your INBOX.
Yes, add the INBOX. That’s the folder that keeps you from dumping packs into chaos. If you can see it every session, you’re way more likely to keep the system clean.
Step six: the INBOX to sorted workflow. This is the secret.
Any time you get a new pack, do not just scatter it into your library. Put it into 00_INBOX, inside a folder named PackName underscore Date. That date part matters, because later you’ll know what’s been sitting untouched.
Then curate immediately. Set a timer: 15 to 30 minutes, max. Inside that pack folder, make three folders: Keep, Maybe, and optionally Trash. And be ruthless.
Here’s your keeper criteria for smoky late-night.
In five seconds, ask: is it too bright? Is it too thin? Is it too clicky?
If the answer is yes to two out of three, it goes in Maybe or it’s gone. Smoky late-night usually wants controlled highs, useful mid character, and sounds that don’t need heroic EQ to sit.
Then, and only then, move your Keep picks into the main structure. Maybe your best ten snares go into your snares folders. The best drones go into drones, maybe the Smoky subfolder.
And remember the DnB mindset: you do not need 900 snares. You need 20 that work at 170, in the vibe you like, without fighting your mix.
Also, duplicates. Stop them early.
If you import a pack and it contains the same file you already have, don’t merge blindly. Keep one version. If the source truly matters, note it in the filename. Like if one is a break rip versus a clean studio recording. But otherwise, duplicates quietly double your browsing time.
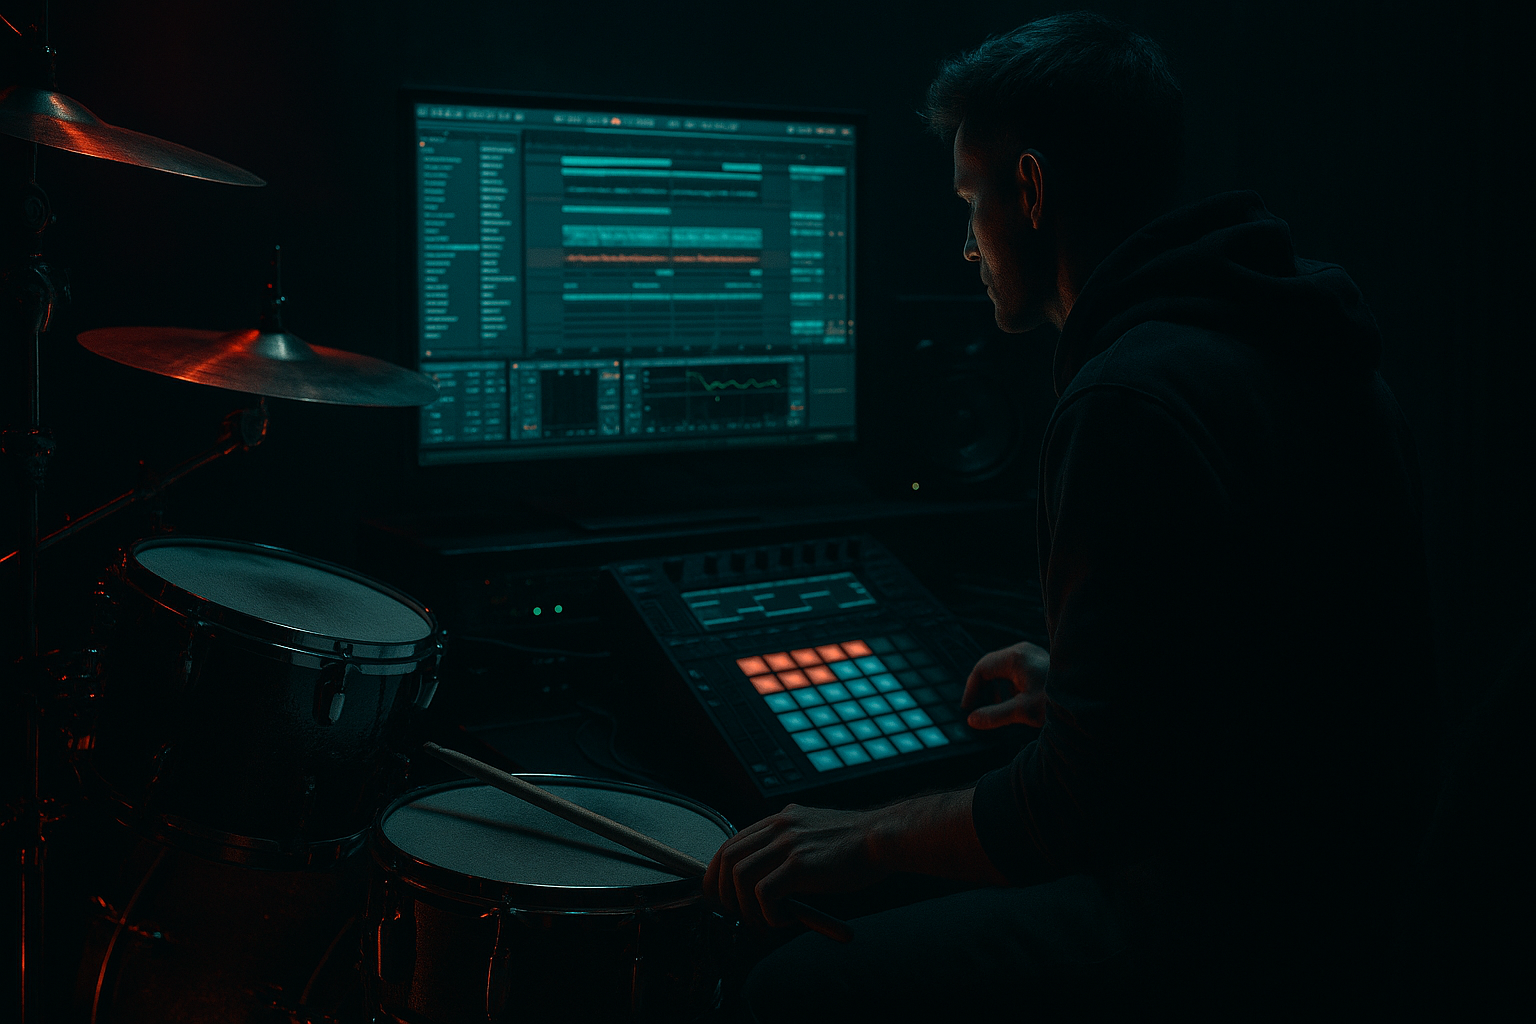
Now, let’s build the Ableton side. Step seven: create a DnB Sample Digging template set.
Make a new Live Set and name it TEMPLATE_DNB_Sample_Digging.
We’re going to add four tracks, and the point is to audition in context, at sane levels, with a little “late-night” processing available instantly.
Track one: Drum Rack Audition for one-shots.
Create a MIDI track, drop in a Drum Rack, leave some pads empty so you can drag samples in quickly.
Then put Utility and a Limiter on the Drum Rack. Set Utility to minus 6 dB. This is a huge teacher tip: loud always sounds better, even when it’s worse. Utility minus 6 dB stops you from choosing samples just because they’re smashing your ears. Then add a Limiter as a safety net, ceiling at minus 0.3 dB.
Track two: Break and Loop Audition.
Create an audio track. Turn Warp on by default. In clip view, you’ll usually want Beats mode for breaks, preserving transients. Try 1/16. For smoother loops, Complex can work, but listen for artifacts.
On the track, put EQ Eight and high-pass around 30 to 40 Hz, just to remove useless rumble that tricks you into thinking the loop is heavier than it is. Then add Drum Buss lightly. Drive maybe 5 to 15 percent. Boom only if it actually helps, don’t force it.
Track three: Texture Bed Audition.
This is where the smoke happens. Create an audio track. Add Auto Filter with a gentle low-pass around 8 to 14 kHz. Then Echo, maybe 1/8 or 1/4, low feedback, and darken the echo with filters. Then Reverb, small to medium, and roll off highs with HiCut somewhere around 6 to 10 kHz.
This chain instantly turns basic ambience into “3am in the club, outside the main room” energy. And it also helps you pick textures based on how they’ll behave once you actually produce.
Track four: Reference Track.
Create an audio track and drop in a pro tune that matches your target vibe. Add Utility and turn it down so it matches your session loudness. Do not chase mastered volume while digging samples. You’re comparing tone, groove, density, and space, not loudness.
Save this set. Treat it like part of your instrument.
Optional, but highly recommended: make a Smoke Test rack.
Create an Audio Effect Rack with EQ Eight, Saturator, Auto Filter, and Utility. EQ: high-pass around 25 to 35 Hz, and if something is harsh, a gentle dip around 3 to 6k. Saturator: soft clip on, drive 1 to 5 dB. Auto Filter: low-pass mapped to a macro, that’s your “lights down” knob. Utility: width control, because narrowing hats and textures slightly can make things feel tighter and more clubby.
Save it as RACK_SmokeTest so you can drop it on anything while auditioning.
Now step eight: make a Smoky Kit folder so you stop rebuilding from scratch.
Inside your drums folder, create a kits folder, and then a kit called Kit_Smoky_Rolling_01.
Inside, you’re going to store a small curated set: two kicks, one punchy and one subby. Three snares: a tight main, a crack or snap, and a layer. Six hats: a couple closed, a couple open, a couple rides or shuffles. Six percs: rim, foley, tom, shaker, clap layer, ghost snare. Two short impacts. And one or two break top loops.
That’s it. That’s a full writing palette. When you can load a kit like this, you stop browsing and start arranging.
Extra coach trick: make quick-pick “taste test” folders.
These are not permanent categories, they’re shortcuts. Make a __GO-TO_TOPS folder with 10 to 30 top loops you trust. And a __GO-TO_SNARES folder with 10 to 20 snares that just work at 170. This prevents option paralysis because when you’re writing, you’re making fewer decisions.
Step nine: use your folders to build a quick 8-bar late-night roller.
Here’s a simple arrangement plan.
Bars one and two: texture plus filtered break tops. Keep it moody, not bright.
Bars three and four: add kick and snare, simple two-step. Don’t over-program. Let the tone do the work.
Bars five and six: bring in hat shuffle and ghost snares. Small movement, not chaos.
Bars seven and eight: add an impact and a micro fill. Maybe a snare drag or a break slice turnaround.
Smoky vibe often means less top-end, more mid texture, subtle movement, and controlled dynamics. No harsh peaks. If it’s aggressive, it’s controlled aggressive.
A quick arrangement upgrade: micro-contrast.
Every four bars, do one subtle change. Mute hats for half a bar, swap a snare layer, automate the texture filter, add one reversed hit into bar four or eight. Movement without turning it into a hype track.
Also, top loop discipline: pick one main top loop and commit. Variation comes from muting slices, not stacking more loops. That keeps your groove coherent and avoids cymbal soup.
Common mistakes to avoid as you set this up.
First, keeping everything. If you don’t curate, your browser becomes a graveyard, and you’ll stop trusting it.
Second, over-tagging. If it takes six clicks to find a snare, you won’t use the system.
Third, not committing to one master location. That’s how projects break and duplicates breed.
Fourth, ignoring gain staging while auditioning. That Utility at minus 6 dB is doing more for your taste than you think.
Fifth, mixing breaks and one-shots in the same place. Keep them separate. Your future self will thank you.
Now, a quick 15-minute practice exercise so this becomes real.
Create the folder structure up to: an INBOX, DnB drums with at least kicks, snares, hats, and breaks, and atmos texture with drones, vinyl noise, and room tone.
Take one random sample pack and drop it into your INBOX.
In Ableton, audition 30 sounds total: ten drums, ten breaks or loops, and ten textures or FX.
Move only ten into your main library: four drums, three breaks or tops, three textures.
Rename at least five using your convention, including tempo for loops, and key where obvious for tonal beds.
The goal is not perfection. The goal is building the habit of curating before producing.
One more habit that keeps this clean long-term: monthly maintenance.
Set a reminder for the last day of the month. Open your INBOX and your MAYBE folders. File it or delete it. If something sits in Maybe for two months, it’s not a maybe. It’s a no.
Recap to lock it in.
One master location prevents chaos and missing files.
Use a DnB-first structure that separates one-shots from breaks, and keeps atmos and texture as a first-class category for mood.
Keep mood tags broad: smoky, dark, industrial. Not a million tiny subgenres.
Maintain hygiene with the INBOX to keep-maybe workflow.
In Ableton, add your folders to Places and use a digging template with Utility, EQ, Drum Buss, and dark reverb and echo for instant vibe checks.
And finally, curate a small Smoky Rolling Kit so you can get to an 8-bar loop quickly and stay in the flow.
If you tell me what sub-style you’re aiming for, like liquid but dark, techstep, or jungle roller, I can suggest a specific minimal folder set and a starter smoky kit list to build first.