Main tutorial
Lesson Overview
This lesson is about building a rewind moment blueprint for a deep jungle atmosphere in Ableton Live 12: the kind of section where the tune feels like it’s being pulled back through time, then slammed into a darker groove with weight and intent 🎛️
In Drum & Bass, a rewind moment is more than a DJ trick. In production terms, it’s a designed arrangement event: a short section that signals “something important just happened,” resets tension, and creates a clean runway into the next phrase. In jungle and darker rollers, this is where you can bring in atmospheric pads, chopped break micro-edits, dubwise tails, vinyl-style texture, and a bass call-and-response without losing the floor.
Why this technique matters:
- It gives your track a memorable structural pivot
- It creates contrast between the drop and the next section
- It lets you use space, FX, and texture as musical tools rather than decoration
- It helps your tune feel DJ-friendly, because the rewind moment can function like a deliberate breakdown or reset
- A tape-rewind style transition made from stock Ableton devices
- A deep jungle atmosphere bed using pads, field-texture, or sampled ambience
- A chopped break loop with ghost notes, reverse hits, and filtered movement
- A bass reset phrase that makes the drop feel intentional and heavy
- A DJ-friendly arrangement section that can sit before a drop, after an 8/16-bar run, or as a switch-up in the second half
- A clean workflow you can reuse as a template for future tracks
- A dark atmosphere suddenly opening up
- Break fragments spinning backward into the void
- The bass ducking out, then re-entering with menace
- A controlled sense of anticipation, not random chaos
- Create a new group called REWIND FX
- Add another group called ATMOS
- Keep your DRUM BUS and BASS BUS separate if possible
- Color-code them immediately for fast navigation
- Bars 1–4: drop or heavy groove
- Bars 5–6: energy pullback / rewind effect
- Bars 7–8: atmosphere and tension rebuild
- Bars 9–12: re-entry into the next phrase
- Reverb
- Delay
- Auto Filter
- Erosion
- Saturator
- Utility
- Freq Echo if you want a more surreal tail
- A field recording
- A vinyl crackle sample
- A low drone from Wavetable
- A filtered noise layer from Operator
- A chopped ambient one-shot from your sample library
- Start with a saw or complex wavetable
- Set oscillator unison modestly
- Add LFO to wavetable position or filter cutoff
- Keep amp envelope slow: Attack 100–500 ms, Release 1.5–4 s
- Low-pass the patch so it sits behind drums
- EQ Eight
- Echo
- Auto Pan
- one narrow, dark bed
- one wider texture layer
- one small foreground detail such as a hiss, flutter, or distant hit
- Put the break into a Simpler track in Slice mode or just chop directly in Arrangement
- Slice on transient markers or manually at key hits
- Create 1/8, 1/16, and tiny pickup edits
- Use reverse slices sparingly
- Kick and snare remain readable
- Ghost notes fill the gaps
- A small reverse hat or snare pick-up leads into the rewind
- One or two slices get filtered or pitched down
- Drum Buss
- Transient shaping via the clip envelope or clip gain to make ghost notes breathe
- Glue Compressor on the break bus
- Build a sub on one layer
- Add a mid reese or growl on another
- Keep the sub mono and clean using Utility
- Utility on sub track: Width 0%, gain trimmed so headroom remains
- Saturator on mid bass: Drive 2–6 dB, Soft Clip on
- Auto Filter on mid bass: automate cutoff from ~200 Hz up to 1–3 kHz over the reset phrase
- Optional Frequency Shifter for subtle movement, not sci-fi chaos
- Bar 1: bass hits hard, then ducks
- Bar 2: short call-and-response gaps
- Bar 3: filtered re-entry with a different rhythm
- Bar 4: full return or held note into the drop
- Filter cutoff on atmosphere and break bus
- Reverb dry/wet rising into the transition
- Utility width narrowing before the rewind, widening after
- Send levels to delay and reverb
- Master of the FX return, if you want a swell that peaks then cuts
- Reverb dry/wet: 10% to 45%
- Delay send: 0% to 20%
- Filter cutoff: 6 kHz down to 300 Hz
- Stereo width: 100% down to 0–40% then back up
- Sub stays mono and simple
- Rewind FX avoid heavy low-mid buildup
- Break edits need transient clarity
- Atmospheres are high-passed enough to avoid mud
- Put Utility on sub and bass buses for mono control
- Use EQ Eight to carve a notch around 200–400 Hz if the atmosphere clouds the snare
- Use a gentle high shelf cut on the rewind FX if it sounds too bright
- Leave headroom: aim to keep the master from getting slammed during the transition
- Lower the main drums more
- Make the reverse pull more obvious
- Reduce bass activity for one extra beat
- Let the atmosphere own the space for a moment
- Intro: 16 bars of DJ-friendly drums and filtered atmosphere
- Drop 1: 16 or 32 bars of main groove
- Rewind moment: 4 bars of pullback, reverse impact, atmosphere bloom
- Drop 2: same core idea but with altered bass rhythm or denser break edits
- before the second drop
- after a call-and-response bass section
- as a switch-up halfway through a 64-bar journey
- Bar 1: energy starts to fall
- Bar 2: reverse FX become obvious
- Bar 3: bass cuts or filters down
- Bar 4: atmosphere and drums reset
- Bar 5: re-entry
- Making the rewind too long
- Overloading the atmosphere with low end
- Using too many FX layers at once
- Letting the bass and reverse hit fight for attention
- Making the rewind sound clean and polite
- Ignoring phrase alignment
- Resample your transition: bounce the reverse effect and break edits into audio, then warp or re-chop it. This gives the moment a more physical, less “preset” feel.
- Use mono collapse before the hit: narrowing the stereo image right before the rewind makes the return feel bigger.
- Layer a low mechanical texture: a faint metallic loop or distant machine noise can make the atmosphere feel industrial and underground.
- Distort the mid-bass, not the sub: keep the sub clean in mono, and add edge with Saturator or Erosion on a separate mid layer.
- Use ghost notes to imply motion: a few quiet break hits are often more effective than a busy fill.
- Automate send throws on the last snare: a delay or reverb throw on the final hit can make the rewind moment feel like it’s echoing into a void.
- Keep the re-entry darker than expected: don’t always return with a huge bright stab. In heavier DnB, a restrained re-entry often hits harder.
- A rewind moment in DnB is an arrangement event, not just an effect
- Keep the transition short, phrase-aligned, and intentional
- Use reverse audio, atmospheric beds, chopped breaks, and bass resets
- Prefer automation and resampling over endless layering
- Protect the sub, mono discipline, and drum clarity
- In darker jungle and rollers, the best rewind moments create tension, grit, and anticipation without killing dancefloor momentum
This is especially useful in deeper jungle, rollers, neuro-leaning halftime turns, and darker DnB where atmosphere and tension carry as much weight as the drop.
What You Will Build
By the end of this lesson, you’ll have a 4- to 8-bar rewind moment blueprint in Ableton Live 12 with:
Musically, the result should feel like:
Step-by-Step Walkthrough
1. Set up a dedicated rewind section in Arrangement View
Start by choosing a phrase point in your arrangement where the energy is about to turn: after an 8-bar drop, before a second drop, or just after a breakdown return.
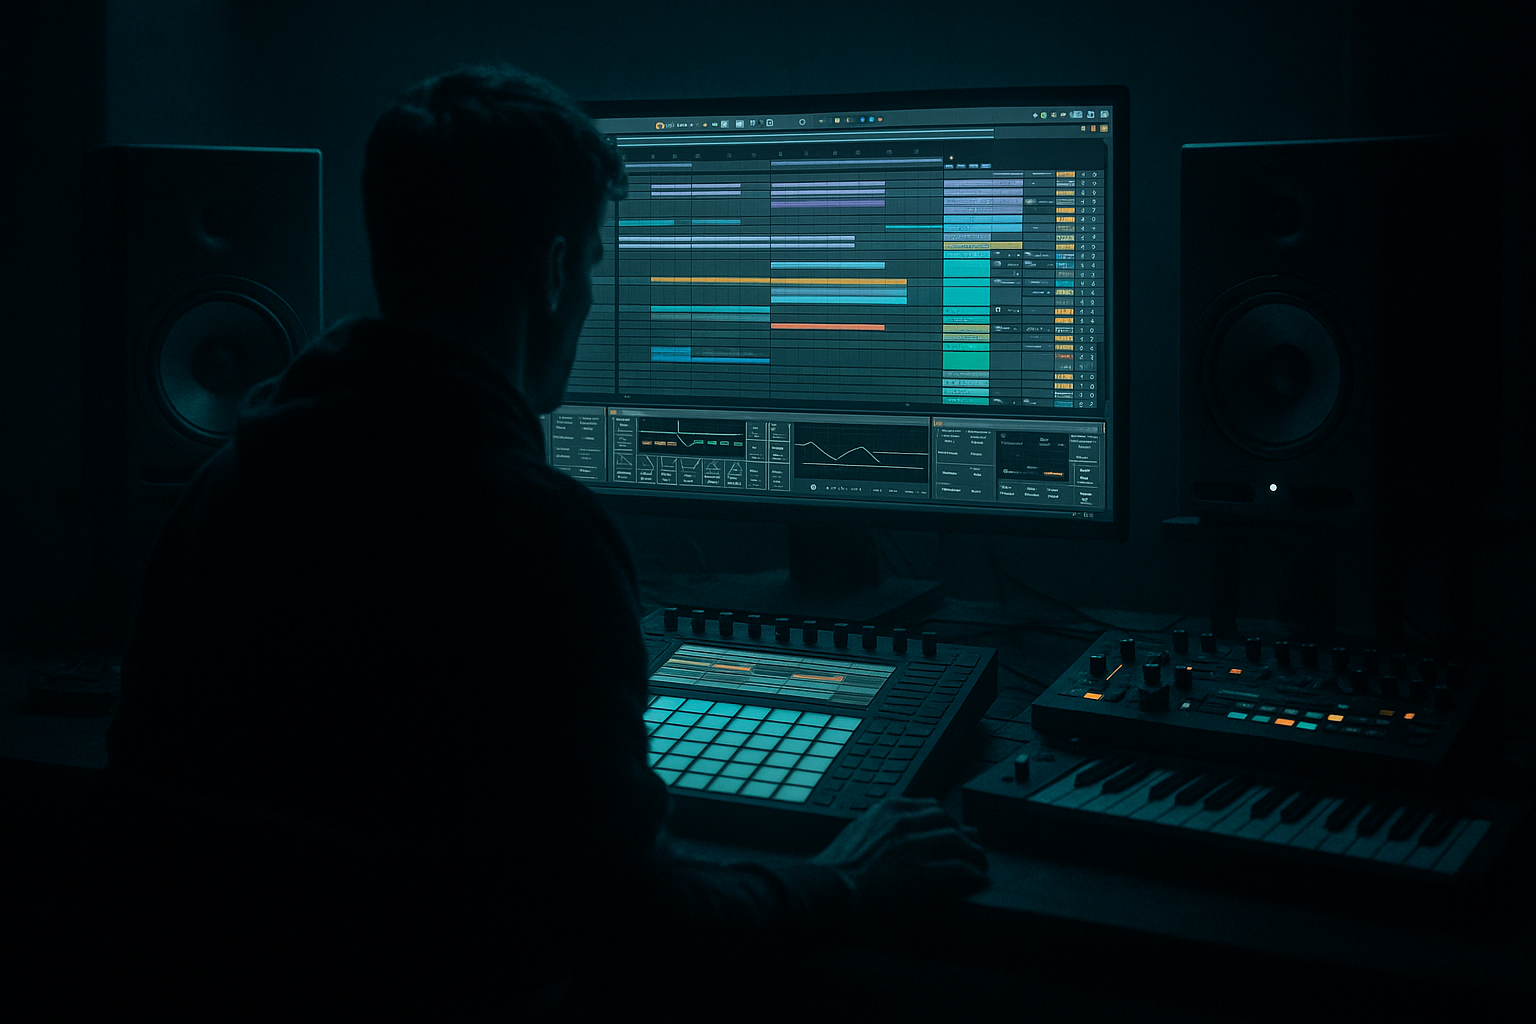
In Ableton Live 12:
A useful structure for this blueprint:
If you’re working fast, duplicate a strong 8-bar section first, then carve out the rewind moment rather than building from scratch. That keeps your groove identity intact.
Why this works in DnB: the listener’s body already locked into a phrase. A short rewind moment resets expectation without killing momentum, which is perfect for dancefloor music where tension and release need to be obvious but not overexplained.
2. Build the tape-rewind blueprint with stock Ableton devices
On a new audio track, place a short sound source: this can be a snare tail, cymbal hit, vocal chop, break fragment, or even a single atmospheric stab. You’ll reverse and process it.
Useful stock devices:
Workflow:
1. Duplicate the audio clip
2. Reverse the duplicate in the clip view
3. Trim it so the reverse movement lands exactly on the phrase boundary
4. Add a Reverb before the reverse ends
- Decay: 2.5–5.0 s
- Size: 60–90
- Low Cut: around 200–350 Hz
- Dry/Wet: 15–35%
5. Put Auto Filter after Reverb
- Start with a low-pass around 2–6 kHz
- Automate the cutoff downward for a sucked-away feel
6. Add Saturator very lightly
- Drive: 1–4 dB
- Soft Clip: on
7. Add Utility
- Use Width at 0–50% if you want the rewind to collapse into mono before exploding outward
For a more authentic “moment blueprint,” automate the reverse clip’s volume down as the filter closes. That gives the illusion of the sound being pulled backward into the mix.
Optional trick: resample the finished reverse chain into a new audio track. Then you can warp, slice, and pitch it like a custom FX element instead of a generic transition.
3. Design the jungle atmosphere bed with texture, space, and motion
Now create the atmosphere layer that sells the deep jungle feel. This should not be a huge pad that eats the mix. Think more like a living environment.
Good sources in Ableton:
If using Wavetable:
Then process it:
- High-pass around 120–250 Hz to keep sub clean
- Dip any harsh band around 2.5–5 kHz if needed
- Time: 1/8 or 1/4 dotted for movement
- Feedback: 10–25%
- Filter the echo heavily
- Amount: 10–35%
- Rate: 1/2 to 2 bars
- Phase: 0–30° for subtle width movement
A strong jungle atmosphere is usually built from layers:
Keep them all low in the mix. The goal is atmosphere, not ambience taking over the drop.
4. Chop a break into micro-edits for tension and identity
This is where the jungle character comes alive. Take a classic break or your own drum loop and create a short chopped phrase that reacts to the rewind.
In Ableton Live:
A practical pattern:
Processing ideas with stock devices:
- Drive: 5–15%
- Crunch: 0–8%
- Boom: use carefully, often below 10% for this kind of section
- Ratio: 2:1 or 4:1
- Attack: 10–30 ms
- Release: Auto or 0.1–0.3 s
A great workflow move: freeze and flatten the break after editing, then chop the rendered audio again. That gives you a more committed, slightly rougher jungle feel. It also speeds up decision-making.
5. Create a bass reset phrase that answers the rewind
The bass should not just vanish. In a rewind moment, the bass often behaves like it’s being pulled back and then reintroduced as a statement.
Use either Wavetable, Operator, or a resampled bass layer:
Example bass setup:
Bass phrase idea:
This is where intermediate producers should think in terms of phrasing, not just sound design. The bass line needs a visible narrative: stop, turn, answer, return.
Why this works in DnB: the ear locks onto bass rhythm as a second drum layer. If the bass phrase mirrors the rewind, the transition feels integrated rather than pasted on.
6. Shape the rewind with automation rather than extra layers
The most convincing rewind moments are often automation-driven, not pile-up driven.
Automate these parameters across 1–2 bars:
Good automation ranges:
A classic move is to automate a pre-rewind choke:
1. Pull the music down with a low-pass filter
2. Increase reverb tail
3. Remove bass briefly
4. Drop the rewind hit
5. Let atmosphere bloom again
Use clip envelopes if you want repeatability inside a loop, or arrangement automation if this moment is unique in the tune.
7. Mix the moment so the chaos still sounds professional
A rewind section can get messy fast. Keep the low end under control and let the atmosphere occupy the upper and mid space.
Mixing priorities:
Practical checks:
If the rewind moment feels weak, don’t just make it louder. Increase contrast:
8. Arrange it like a DJ-friendly structural event
A great rewind blueprint is also an arrangement tool. Think like a DJ and a selector.
Useful arrangement context example:
For jungle and rollers, the rewind often works best when it appears:
Keep the transition readable:
This creates a structure that a DJ can mix around, and it helps your track feel like it has purposeful sections rather than just one loop extended for too long.
Common Mistakes
Fix: keep the core moment to 1–4 bars unless it’s a breakdown. DnB needs momentum.
Fix: high-pass ambience at 120–250 Hz and check it against the sub in mono.
Fix: one reverse event, one atmosphere bed, one rhythmic break movement is often enough.
Fix: carve space with automation, not just EQ. Drop the bass for a beat if needed.
Fix: add saturation, vinyl texture, or a bit of resampled grit. Jungle atmosphere usually benefits from controlled roughness.
Fix: place the rewind on clear 8/16-bar boundaries so the groove feels intentional and mixable.
Pro Tips for Darker / Heavier DnB
Mini Practice Exercise
Set a 15-minute timer and build a rewind moment in one 8-bar loop:
1. Load a break, a sub, a mid-bass, and one atmosphere layer.
2. Choose one hit or vocal fragment and create a reverse FX moment with Reverb + Auto Filter.
3. Chop the break into at least 4 edits, including one ghost note and one pickup.
4. Automate the bass to leave space for one full beat.
5. Add a 2-bar atmosphere swell using Echo or Reverb sends.
6. Make the section land on bar 5 with a clear re-entry.
Constraint: do not add more than 4 new tracks. This forces you to rely on arrangement, automation, and editing rather than clutter.
Optional challenge: render the rewind section to audio and rework it once more. If it still feels strong after resampling, you’ve probably built a reusable blueprint.

