Main tutorial
Lesson Overview
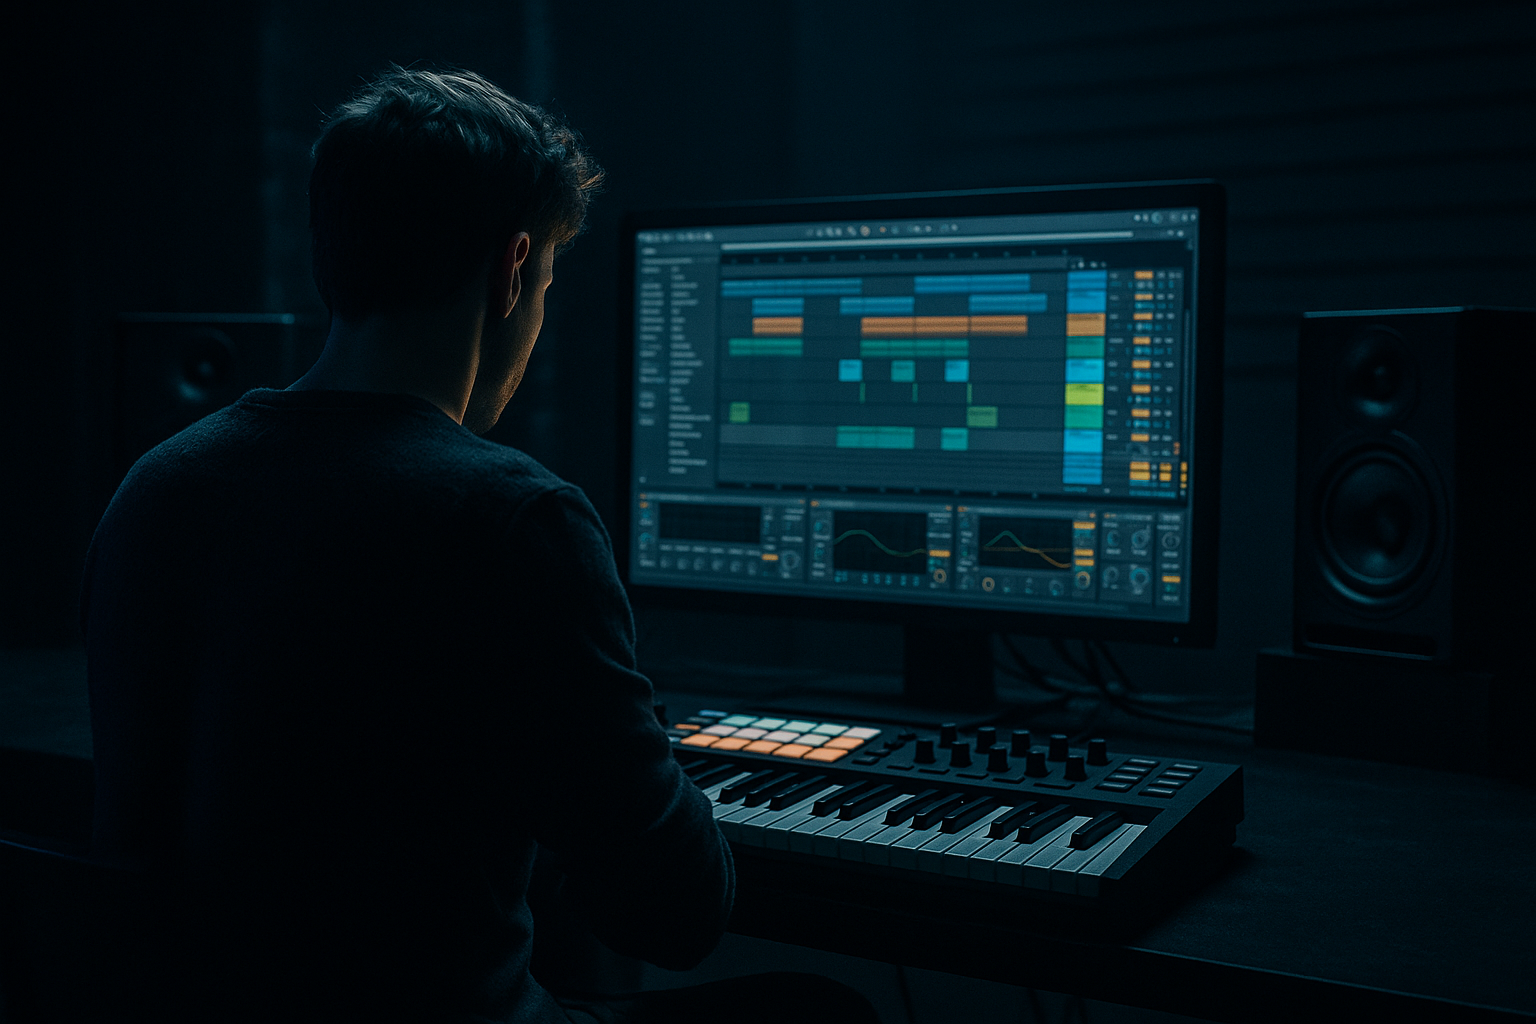
A timeless roller lives or dies on the relationship between sub weight, mid-bass movement, and drum edits. In Drum & Bass, especially rollers, you’re not trying to “fill every bar” with bass content — you’re carving space so the groove feels like it’s constantly leaning forward. This lesson focuses on a subsine workflow in Ableton Live 12: building a clean, sine-based sub foundation, then carving it with edits, phrasing, saturation, and automation so the bassline keeps momentum without losing low-end authority.
This matters because rollers often need to do three things at once:
- stay heavy and club-ready
- remain musically repetitive enough to hypnotize the listener
- evolve just enough across 8, 16, or 32 bars to avoid fatigue
- rollers with steady forward pressure
- deeper / darker halftime-adjacent DnB
- minimal neuro-leaning bass tracks where the sub is part of the tension
- jungle-inspired edits where break chops and bass stabs need room to breathe
- a clean mono sub layer on a sine or near-sine wave
- a mid-bass layer that supports the groove without masking the sub
- edited bass phrasing that creates momentum through gaps, not just notes
- a drum/bass pocket that leaves room for the kick, snare, and break transients
- a simple 8-bar roller loop that can be expanded into a full arrangement
- automation and resampling moves for tension, switch-ups, and drop evolution
- a sub that “speaks” on the important notes
- bass movement that sits between the snare hits
- ghosted syncopation that makes the loop breathe
- enough low-mid grit to feel modern, but not so much that the sub gets blurred
- Too much bass note density
- Sub not truly mono
- Mid-bass fighting the sub
- Bassline ignoring the snare
- Overprocessing the low end
- No variation across the arrangement
- Drums too weak to support the bass
- Use a slightly unstable mid layer: tiny detune, slow filter motion, or subtle LFO movement makes the bass feel alive without losing the sub.
- Try call-and-response phrasing between sub and mid: one note speaks heavy, the next is more percussive.
- For darker pressure, let the bassline stop short before key snare hits. Silence creates threat.
- Use Saturator on the bass bus with modest drive, then pull down output to keep headroom.
- If the roller needs more menace, layer a very quiet noise or reese texture above 150 Hz only. Keep the sub clean.
- On transition bars, automate Auto Filter cutoff slightly higher for one bar, then drop it back. It feels like the track inhales and exhales.
- Use break edits to reinforce bass syncopation — ghost snares and shuffled hats can make a simple subline feel more complex.
- For a neuro-leaning edge, add a second mid layer with more motion, but keep it band-limited so the sub remains the anchor.
- Check the bass in mono regularly. Timeless rollers survive club systems because the foundation is disciplined.
- If the mix feels harsh, carve a small dip in the bass around 2.5–5 kHz where metallic resonance can stack up.
- keep the sub simple and mono
- use the drums as the timing reference
- create movement through MIDI edits and rests
- let the mid-bass add character, not low-end clutter
- use saturation, sidechain, and resampling to finish the vibe without breaking clarity
That’s where a subsine workflow shines. You use a dedicated sine or near-sine sub, then create movement by carving out note length, velocity, gaps, and call-and-response pockets around the drums. Instead of relying on huge synth complexity, you make the track feel expensive through editing choices. That’s very DnB: the groove is the arrangement.
This is especially useful in:
The key idea: a timeless roller doesn’t feel crowded. It feels like the sub and drums are locked together in a controlled push-pull.
What You Will Build
You’ll build a subsine roller bass workflow in Ableton Live 12 that gives you:
Musically, the result will feel like a deep DnB loop with:
Think of it as a rolling bass statement built for mixdown discipline and arrangement longevity.
Step-by-Step Walkthrough
1. Start with a drum-first 8-bar loop
Build your groove before the bass. In Ableton Live, lay down:
- a kick on the main downbeats
- a snare on 2 and 4
- a break layer with chopped ghost notes or shuffle
- hats/percs with a restrained swing
For a roller, the drums need a stable spine. Use Groove Pool lightly if needed, but don’t overhumanize the pocket. A good starting point is a subtle MPC-style swing around 53–57%, or a break that already carries swing.
Make sure your drum bus has headroom. Aim for the master peaking well below clipping while you build. You want space for the sub to breathe later.
Why this works in DnB: the bass in rollers is usually felt against the drum grid, not floating above it. If the drums aren’t solid first, the subline won’t know where to lean.
2. Create a dedicated sub track with Operator or Drift
Add a MIDI track and load Operator for a clean sine sub, or Drift if you want a little more analog drift and movement. For a timeless roller, keep the sub simple.
Good Operator starting points:
- Oscillator A: sine
- No unneeded oscillators
- Filter off or very minimal
- Envelope: fast attack, medium release
Suggested settings:
- Attack: 0–5 ms
- Decay: 180–350 ms if you want a natural note tail
- Release: 60–120 ms for tight notes, or 150–220 ms for more flowing lines
- Mono/Legato: on if you want clean note transitions
- Glide: very subtle, around 20–60 ms for slides between select notes
Write a bass pattern that mostly follows the kick/snare energy but avoids constant note density. Use longer notes on strong moments and shorter notes where the drum edits need room.
Keep the sub centered and mono. If you use Utility, set Width to 0% on the sub track. This is non-negotiable for clean DnB low end.
3. Map the subline to the drums, not just the key
Now edit the MIDI notes so the bassline serves the groove. In a roller, the sub often works best when it:
- hits slightly before or right with the kick
- leaves space after the snare
- creates response notes in the gaps between drum hits
- avoids stepping on break ghost notes that carry swing
Think in phrases of 1-bar and 2-bar conversations. For example:
- Bar 1: root note + short answer note
- Bar 2: longer sustain into the snare
- Bar 3: variation with a pickup note
- Bar 4: a tiny rest or octave drop
Use note lengths strategically:
- Shorter notes for tight, nervous drive
- Longer notes for weight and hypnotic flow
- Tiny rests to make the next note feel bigger
In Ableton’s piano roll, zoom in and make sure note ends are intentional. The “edit” part of the workflow matters here: a roller is often just a few notes, but every note length is doing arrangement work.
4. Add a mid-bass layer that leaves the sub alone
Duplicate the bass track or create a second track for a mid layer. This should not be a huge, wide mess — it should support the sub with character, movement, and presence.
Good stock device chains:
- Wavetable or Operator for a simple reese-ish or harmonic layer
- Saturator for edge
- Auto Filter for movement
- Utility to control width and mono compatibility
Start with a simple waveform pair or unison sound and keep the low end under control. Then high-pass the mid layer so it doesn’t fight the sub:
- High-pass around 90–140 Hz
- adjust by ear depending on kick/sub relationship
Suggested movement ideas:
- slight filter motion with Auto Filter
- subtle detune or phase drift
- very light chorus-style width only above the sub range
- envelope modulation on filter cutoff for attack movement
The goal is to create a bass layer that “speaks” in the mids while the sine sub remains clean. This is where the roller starts sounding modern without losing the timeless low-end core.
5. Carve the bass rhythm using edits, not extra layers
This is the heart of the lesson. Instead of piling on more sounds, carve momentum through MIDI edits and note phrasing.
In your bass MIDI:
- remove notes that compete with snare accents
- shorten notes before important drum fills
- add micro-rests before drop hits
- create call-and-response with ghost notes or pickup notes
Try this editing logic:
- Main note on beat 1 or the “push” note before the snare
- response note in the offbeat
- gap where the snare or break chop can breathe
- pickup into the next bar
If the line feels too flat, don’t instantly add another synth. First, try:
- moving one note earlier by a 16th
- shortening a note by 20–40%
- deleting one note from the second half of the bar
- adding a repeated note with slightly lower velocity
In DnB, these edit choices are often more effective than more sound design. A bassline that leaves room feels bigger than one that fills everything.
6. Shape the bass with Saturator, EQ Eight, and envelope discipline
Now polish the bass bus. Group the sub and mid-bass into a Bass Rack or group track, then process carefully.
Suggested stock chain:
- EQ Eight
- Saturator
- Utility
- optional Compressor or Glue Compressor
Practical starting points:
- Use EQ Eight to cut mud around 200–400 Hz if the bass feels boxy
- Add a very gentle low shelf only if needed; don’t boost blindly
- Use Saturator with Drive around 1–4 dB for harmonics
- Keep Soft Clip on if you want controlled density
- Use Utility to keep the bass centered and check mono
Important: don’t overcompress the sub. If you want more consistency, use Compressor with gentle settings:
- Ratio: 1.5:1 to 2:1
- Attack: 20–40 ms
- Release: 80–150 ms
- just enough gain reduction to smooth peaks
If the bassline loses punch, it’s usually because the edits are too busy or the dynamics were flattened. Let the notes do some of the work.
7. Create drum/bass space with sidechain and arrangement-aware edits
In DnB, sidechain is not just a pumping effect — it’s a space-making tool. Use Compressor or Glue Compressor on the bass, sidechained from the kick, and possibly a gentler second sidechain from the snare if needed for the densest roller sections.
Suggested starting point:
- Sidechain threshold so you get 2–5 dB of gain reduction on kick hits
- Faster attack for cleaner pocket
- Release tuned to the groove, often 80–180 ms
But don’t rely on sidechain alone. Edit the bass notes so they already avoid the snare and kick collision zones. That way, sidechain becomes glue, not a fix.
Arrangement-wise, build the roller in phrases:
- 8 bars intro
- 16 bars first drop
- variation every 4 or 8 bars
- use a half-bar bass edit or tiny stop before a switch-up
- bring in an alternate bass rhythm every 16 bars
Example context: a deep 174 BPM roller might start with a DJ-friendly intro, then drop into a 16-bar loop where the bassline repeats a two-bar idea with tiny variations on bar 4, 8, 12, and 16. That keeps the track hypnotic, but the edits stop it from feeling static.
8. Resample your bass edits for movement and finishing
Once the bass groove is working, resample it. In Ableton Live, freeze and flatten, or record the bass output onto a new audio track. Then you can edit the audio like a drum break.
This is especially useful for:
- tiny reverse tails into new phrases
- chopped bass pickups before snare hits
- one-shot resample stabs for fills
- audio fades that create cleaner transitions than MIDI alone
Process the resampled audio lightly:
- Warp only if necessary and carefully
- use Simpler in Slice mode if you want to re-chop bass phrases
- add automation to Auto Filter or Reverb/Delay throws on selected transition notes
This resampling approach gives you better control over edits in heavier DnB, especially if the original MIDI feels too stiff. It also helps you commit to a sound, which is often what turns a decent loop into a finished roller.
Common Mistakes
- Fix: remove notes before adding layers. A roller needs air.
- Fix: use Utility on the sub track and keep width at 0%.
- Fix: high-pass the mid layer around 90–140 Hz and check the crossover by ear.
- Fix: edit note lengths so the snare has space to land. The snare is part of the bass groove in DnB.
- Fix: use light saturation and gentle compression. If the bass gets smaller, back off.
- Fix: create 4- or 8-bar edits, not just a looping 1-bar phrase.
- Fix: strengthen kick transient, snare body, and break edit timing before increasing bass complexity.
Pro Tips for Darker / Heavier DnB
Mini Practice Exercise
Spend 15 minutes building a roller-ready bass edit:
1. Make a simple 8-bar drum loop at 174 BPM with kick, snare, and a chopped break.
2. Create a sine sub in Operator and write a 2-bar bass phrase with only 4–6 notes.
3. Duplicate it and make three edits:
- one version with shorter notes
- one version with a pickup note before the bar
- one version with a rest before the snare
4. Add a mid-bass layer with Wavetable or Operator, high-pass it, and saturate lightly.
5. Group the bass, then check mono with Utility.
6. Resample one pass of the bass and chop one tiny fill for the end of bar 8.
7. Compare the original and edited versions. Ask: which one grooves harder without sounding busier?
Goal: make the bassline feel like it’s moving forward even when the note count stays low.
Recap
A strong subsine roller workflow is about edit discipline, not overload. Build a clean mono sub, support it with a controlled mid layer, and carve momentum through note length, gaps, syncopation, and arrangement-aware variation.
The big takeaways:
If your roller feels timeless, it’s probably because the bassline and drums are breathing together. That’s the real DnB edit craft.

