Main tutorial
Break Lab: Ableton Live 12 Sampler Rack Playbook for Crisp Transients + Dusty Mids
Jungle / oldskool DnB sound design tutorial 🥁⚡
1. Lesson overview
In this lesson, you’ll build a Break Lab Sampler Rack in Ableton Live 12 that turns one sampled break into a tight, mix-ready jungle weapon:
- Crisp transients for kick/snare definition
- Dusty mids for character, crunch, and vintage glue
- Controlled low end so the break works with rolling basslines
- Performance-friendly mapping so you can chop, layer, and re-arrange quickly
- Simpler
- Sampler
- Drum Rack
- EQ Eight
- Saturator
- Drum Buss
- Glue Compressor
- Transient shaping techniques
- Utility
- Optional: Roar or Redux if you want extra grime in Live 12 🎛️
- Load a break into Simpler/Sampler
- Split the break into transient / body / dust layers
- Process each layer differently
- Trigger or sequence chopped hits in a Drum Rack
- Save the rack as a reusable jungle toolkit
- Amen-style bite
- Think break-style bounce
- Dusty upper mids
- Snappy snare crack
- Lean kick thump
- Enough grit to feel authentic, but still controlled enough for modern low-end systems
- Clear kick and snare transient peaks
- Some room tone / air / hiss
- Natural ghost notes
- Not too much sub information
- Amen-style breaks
- Funk breaks
- Old soul loop chops
- Drummer breaks with personality
- Mode: Slice or Classic
- Warp: Off for initial sampling if you want the break’s natural tone
- Trigger: Gate for responsive playback
- Voices: 1 for single-hit chops, or more if layering
- Fade: very short, just enough to prevent clicks
- Set Mode = Classic
- Use the waveform to isolate kick/snare sections
- Set Mode = Slice
- Slice by transients
- Map slices to MIDI notes
- Does the snare crack through?
- Does the kick click without becoming fizzy?
- Is the top end sharp but not piercing?
- vinyl air
- mic bleed
- tape saturation
- room noise
- old break character
- Transients: loudest or tied with body
- Body: slightly below or equal
- Dust: quietest, but audible in solo
- raise body
- reduce body around 200–400 Hz
- raise transients or add a little saturation
- raise dust layer slightly and soften the top end
- ghost notes
- snare pickups
- reversed hits
- single kick stutters
- tiny silence gaps
- Put the main snare on 2 and 4 feelually, but offset it with syncopated ghost hits
- Add kick variations before the snare for momentum
- Double a snare hit at the end of a bar for fill energy
- Duplicate and nudge hits by a few milliseconds
- Use Extract Groove from the original break
- Apply groove lightly to your chopped MIDI
- Use velocity variation so repeated hits don’t feel robotic
- Tiny pitch shifts on selected chops
- Reverse reverb-style transitions
- Short filtered repeats
- One delayed ghost snare per 2 bars
- A tape-ish breakdown section before the drop
- Delay
- Echo
- Reverb on sends only
- Auto Filter for breakdown movement
- Simple Delay for quick dubby break echoes
- Let the break occupy the midrange rhythm pocket
- Let the bass own the sub and lower low-mid
- Avoid clutter around 120–250 Hz
- Use sidechain carefully if needed, but don’t kill the break’s drive
- Save the Drum Rack
- Save your Audio Effect Rack
- Label chains clearly:
- amen flips
- halftime breaks
- rollers
- atmospheric jungle intros
- darkstep-style percussion layers
- Low-pass dust around 6–8 kHz
- Leave transient layer brighter
- Keep the master break balanced
- Saturator
- Roar
- Overdrive
- Redux very lightly
- Short Reverb
- Very low mix
- High-pass the reverb return aggressively
- attack around 2–5 kHz
- body around 180–250 Hz only if needed
- a snare tail
- a kick ghost
- a reversed cymbal slice
- a hi-hat flurry from the break itself
- feel energetic at low volume
- have a strong snare crack
- retain dusty character
- leave space for the bass
- one darker and more brutal
- one more classic and breaky
- Crisp transients for punch
- Dusty mids for jungle character
- Controlled body for groove and weight
- A flexible workflow for slicing, layering, and arranging breaks in DnB
- Split breaks into transient / body / dust
- Use EQ Eight, Saturator, Drum Buss, Glue Compressor, Utility
- Keep low end controlled and let the bassline breathe
- Use velocity, micro-edits, and groove for jungle feel
- Save your rack as a reusable template for future tracks
This is not just about making a break sound “vintage.” It’s about making it hit hard in a modern mix while still carrying that oldskool pressure from jungle and early DnB.
We’ll use stock Ableton devices, mainly:
---
2. What you will build
By the end, you’ll have a multi-layered break processing rack that lets you:
Final sound target
Think:
---
3. Step-by-step walkthrough
Step 1: Pick the right break
Start with a break that has:
Good candidates:
Practical tip
If the break is too clean, it may sound sterile.
If it’s too compressed already, it may lose punch when you process it.
Best practice: choose a break that sounds good raw, but slightly imperfect.
---
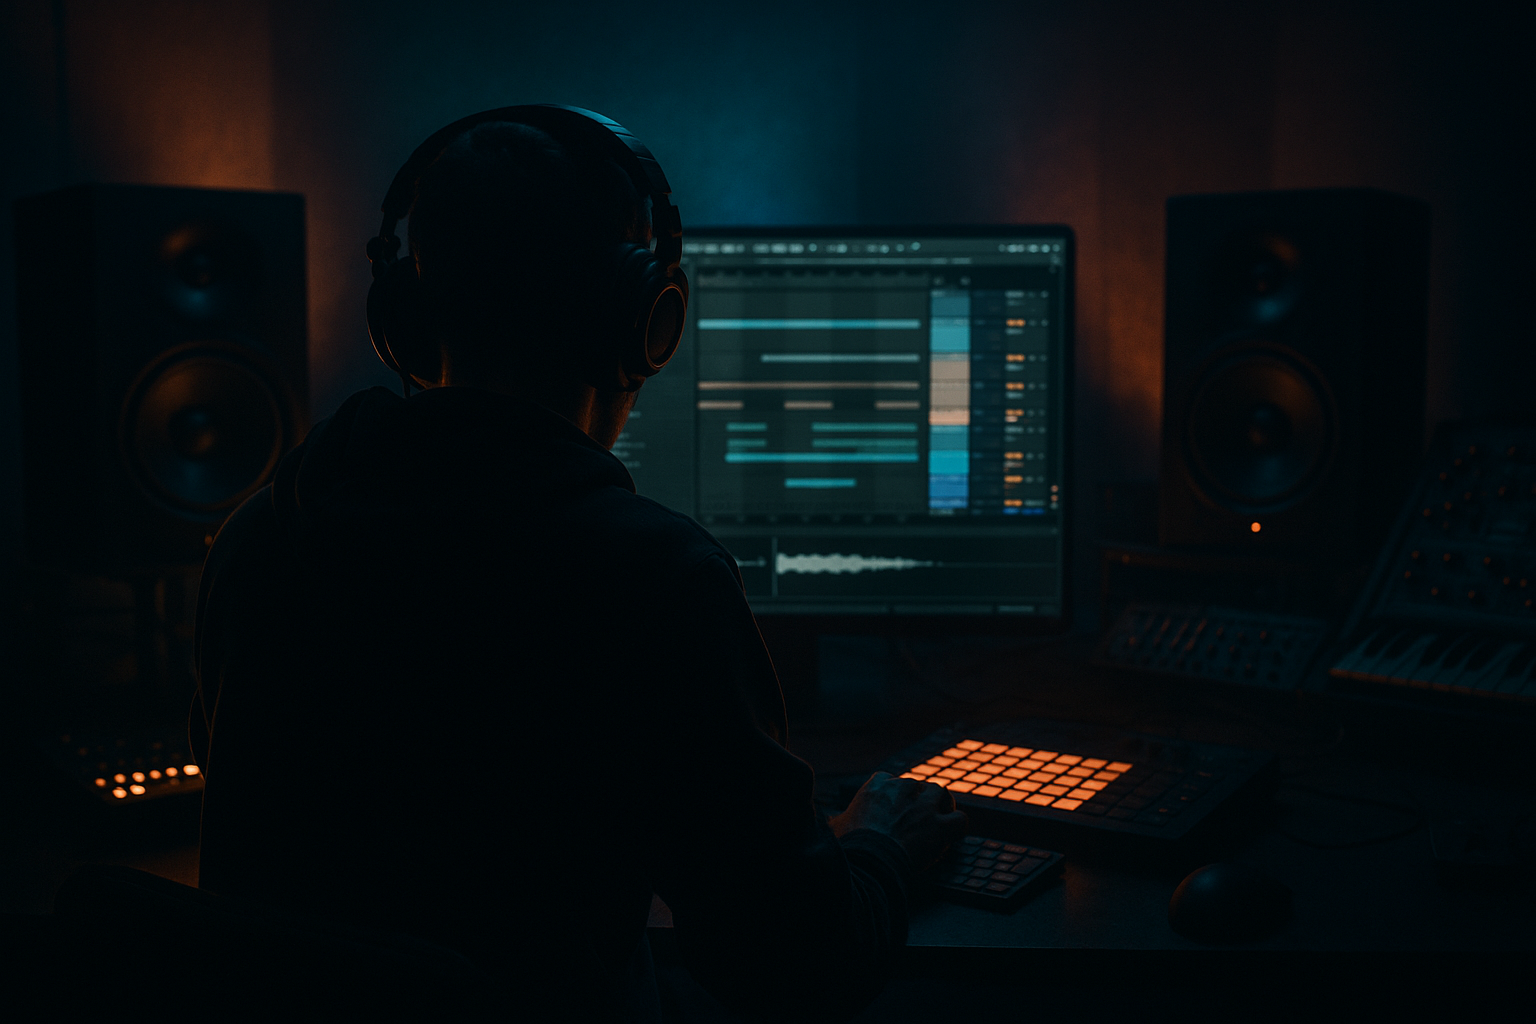
Step 2: Put the break into Simpler
Create a new MIDI track and drop the break into Simpler.
Suggested Simpler settings
If you want to chop the break manually:
If you want automatic slicing:
Why this matters
For jungle and DnB, the groove often comes from micro-edits and re-triggered fragments, not just looping the full break.
---
Step 3: Make a break rack with 3 layers
Now build a 3-chain Audio Effect Rack or place three Simpler instances in a Drum Rack:
Layer A — Transients
Purpose: bring out attack, snap, and definition.
Layer B — Body
Purpose: preserve the main punch and groove.
Layer C — Dust / Mid character
Purpose: add grit, room, and nostalgic “vinyl” energy.
---
Option 1: Use an Audio Effect Rack on the break
Duplicate the break track and process each copy as a layer.
Option 2: Use Drum Rack + Simpler cells
Best for arrangement and finger-drumming chopped breaks.
For this tutorial, let’s do the Drum Rack approach because it’s more flexible for drum & bass programming.
---
Step 4: Create the transient layer
In one Drum Rack pad, load a Simpler instance with the break or an isolated hit.
Processing chain for Transient Layer
1. EQ Eight
- High-pass around 120–180 Hz
- Gentle boost around 3–6 kHz if the snare needs crack
- Cut harshness if needed around 7–9 kHz
2. Drum Buss
- Drive: 5–15%
- Transients: 10–30%
- Boom: usually off or very low for this layer
3. Saturator
- Soft Clip: On
- Drive: 2–5 dB
- Output adjusted to match level
Goal
You want the transient layer to feel like the stick hit the skin, not like the whole drum sample.
Practical listening cue
Solo the layer and ask:
---
Step 5: Create the body layer
This layer carries the groove and weight.
Processing chain for Body Layer
1. EQ Eight
- Low-pass around 8–12 kHz
- High-pass around 35–50 Hz if the break has unusable sub rumble
- Optional small cut around 250–400 Hz if boxy
2. Glue Compressor
- Attack: 10–30 ms
- Release: Auto or 0.3–0.6 s
- Ratio: 2:1
- Aim for 1–3 dB gain reduction
3. Saturator
- Drive: 3–8 dB
- Analog Clip: optional
- Output matched carefully
Goal
This layer should feel like the meat of the break.
It should support the transient layer and make the groove feel solid.
---
Step 6: Create the dusty mids layer
This is where the oldskool vibe lives.
Processing chain for Dust Layer
1. EQ Eight
- High-pass around 200–350 Hz
- Low-pass around 6–9 kHz
- Focus on the 500 Hz–3 kHz zone
2. Redux or Roar (if you want extra grit)
- Redux:
- Bit reduction lightly, not full destruction
- Use sparingly to avoid harsh digital fizz
- Roar:
- Subtle drive and tone shaping for texture
3. Auto Filter
- Gentle band-pass movement if you want motion
- Keep resonance moderate
4. Utility
- Width control if the layer is too wide or messy
Goal
The dusty layer should sound like:
It should be felt more than noticed.
---
Step 7: Blend the layers
Bring all three layers up together.
Balance starting point
Quick balancing rule
If the break sounds exciting but small:
If it sounds muddy:
If it sounds flat:
If it sounds too modern/clean:
---
Step 8: Add break glue on the rack
On the Drum Rack group or Audio Effect Rack output, add a final glue chain:
Suggested master break chain
1. EQ Eight
- Small cleanup cuts
- Subtractive EQ only if needed
2. Glue Compressor
- Attack: 10 ms
- Release: Auto
- Ratio: 2:1
- Soft Clip: On
- 1–2 dB gain reduction
3. Saturator
- Drive: 1–3 dB
- Soft Clip: On
4. Utility
- Width control if needed
- Keep low frequencies centered
Important
Do not over-compress the rack.
Jungle breaks need movement, not flat lifeless squash.
---
Step 9: Chop for jungle flow
Now program the break into a DnB phrase.
Classic jungle approach
Use a 1-bar or 2-bar loop and create variation with:
MIDI ideas
Useful editing techniques in Ableton
---
Step 10: Make it feel oldskool, not generic
Oldskool DnB is about rhythm personality.
Add one or two of these:
Ableton devices that help
Keep these subtle. The break must stay functional in the mix.
---
Step 11: Place the break with bass correctly
In drum and bass, the break and bassline must cooperate.
Arrangement guidance
Practical mix move
If your bass is strong in the 150–300 Hz region, notch a small pocket in the break there.
If the snare is disappearing, make space in the bass around 1–3 kHz only if necessary.
---
Step 12: Save the rack as a reusable template
Once you like the sound:
- `Break_Transient`
- `Break_Body`
- `Break_Dust`
- `Break_Master`
Why this matters
You can reuse the system for:
This becomes a personal break-processing toolkit.
---
4. Common mistakes
1. Over-boosting the highs
Too much top-end boost makes breaks sound brittle, fake, and fatiguing.
Fix: use saturation and transient shaping before EQ boosts.
---
2. Crushing the break too hard
If the break has no dynamic movement, it loses the jungle feel.
Fix: reduce compression and keep some transient life.
---
3. Leaving too much low end in the break
This fights the bassline and muddies the drop.
Fix: high-pass non-kick layers and keep sub centered elsewhere.
---
4. Using only one break layer
A single untreated break often sounds flat in a modern mix.
Fix: split transient/body/dust and process each differently.
---
5. Ignoring velocity and groove
Even the best sample sounds stiff if every hit is identical.
Fix: vary velocities, nudge notes, and use groove sparingly.
---
6. Making the dust layer too loud
It can quickly turn into hissy clutter.
Fix: keep it low, focused in the mids, and filtered.
---
5. Pro tips for darker/heavier DnB
Tip 1: Darken the break with selective filtering
Instead of overall dullness, target the top end of the dust layer.
This gives a dark mix without killing definition.
---
Tip 2: Use parallel distortion
Duplicate the break and distort only the copy.
Try:
Blend in just enough to hear the aggression.
---
Tip 3: Add controlled room tone
A tiny amount of room or ambience can make the break sound bigger and dirtier.
This is especially useful for cinematic or dark jungle intros.
---
Tip 4: Emphasize the snare pocket
In heavier DnB, the snare is a focal point.
Boost:
But be careful not to crowd the bass.
---
Tip 5: Make fills with break fragments
Instead of adding extra percussion, reuse fragments of the break:
This keeps the groove cohesive and authentic.
---
6. Mini practice exercise
Task
Build a 2-bar jungle loop using one break and your new rack.
Instructions
1. Load one classic break into Simpler.
2. Split it into:
- transient layer
- body layer
- dust layer
3. Process each layer differently.
4. Write a 2-bar MIDI pattern with:
- 1 main snare emphasis
- 2–4 ghost hits
- at least 1 fill at the end of bar 2
5. Add a rolling sub bassline underneath.
6. Check the mix at low volume.
Success criteria
Your loop should:
Challenge version
Make two variations:
---
7. Recap
You’ve now built a practical Break Lab sampler rack for Ableton Live 12 that gives you:
Key takeaways
If you want, I can also turn this into:
1. a rack-by-rack Ableton preset blueprint, or
2. a full jungle break programming lesson with MIDI patterns and arrangement bars.

