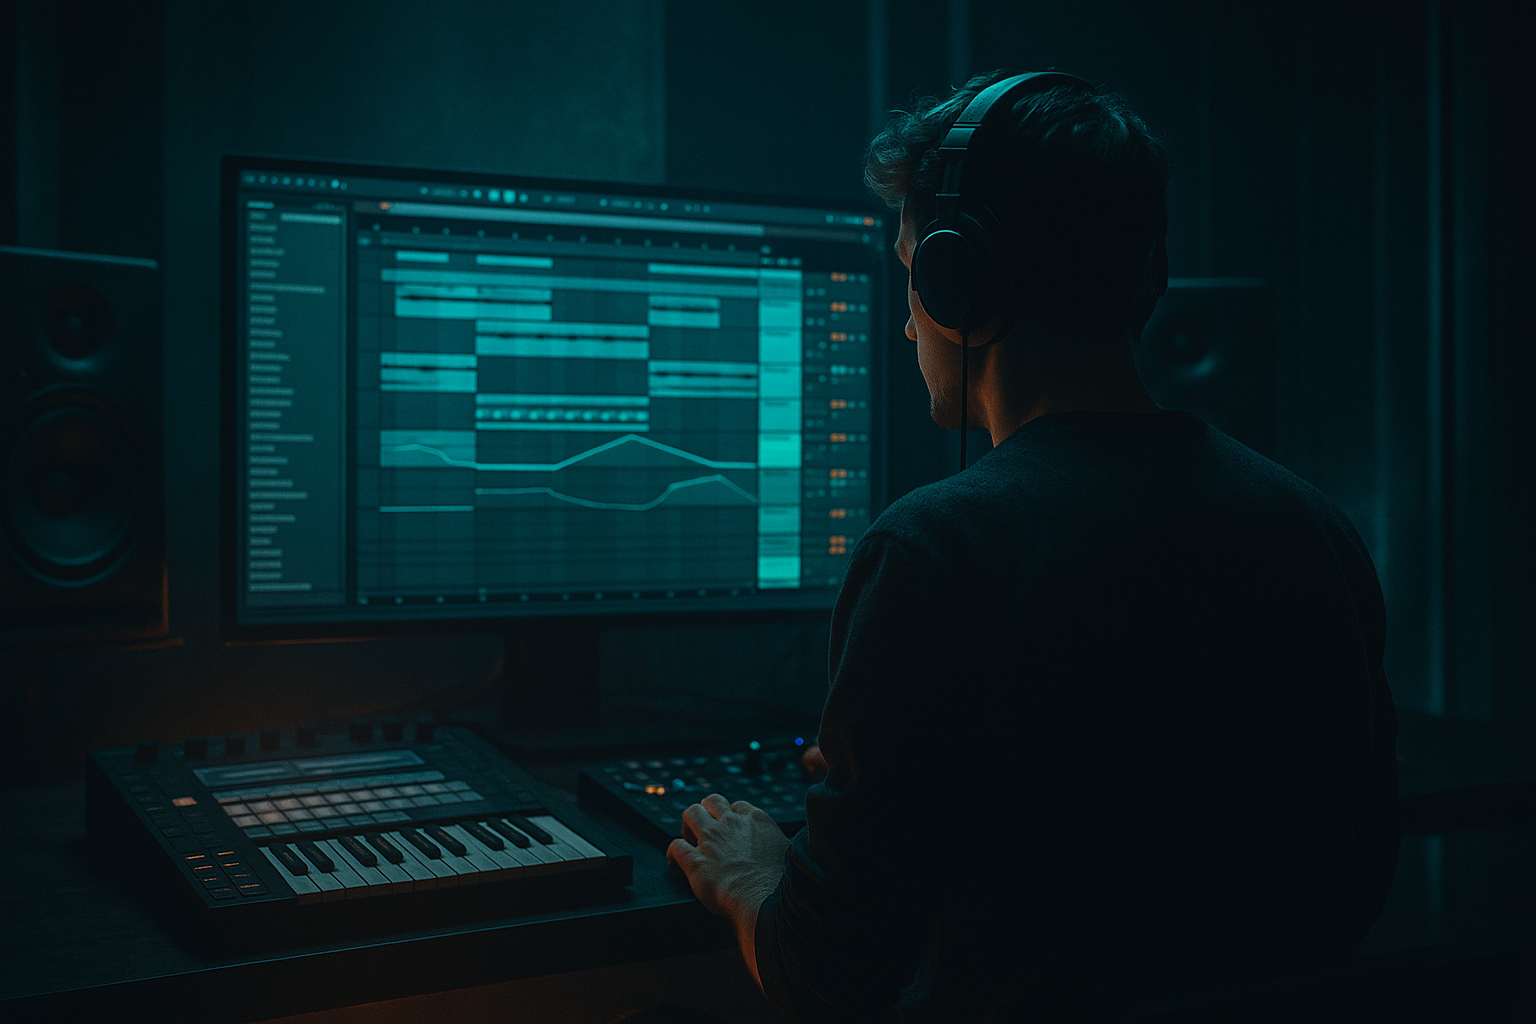
DNB COLLEGE

Drum & Bass Ableton Live 12 Tutorials

LESSON DETAIL

Bounce an Amen-style air horn hit with jungle swing in Ableton Live 12 (Intermediate)

An AI-generated intermediate Ableton lesson focused on Bounce an Amen-style air horn hit with jungle swing in Ableton Live 12 in the FX area of drum and bass production.

Back to lessons
Bounce an Amen-style air horn hit with jungle swing in Ableton Live 12 (Intermediate) cover image

Narrated lesson audio

The voice track includes the tutorial plus extra teacher commentary.

Open audio file

Main tutorial

Bounce an Amen‑style Air Horn Hit with Jungle Swing in Ableton Live 12 (DnB FX)

1) Lesson overview

You’re going to create that classic Amen-era air horn stab—but with a modern DnB workflow: tight timing, jungle swing, gritty resampling, and a clean bounce-to-audio process so it lands like a real record FX hit. 🥁📣

This is an FX lesson, but it’s rooted in proper jungle/DnB arranging: the horn will interlock with your break groove instead of floating on top.

---

2) What you will build

By the end you’ll have:

  • A one-shot air horn hit that feels like it came from an old rave tape
  • Jungle swing that matches your Amen/think break groove
  • A resampled audio clip you can drop into a tune instantly
  • A small FX chain you can reuse for other stabs (sirens, shouts, horn riffs)
  • ---

    3) Step-by-step walkthrough

    A. Set the DnB session context (so the swing makes sense)

    1. Tempo: set project to 170–174 BPM (start at 172).

    2. Create a basic break reference (optional but recommended):

    - Drop an Amen loop (or any break) onto an audio track.

    - Warp mode: Beats (or Complex if it’s messy).

    - Set it looping 1–2 bars so you can A/B feel.

    Why: Swing is relative. Jungle swing is usually “late 16ths” against a break pocket.

    ---

    B. Load your air horn + get it into a playable instrument

    1. Add a MIDI track → drop in Simpler (Ableton stock).

    2. Drag an air horn sample into Simpler.

    3. In Simpler:

    - Mode: One-Shot

    - Trigger on (so it plays full hit even if note is short)

    - Fade Out: 10–40 ms (prevents clicks)

    4. Set Start so the horn hits immediately (trim silence).

    5. Optional but very DnB: pitch it to the tune’s key

    - Transpose: try -2, -5, or -7 semitones for darker horn weight

    ---

    C. Program the horn rhythm (Amen-style placement)

    Classic jungle horns often answer the snare or hype the 2/4. Start simple and then add swing.

    1. Make a 1-bar MIDI clip.

    2. Put the horn on these 16th-grid positions to start (at 172 BPM):

    - Beat 2 (snare area): 1.2.1

    - Late pick-up: 1.2.4 (the “and-a” before beat 3)

    - Optional extra: 1.4.4 (late bar push)

    3. Velocities (important for groove):

    - Main hit (1.2.1): 110–127

    - Ghost/late hits: 70–95

    This gives you the “call” + “drag” feel that sits with Amen edits.

    ---

    D. Apply jungle swing (two reliable methods)

    #### Method 1: Groove Pool (most authentic + easiest to match breaks)

    1. Open Groove Pool (bottom left “hot-swap” / groove icon).

    2. Drag in a groove:

    - Good starting points: MPC 16 Swing 55–65 (stock grooves)

    - Or extract from your break:

    - Right-click your Amen audio clip → Extract Groove

    3. Apply groove to your horn MIDI clip:

    - Drag the groove onto the clip.

    4. Groove settings (starting point):

    - Timing: 70–95%

    - Random: 2–6% (tiny human wobble)

    - Velocity: 10–25% (more natural phrasing)

    5. Hit Commit once it feels right (optional, but helpful before bouncing).

    DnB tip: If your horn starts feeling late and lazy, reduce Timing or pull the first hit slightly earlier (see section F).

    ---

    #### Method 2: Clip swing via manual micro‑nudges (fast + precise)

    If you want that classic “late 16th” jungle shuffle:

    1. Keep grid at 1/16.

    2. Nudge the “off” hits later by 8–18 ms:

    - Move 1.2.4 later slightly

    - Move 1.4.4 later slightly

    3. Don’t nudge the main snare-answer hit too late; keep 1.2.1 mostly tight.

    This makes the horn dance with the break rather than just being quantized.

    ---

    E. Build the FX chain (stock Ableton) for rave tape energy 📼

    Put these audio effects after Simpler (in this order). Use as a starting chain:

    1. EQ Eight

    - HPF: 24 dB/oct @ 120–200 Hz (remove rumble)

    - Small dip if honky: -2 to -4 dB @ 700–1.2 kHz

    - Add bite if needed: +2 dB @ 3–5 kHz (careful)

    2. Saturator

    - Mode: Analog Clip

    - Drive: 3–8 dB

    - Soft Clip: On

    - Output: trim so it’s not slamming your master

    3. Redux (subtle “crust”)

    - Downsample: 6–12 (try 8)

    - Bit Reduction: 0–2 (keep low; you want texture, not pure 8-bit)

    4. Echo

    - Time: 1/8 or 1/8 dotted (dotted is very jungle)

    - Feedback: 15–30%

    - Filter: HP around 200 Hz, LP around 6–9 kHz

    - Dry/Wet: 8–18%

    - Optional: add a touch of Mod for movement (but keep it subtle)

    5. Reverb (small, dark room—don’t wash it)

    - Size: 15–30%

    - Decay: 0.8–1.6 s

    - Pre-delay: 10–25 ms

    - Low Cut: 250–400 Hz

    - Dry/Wet: 6–14%

    6. Limiter (just to catch peaks)

    - Ceiling: -1.0 dB

    - Only 1–3 dB gain reduction on the loudest hit

    Goal: It should feel printed and slightly abused, but still punchy.

    ---

    F. Make it “bounce” like an Amen hit (envelope + transient shaping)

    The bounce is often shorter + punchier than you think.

    In Simpler:

  • Amp Envelope:
  • - Attack: 0–2 ms

    - Decay: 250–600 ms (depends on the horn)

    - Sustain: 0% (often works great for one-shots)

    - Release: 60–140 ms (prevents abrupt cut)

    Optional stock transient control:

  • Add Drum Buss
  • - Drive: 2–6

    - Transients: +5 to +15 (adds crack)

    - Boom: Off (usually off for horn; enable only if you want chest)

    Micro-timing polish:

    If the horn flam-feels against the snare, zoom in and move the first hit earlier by 5–10 ms, while leaving swung late hits as-is. That’s the “tight-leading / loose-trailing” jungle feel.

    ---

    G. Resample + bounce to audio (clean, reliable workflow)

    You’ve got two good options. I’ll give you both:

    #### Option 1: Resampling (fast creative printing)

    1. Create a new Audio Track named: `HORN_PRINT`.

    2. Set its input to:

    - Audio From: your horn MIDI track

    - Post FX (important!)

    3. Arm `HORN_PRINT`.

    4. In the top bar, set Arrangement Record and record 1–2 bars of horn playback.

    5. Stop recording → trim the best hit(s).

    #### Option 2: Freeze + Flatten (neat and CPU-friendly)

    1. Right-click the horn MIDI track → Freeze Track

    2. Right-click again → Flatten

    3. Now it’s audio, with FX printed.

    ---

    H. Edit the printed audio like a real jungle producer

    This is where it starts to feel like a recorded Amen-era stab.

    1. In the printed audio clip:

    - Tighten start point (no silence)

    - Add a 2–10 ms fade in and 20–80 ms fade out

    2. Warp mode:

    - Often Off for one-shots

    - If you need to time-stretch: Beats with short transient

    3. Consolidate: select the hit → Cmd/Ctrl + J (creates a clean sample region)

    4. Save it:

    - Drag it into your User Library: `Samples/FX/Horns/Jungle`

    ---

    I. Arrangement ideas in rolling DnB / jungle

    Try these placements (they work because they respect break phrasing):

  • Drop accent: horn on bar 1 beat 2 of the drop (snare answer)
  • 2-bar call/response: horn on bar 1, a pitched-down variant on bar 2
  • Fill into transition: horn with Echo 1/8 dotted right before a crash
  • Sparse hype: one horn every 4 or 8 bars (classic restraint = more impact)
  • ---

    4) Common mistakes

  • Over-swinging everything: If every note is late, the groove collapses. Swing the off-hits, keep anchors tight.
  • Too much reverb: Jungle horns are often compact and dirty, not huge and washy.
  • Leaving low-end mud: Horns can carry unnecessary 100–250 Hz energy that fights bass and kick.
  • No clip fades: Clicks kill the illusion of “sampled from vinyl/tape”.
  • Printing pre-FX: Make sure you’re resampling Post FX if you want the full character.
  • ---

    5) Pro tips for darker/heavier DnB

  • Pitch down + shorten: Transpose -5 to -12 and reduce decay—instant darker stab.
  • Parallel distortion rack:
  • Create an Audio Effect Rack with two chains:

    - Clean chain (EQ + light sat)

    - Dirty chain (Saturator Drive 8–12 dB + Redux heavier)

    Blend dirty chain at 10–30% for weight without ruining clarity.

  • Gated room vibe:
  • Put Gate after Reverb (threshold so it chops the tail). That “rave room but controlled” sound is deadly in techy rollers.

  • Midrange focus:
  • In heavy DnB, horns live in 700 Hz – 5 kHz. Shape there so they cut through reeses without screaming.

  • Re-trigger stutter for menace:
  • Duplicate the printed audio and create a 1/32–1/16 stutter right before a drop (keep it short, like 1 beat).

    ---

    6) Mini practice exercise (10–15 minutes)

    1. Make three versions of the same horn:

    - A: Groove Pool swing (Timing 85%)

    - B: Manual ms nudges (late hits +12 ms)

    - C: Same as B but pitch down -7 and heavier Saturator

    2. Print all three to audio.

    3. Drop them into a 16-bar loop with:

    - Break (Amen)

    - Bass (simple reese or sub)

    - One hat loop

    4. Decide which horn version sits best without turning it up.

    ---

    7) Recap

  • You built a Simpler-based air horn one-shot, placed it with Amen-aware rhythm, and added jungle swing via Groove Pool or micro-nudges.
  • You used a practical stock Ableton FX chain (EQ Eight → Saturator → Redux → Echo → Reverb → Limiter) to get that tape/rave vibe.
  • You bounced/resampled to audio and edited it like a proper jungle sample so it’s ready to drop into any rolling DnB arrangement. 📣🥁

If you tell me your BPM and whether your break is more Amen-chopped or 2-step steppy, I can suggest exact horn placements for a 16-bar drop pattern.

Ask GPT about this lesson

Chat with the lesson tutor, get follow-up help, or use quick actions.

Turn this into exact step-by-step Ableton actions I can follow.
## Bounce an Amen-style air horn hit with jungle swing (Ableton Live 12) — exact actions ### 0) Session setup (so swing actually matches jungle) 1. **Set tempo:** Top-left BPM → type **172**. 2. **Add a break reference (recommended):** - Drag an **Amen loop** into **Arrangement View** on a new **Audio Track**. - Click the clip → enable **Warp**. - Set **Warp Mode = Beats**. - Set **Loop** ON and loop **1–2 bars**. 3. Press **Space** to play and make sure the break is locked to tempo. --- ## 1) Put the air horn into Simpler (playable one-shot) 1. **Create MIDI track:** `Cmd/Ctrl + Shift + T`. 2. From the Browser: - **Instruments → Simpler** → drag to the MIDI track. 3. Drag your **air horn sample** onto Simpler’s waveform area. 4. In Simpler set: - **Mode = One-Shot** - **Trigger = ON** (so short MIDI notes still play the full hit) - **Fade Out = 10–40 ms** (prevents clicks) 5. Trim the sample start: - In Simpler, drag the **Start** marker so the horn hits immediately (no silence). 6. Optional pitch (classic darker DnB weight): - Set **Transpose = -2, -5, or -7 st** (try **-5** first). --- ## 2) Program the Amen-style horn rhythm (1 bar) 1. Select the horn MIDI track. 2. Create a MIDI clip: - In Arrangement, drag to create **1 bar**, or in Session press **Cmd/Ctrl + Shift + M** (then set length to 1 bar). 3. Double-click the clip to open the **MIDI Editor**. 4. Set grid: - In the MIDI editor, right-click grid or use the grid menu → choose **1/16**. 5. Add notes (classic placements): - Place a note at **1.2.1** (beat 2 downbeat—snare-answer area) - Place a note at **1.2.4** (late pickup into beat 3) - Optional: place a note at **1.4.4** (late push at end of bar) 6. Set velocities (groove matters in jungle): - Click a note → in the velocity lane set: - **1.2.1 = 110–127** - **1.2.4 / 1.4.4 = 70–95** --- ## 3) Add jungle swing (pick ONE method) ### Method A — Groove Pool (best for matching a break) 1. **Extract groove from the Amen:** - Click the Amen audio clip → right-click → **Extract Groove**. 2. Open **Groove Pool**: - Click the **Groove Pool** icon (bottom-left area), or open it from the View options. 3. You’ll see the extracted groove appear in the Groove Pool list. 4. Apply it to the horn MIDI clip: - Drag the groove from Groove Pool onto your **horn MIDI clip**. 5. Dial in the groove (starting points): - **Timing: 70–95%** (start ~**85%**) - **Random: 2–6%** - **Velocity: 10–25%** 6. If it feels right and you want it “printed”: - In Groove Pool, hit **Commit** (so timing becomes actual note positions). ### Method B — Manual “late 16th” micro-nudge (fast + precise) 1. Keep grid at **1/16** but temporarily disable snapping: - Click the **magnet** (Snap) OFF, or hold **Cmd/Ctrl** while dragging (depending on your settings). 2. In the MIDI editor, nudge only the off hits: - Move **1.2.4** later by about **+8 to +18 ms** - Move **1.4.4** later by about **+8 to +18 ms** 3. Keep **1.2.1** mostly tight (don’t drag it late). 4. If the whole phrase feels late, use track delay: - In Mixer, **Show Track Delays** (from View options) - Set the horn track delay to **-5 to -15 ms** (pulls it forward while keeping swing shape). --- ## 4) Shape the “bounce” (envelope + transient) ### In Simpler (Amp Envelope) 1. In Simpler, go to **Controls** (if not already). 2. Set **Amp Envelope** roughly: - **Attack: 0–2 ms** - **Decay: 250–600 ms** - **Sustain: 0%** - **Release: 60–140 ms** 3. Goal: punchy stab that doesn’t hang over the break. ### Optional: add transient bite (Drum Buss) 1. After Simpler, add **Audio Effects → Drum Buss**. 2. Set: - **Drive: 2–6** - **Transients: +5 to +15** - **Boom: OFF** (usually; turn on only if you deliberately want extra chest) --- ## 5) Build the rave-tape FX chain (stock devices, exact order) On the horn MIDI track **after Simpler** (and after Drum Buss if you used it), add: 1. **EQ Eight** - Enable a **High-Pass** filter: **24 dB/oct @ 120–200 Hz** - If honky: bell dip **-2 to -4 dB @ 700–1.2 kHz** - If it needs cut: gentle boost **+1 to +2 dB @ 3–5 kHz** (don’t overdo) 2. **Saturator** - **Mode: Analog Clip** - **Drive: 3–8 dB** - **Soft Clip: ON** - Adjust **Output** so the track isn’t slamming 3. **Redux** - **Downsample: 6–12** (try **8**) - **Bit Reduction: 0–2** 4. **Echo** - **Time: 1/8** or **1/8 dotted** (dotted = very jungle) - **Feedback: 15–30%** - **Filter:** HP ~**200 Hz**, LP **6–9 kHz** - **Dry/Wet: 8–18%** 5. **Reverb** - **Size: 15–30%** - **Decay: 0.8–1.6 s** - **Pre-Delay: 10–25 ms** - **Low Cut: 250–400 Hz** - **Dry/Wet: 6–14%** 6. **Limiter** - **Ceiling: -1.0 dB** - Aim for only **1–3 dB** gain reduction on peaks **Quick mono/phase check (recommended):** - Add **Utility** at the end → try **Width 0–50%** and/or **Mono** toggle. Keep the setting that punches hardest without disappearing. --- ## 6) Print (bounce) the horn to audio (two reliable workflows) ### Option 1 — Resample to a new audio track (best “print a take” vibe) 1. Create a new **Audio Track**: `Cmd/Ctrl + T`. 2. Rename it **HORN_PRINT**. 3. In **HORN_PRINT** input routing: - **Audio From:** select your horn MIDI track - Choose **Post FX** (important—prints the character) 4. Arm **HORN_PRINT** (record-enable). 5. Switch to **Arrangement View**. 6. Press **Arrangement Record** (top transport record button). 7. Record **1–2 bars** while your horn plays. 8. Stop, then you’ll have printed audio on HORN_PRINT. ### Option 2 — Freeze + Flatten (clean + CPU-friendly) 1. Right-click the horn MIDI track header → **Freeze Track**. 2. Right-click again → **Flatten**. 3. Now it’s audio with FX baked in. --- ## 7) Edit the printed audio like a jungle one-shot 1. Click the printed horn clip on **HORN_PRINT**. 2. Tighten the start: - Drag the clip start so the transient starts immediately (no dead air). 3. Add fades (kills clicks, feels “sampled”): - In Clip View or by dragging fade handles: - **Fade In: 2–10 ms** - **Fade Out: 20–80 ms** 4. Turn Warp **Off** for one-shots (usually best): - Clip View → uncheck **Warp** (unless you must time-stretch). 5. Consolidate a clean one-shot: - Highlight just the hit region → **Cmd/Ctrl + J**. 6. Save it: - Drag the consolidated clip into **User Library** (e.g. `Samples/FX/Horns/Jungle/`). - Name it with BPM/key/role (example: `AirHorn_172_-5st_Main.wav`). --- ## 8) Quick placement check (DnB arrangement sanity) - Drop the printed one-shot on **bar 1 beat 2** of your drop, then optionally a late pickup on **1.2.4**. - Keep horns **sparse** (every 4–8 bars) so they hit like classic rave punctuation, not a lead. --- If you tell me: 1) your exact BPM, 2) whether your break is straight Amen loop or heavily chopped, …I’ll give you a **16-bar horn pattern** (exact bar/beat placements) that locks to your groove.

Narration script

Show spoken script
Title: Bounce an Amen-style air horn hit with jungle swing in Ableton Live 12 (Intermediate)

Alright, let’s build one of the most iconic jungle FX moves ever: that Amen-era air horn stab. But we’re not just dropping a sample on the grid and calling it a day. We’re going to make it bounce like it came off a rave tape, lock it into jungle swing, print it to audio, and end with a one-shot you can throw into any drum and bass tune instantly.

Quick mindset shift before we touch anything: this is an FX lesson, but in jungle and DnB, FX are part of the groove. If the horn doesn’t interlock with the break pocket, it’ll feel like a sticker on top of your beat instead of a piece of the record.

First, set the session up so swing actually means something. Put your tempo in the 170 to 174 zone. I’ll start at 172 BPM. And I highly recommend you grab an Amen loop or any classic break and drop it on an audio track as a reference. Loop one or two bars so it just runs. Warp it if you need to; Beats mode is usually fine for a clean break. The reason we do this is simple: swing is relative. Your horn groove needs a “grid owner.” Most of the time in jungle, the break owns the feel, not the MIDI grid.

Now let’s get the air horn into a playable instrument. Create a new MIDI track and drop in Simpler, the stock one. Drag your air horn sample into Simpler. Set Simpler to One-Shot mode, and turn Trigger on, so the horn plays its full character even if you tap a short MIDI note. Add a tiny Fade Out, somewhere like 10 to 40 milliseconds, just to kill clicks at the end.

Then trim the start. This matters more than people think. If there’s even a little silence before the transient, your timing will always feel late and you’ll keep “fixing” groove when the real issue is the sample start. So move the Start point so the horn hits immediately.

Optional, but extremely DnB: pitch it into the vibe of your tune. Try transposing down by 2, 5, or 7 semitones. Minus 5 and minus 7 are classic for making it heavier and less cartoony. Just remember: the lower you pitch, the more you may want to shorten it so it doesn’t feel like it’s blooming forever over the drums.

Cool. Now let’s program an Amen-style rhythm. Make a one-bar MIDI clip. Start with a placement that answers the snare and adds that late pickup energy.

Put your main horn hit on beat 2, right where the snare energy lives. In Ableton’s clip display, that’s 1.2.1.

Then add a late pickup hit at 1.2.4. That’s the “and-a” area before beat 3. This is where a lot of jungle swagger comes from: not just the main hit, but the little late drag that makes it feel like it’s leaning into the next phrase.

If you want an extra push at the end of the bar, add one more at 1.4.4. Not always, but it’s a great classic bar-turnaround poke.

Now do velocities. This is one of the fastest ways to make it feel sampled instead of programmed. Make the main hit strong, around 110 up to 127. Then make the late hits lower, like 70 to 95. Teacher tip: if everything is loud, nothing feels like a “phrase.” Jungle is full of implied dynamics, even when it’s smashed on tape.

Now for the swing. You’ve got two solid methods, and you should be comfortable with both.

Method one is Groove Pool, and it’s the most authentic way to match a break. Open Groove Pool. You can start with something like an MPC 16 Swing around 55 to 65, but the real move is extracting groove from your Amen. Right-click the Amen audio clip and choose Extract Groove. Now you’ve captured the pocket of that exact loop.

Drag that groove onto your horn MIDI clip. Then adjust the groove settings. Timing around 70 to 95 percent is a good range. Add a tiny Random value, like 2 to 6 percent, so it doesn’t feel machine-perfect. And push a bit of Velocity influence, maybe 10 to 25 percent, so the groove isn’t only timing—it’s also phrasing.

If you like it, you can commit the groove, which bakes it into the MIDI timing. I like committing when I’m about to print audio, because it keeps things predictable.

Method two is manual micro-nudging, which is fast and super precise. Keep the grid at 1/16. Then take only the off hits, like 1.2.4 and 1.4.4, and nudge them later by about 8 to 18 milliseconds. That’s the zone where it starts to shuffle instead of sounding like a mistake. Leave your main anchor hit, the one on 1.2.1, mostly tight. This is key: if you swing the anchors too, the whole groove collapses into mush. In jungle, the anchors stay confident and the pickups do the dancing.

Now let’s build the character chain. We’re going to do this with stock Ableton effects, in a very “printed” order. After Simpler, add EQ Eight first. High-pass the horn somewhere around 120 to 200 Hz with a steep slope. Horns love to carry low-mid junk that fights your kick and bass, and you don’t even realize it until the drop feels cloudy. If it sounds honky, dip a couple dB around 700 Hz to 1.2 kHz. And if it needs bite, add a gentle boost around 3 to 5 kHz, but go easy. Horn harshness is real.

Next add Saturator. Set it to Analog Clip, drive it maybe 3 to 8 dB, turn Soft Clip on, and trim the output so you’re not slamming your master. The goal is “tape attitude,” not “destroy the mix.”

After that add Redux, but subtle. Downsample around 6 to 12, try 8, and keep Bit Reduction low, like 0 to 2. You’re adding crust and edges, not turning it into a chiptune horn.

Then add Echo. Set the time to 1/8 or 1/8 dotted. Dotted eighth is a jungle cheat code. Feedback around 15 to 30 percent. Filter it so the low end doesn’t wash out; high-pass around 200 Hz and low-pass around 6 to 9 kHz. Dry/Wet around 8 to 18 percent. If you want movement, a touch of modulation is fine, just don’t turn it into a chorus puddle unless that’s the vibe.

Then Reverb, small and dark. Size around 15 to 30 percent, decay maybe 0.8 to 1.6 seconds, pre-delay 10 to 25 milliseconds so the transient stays punchy. Low cut the reverb around 250 to 400 Hz. Dry/Wet around 6 to 14 percent. The classic mistake is too much reverb. Jungle horns are usually compact and dirty, not gigantic and cinematic.

Finally, add a Limiter just as safety. Set the ceiling to minus 1 dB. You only want maybe 1 to 3 dB of gain reduction on the loudest hit. If the limiter is doing the sound design, you’re probably masking issues upstream.

Now let’s make it bounce like an Amen hit. This is where envelope shaping matters. In Simpler’s amp envelope, keep the attack basically instant, 0 to 2 milliseconds. Set decay somewhere like 250 to 600 milliseconds depending on how long your horn sample is. Often set sustain to zero for one-shots, and use release around 60 to 140 milliseconds to avoid an abrupt cutoff. The big concept: the horn should feel like a stab, not a pad. Shorter is usually punchier, and punchier reads more “sampled.”

If you want extra crack, add Drum Buss after your effects, or even before the time-based effects depending on taste. Set Drive around 2 to 6, and Transients up maybe plus 5 to plus 15. Usually keep Boom off for horns unless you specifically want chesty low-mid, and even then be careful because your bass will hate you.

Here’s a pro groove hack if the horn feels great but it reacts a little too late: track delay. In Live, show track delays and set the horn track to negative delay, like minus 5 to minus 15 milliseconds. This pulls the whole phrase forward without destroying the swing shape you worked for. It’s like moving the performer closer to the front of the stage.

Before we print, do a quick mono and phase reality check. Horn samples can be wide, chorus-y, or weirdly out of phase. Put Utility at the very end of the chain and try reducing Width to 0 to 50 percent. Toggle mono. If the horn collapses and disappears, you’ve got phase issues, so keep it narrower or reduce modulation in Echo or any stereo processing. This matters because clubs, phones, and lots of playback systems don’t reproduce super-wide midrange consistently.

Also, level staging: try to keep the horn track peaking around minus 10 to minus 6 dBFS before the limiter. That keeps it feeling “recorded,” not like a plugin chain that’s constantly redlining.

Now we bounce. You have two workflows, and both are valid.

Option one is resampling, which is fast and creative. Make a new audio track called HORN_PRINT. Set its input to Audio From your horn track, and choose Post FX. Post FX is important, because you want the character you built. Arm HORN_PRINT, then record one or two bars while your horn plays. And here’s a very jungle way to do it: record 4 to 8 bars and do tiny performance moves while it plays, like nudging Echo Dry/Wet or Saturator drive a little. Then you choose the best single hit from a few takes, like you’re sampling a tape. That selection process is part of what makes it feel authentic.

Option two is freeze and flatten. Right-click the horn MIDI track, freeze it, then flatten. Now it’s audio with the effects printed. Super clean and CPU-friendly.

Once you have audio, edit it like a real jungle producer. Trim the start so it hits instantly. Add a tiny fade-in, like 2 to 10 milliseconds, and a fade-out, like 20 to 80 milliseconds. Those fades are the difference between “pro one-shot” and “why is this clicking in my drop.”

For warp: for one-shots, I often turn warping off. If you must warp it to fit timing, use Beats mode with a short transient setting, but don’t stretch it so much that the tone starts wobbling.

Then consolidate the final hit so it’s a clean, self-contained sample. And save it properly. Drag it into your User Library under something like Samples, FX, Horns, Jungle. Future you will thank you.

Now let’s talk placement in an actual DnB phrase, because this is where people overdo it. Try a drop accent: one horn on bar one, beat two, answering the snare. That’s huge already. Or do a two-bar call and response: bar one normal horn, bar two a pitched-down variant. Or a transition fill: a horn right before a crash with 1/8 dotted echo, so the tail throws you into the next section. And the most classic of all: restraint. One horn every 4 or 8 bars. If you’re used to modern over-FX’d drops, this will feel almost too sparse. Then you hit play and realize it’s way more powerful.

A couple common mistakes to dodge: don’t over-swing everything. Swing the off hits, keep anchors tight. Don’t drown it in reverb. Don’t leave low-end mud in the 100 to 250 range. And don’t accidentally print pre-FX when you meant to print the vibe. Always confirm you’re recording Post FX.

If you want to push into darker, heavier DnB: pitch down minus 5 to minus 12 and shorten the decay. Or build a parallel distortion rack with a clean chain and a dirty chain, blending the dirty around 10 to 30 percent. Another nasty trick: gated room. Put a Gate after your reverb before printing, so you get space that chops off fast. That “rave room but controlled” sound hits perfectly in techy rollers.

And if you want menace right before a drop, do a micro-stutter without turning it into a flam disaster. Use Beat Repeat for one moment only: set interval to one bar, grid to 1/16, chance 100%, gate around 40 to 70%. Automate it on for just a beat, print it, and get out. Short, intentional, scary.

Mini practice, if you want to level up fast: make three horn versions. One using Groove Pool at around 85% timing. One using manual nudges with late hits plus 12 milliseconds. And one like the manual version but pitched down minus 7 with heavier saturation. Print all three. Drop them into a 16-bar loop with your break, a simple bass, and a hat loop. Then choose which one sits best without turning it up. That’s the real test: if it needs volume to work, it’s not actually glued into the groove.

Recap: you built a Simpler-based air horn one-shot, placed it in an Amen-aware rhythm, gave it jungle swing either through Groove Pool or micro-timing, ran a stock FX chain for that gritty rave-tape energy, and printed it to audio with clean edits so it behaves like a real sample.

If you tell me your BPM and whether your break is straight Amen or heavily chopped, I can suggest exact horn placements across a full 16-bar drop, including where to leave space so the horn feels legendary instead of annoying.

mickeybeam

Go to drumbasscd.com for +100 drum and bass YouTube channels all in one place - tune in!

Generating PDF preview…